User Settings controls who can log in to Investwell and which menus each user can see, using roles.
Overview
User Settings is used to manage an organization's users and to give them access to different menus of the software. The page explains the idea in one line: permissions are controlled using roles, and users are then assigned to roles.
There are three parts to the work:
- Create a role, or use one of the default roles.
- Create a user and assign the role.
- Set the access permissions for each role.
Permissions are set separately for two logins:
- Broker portal: the user's own login to Investwell.
- Client portal: what is shown when a broker user opens a client's portfolio by clicking the client's name. This is called hopping to the client portal. The same permissions also decide what the clients themselves see when they log in, but only when they are set for the Investor role (see Hiding a menu from clients).
Opening User Settings
- Click Settings at the top right of Investwell to open Account Settings.
- Click User Settings. It is described as "Manage your organization users and provide menu access permissions".
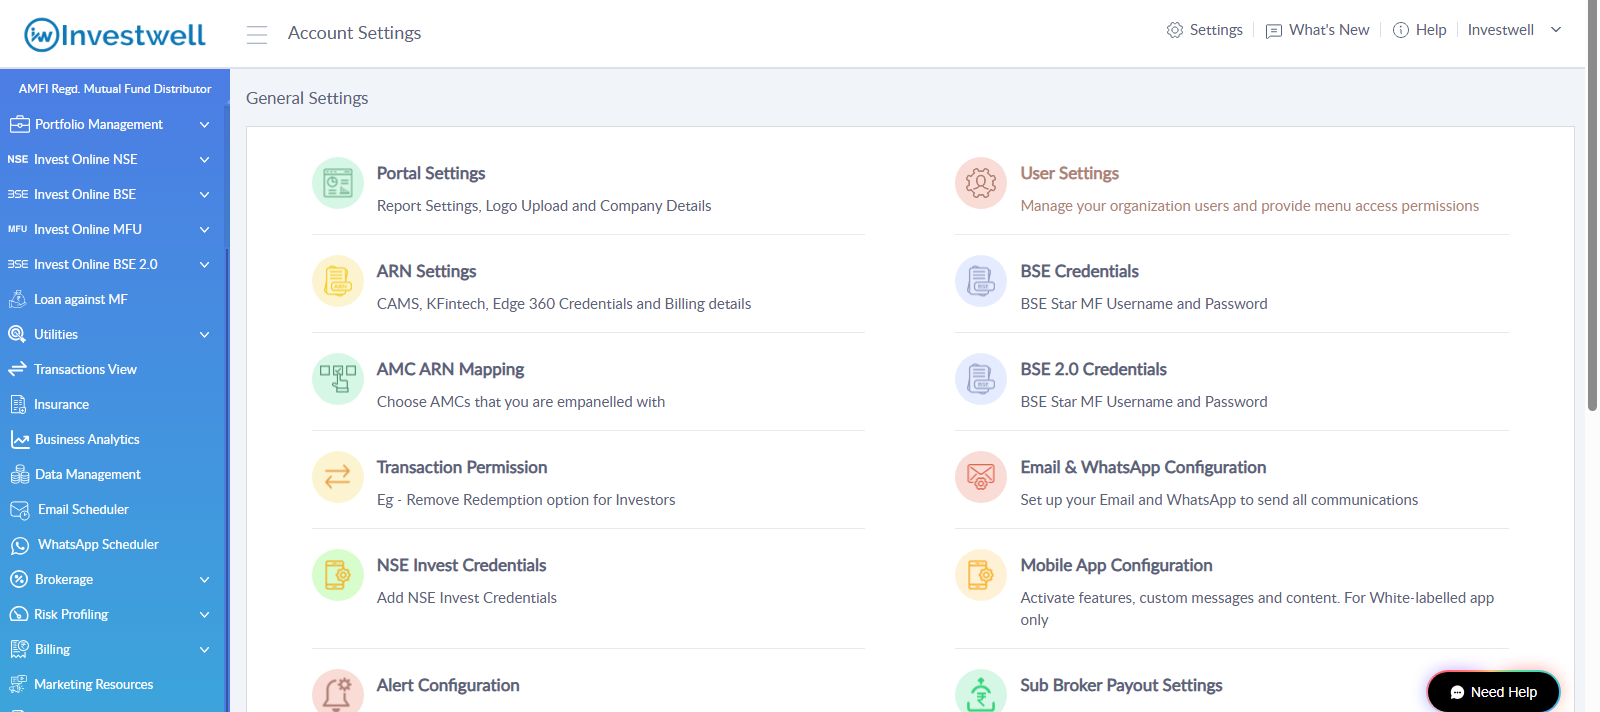
User Settings has two tabs:
- Users: the list of users, with the buttons to create users and roles.
- Access Permission: the menu permissions for each role.
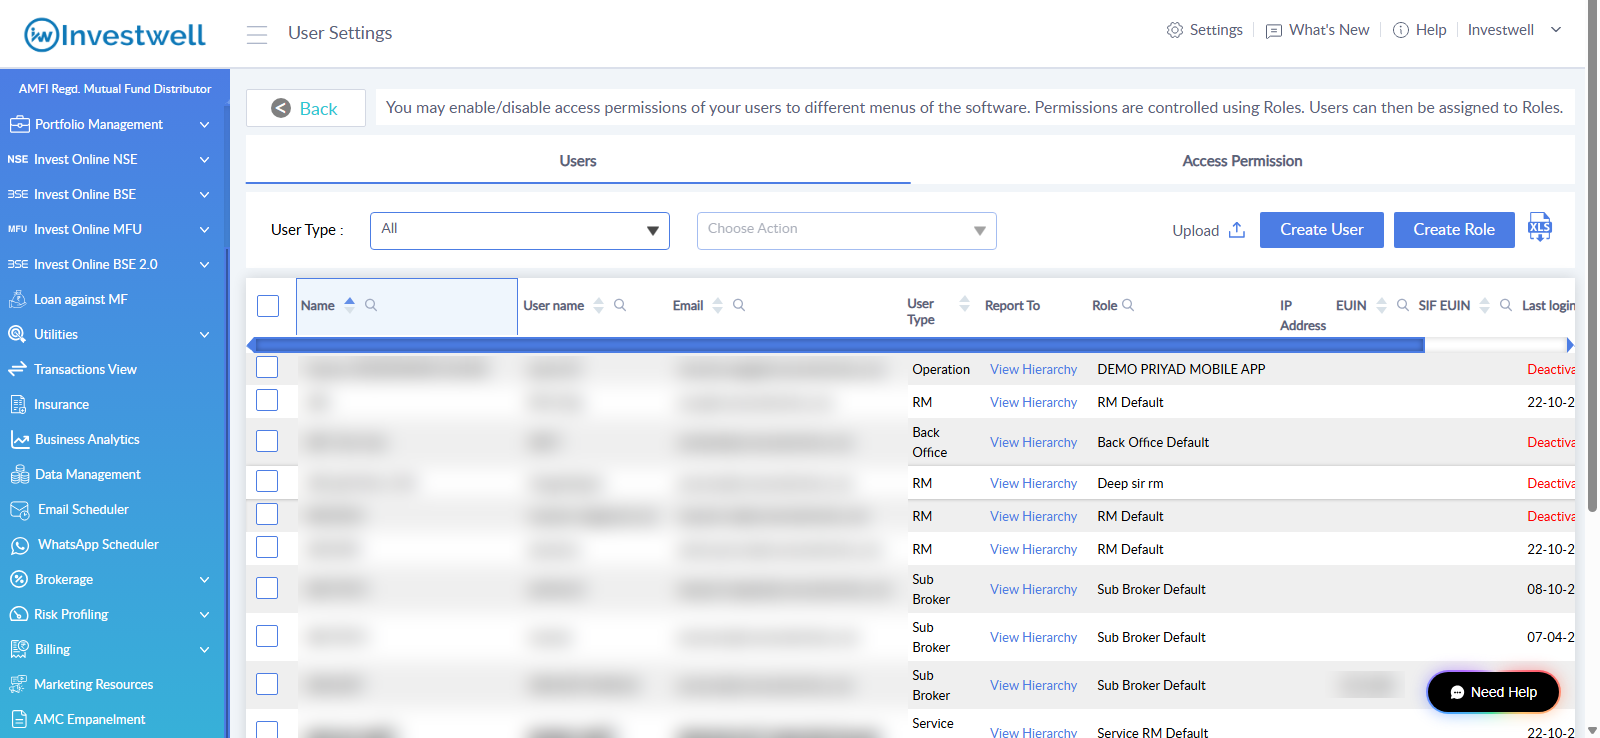
The Users tab has a User Type filter, a Choose Action list, an Upload option for adding users in bulk, the Create User and Create Role buttons, and an XLS button to download the list. For each user the list shows the name, user name, email, user type, who the user reports to (with a View Hierarchy link), role, IP address, EUIN, SIF EUIN, last login and whether the user is deactivated.
Creating a role
A role is a named set of menu permissions. Investwell comes with default roles, and new roles can be added.
- In User Settings, on the Users tab, click Create Role.
- In the Create Role window, type the name in New Role (Enter Role Name).
- Click Save. The new role is added to the list below.
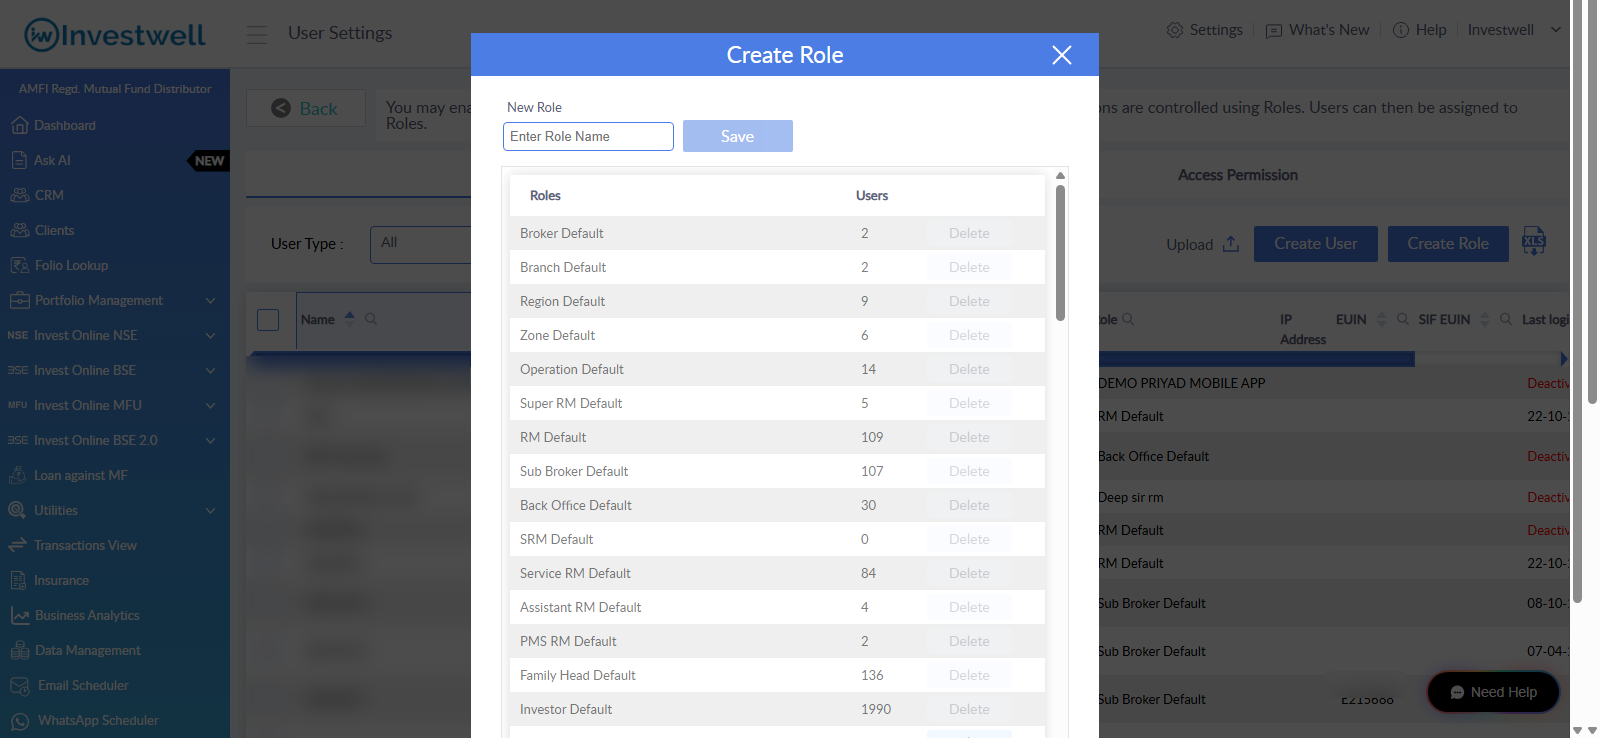
The list in this window shows every role and the number of users who have it. The default roles are Broker Default, Branch Default, Region Default, Zone Default, Operation Default, Super RM Default, RM Default, Sub Broker Default, Back Office Default, SRM Default, Service RM Default, Assistant RM Default, PMS RM Default, Family Head Default and Investor Default. The Delete option is greyed out for these default roles.
After a role is created, set its menu permissions in the Access Permission tab (see Setting access permissions for a role).
Creating a user and assigning a role
- In User Settings, on the Users tab, click Create User. The Create User window opens on the General Information tab.
- Select the User Type. Select this first, because the Role field is greyed out until then.
- Select the Role the user should have, for example RM Default or a role created earlier. The role decides which menus the user can see.
- Fill in the other details (below).
- Click Save.
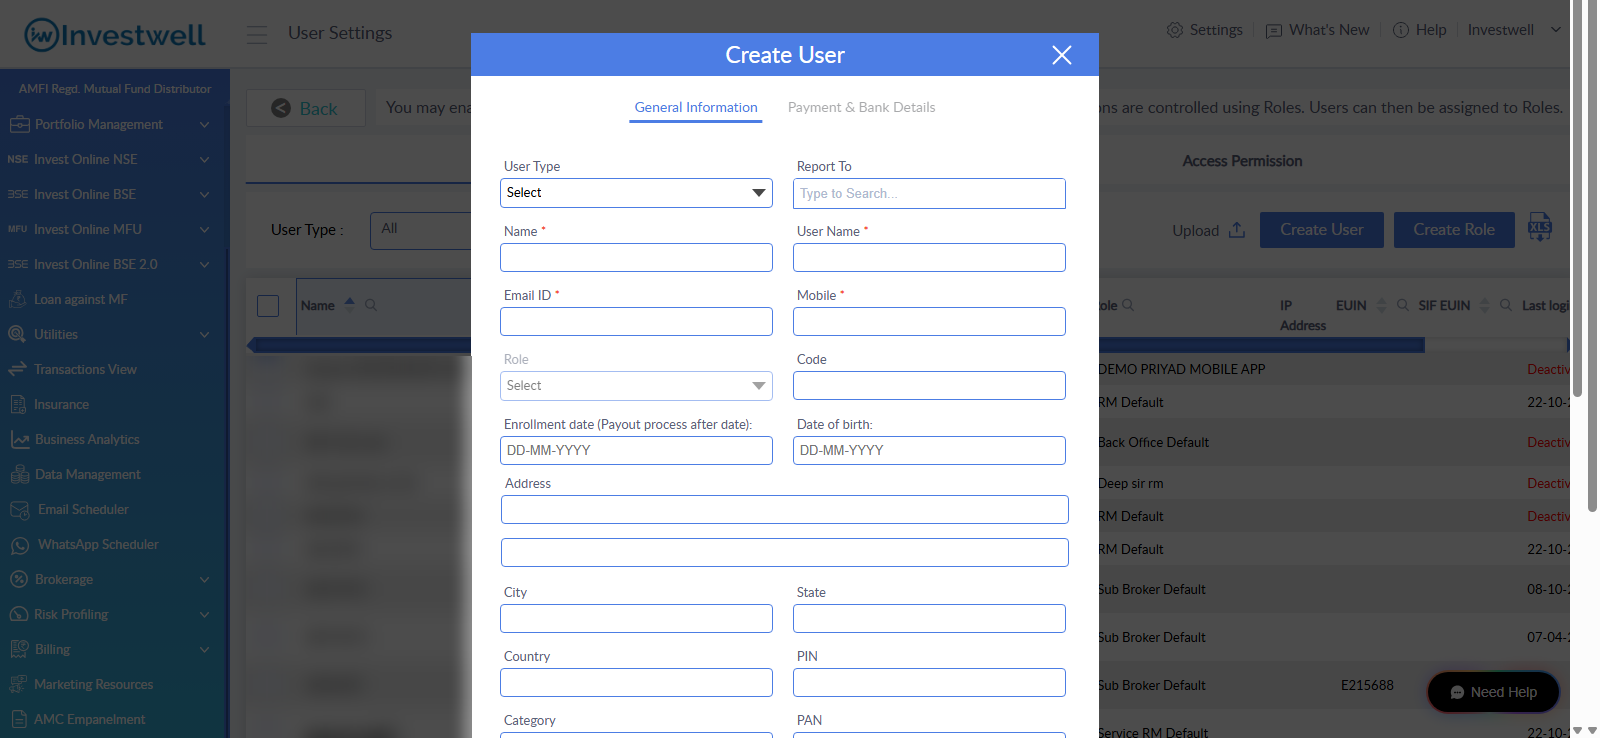
General Information fields:
- User Type, and Report To (type to search for the person this user reports to).
- Name, User Name, Email ID and Mobile. These four are marked with a star and are required.
- Role and Code.
- Enrollment date (payout process after date) and Date of birth.
- Address, City, State, Country and PIN.
- Category, PAN, EUIN, SIF EUIN and the EUIN validity period.
- IP Address. An information icon beside the field gives more detail.
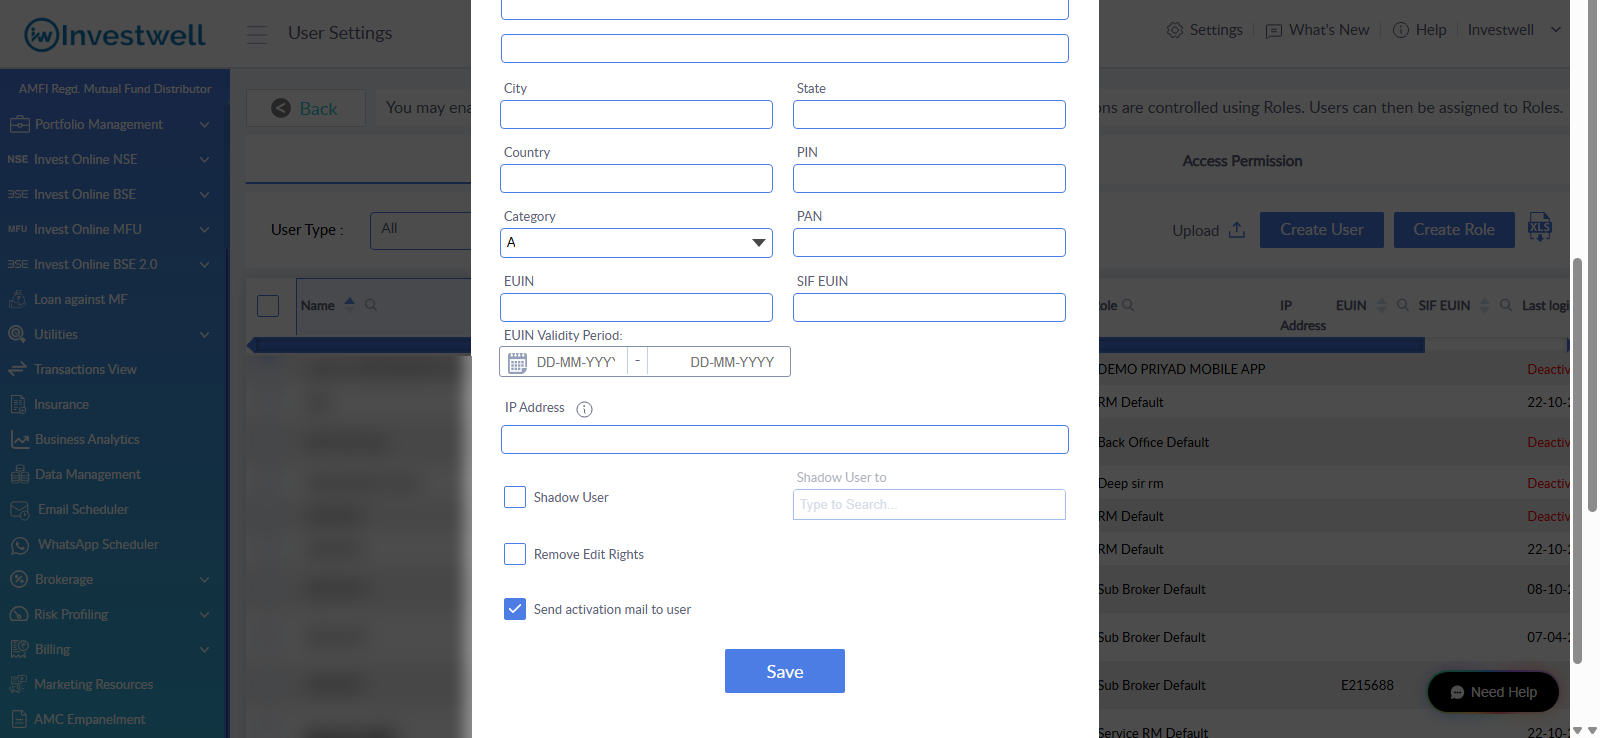
Three tick boxes sit at the bottom of the form:
- Shadow User: when ticked, the Shadow User to field is used to search for and select the user concerned.
- Remove Edit Rights: when ticked, the user's edit rights are removed.
- Send activation mail to user: ticked by default. The user receives an email to activate the login.
Payment and bank details
The second tab of the Create User window, Payment & Bank Details, holds the payment and bank details of the user.
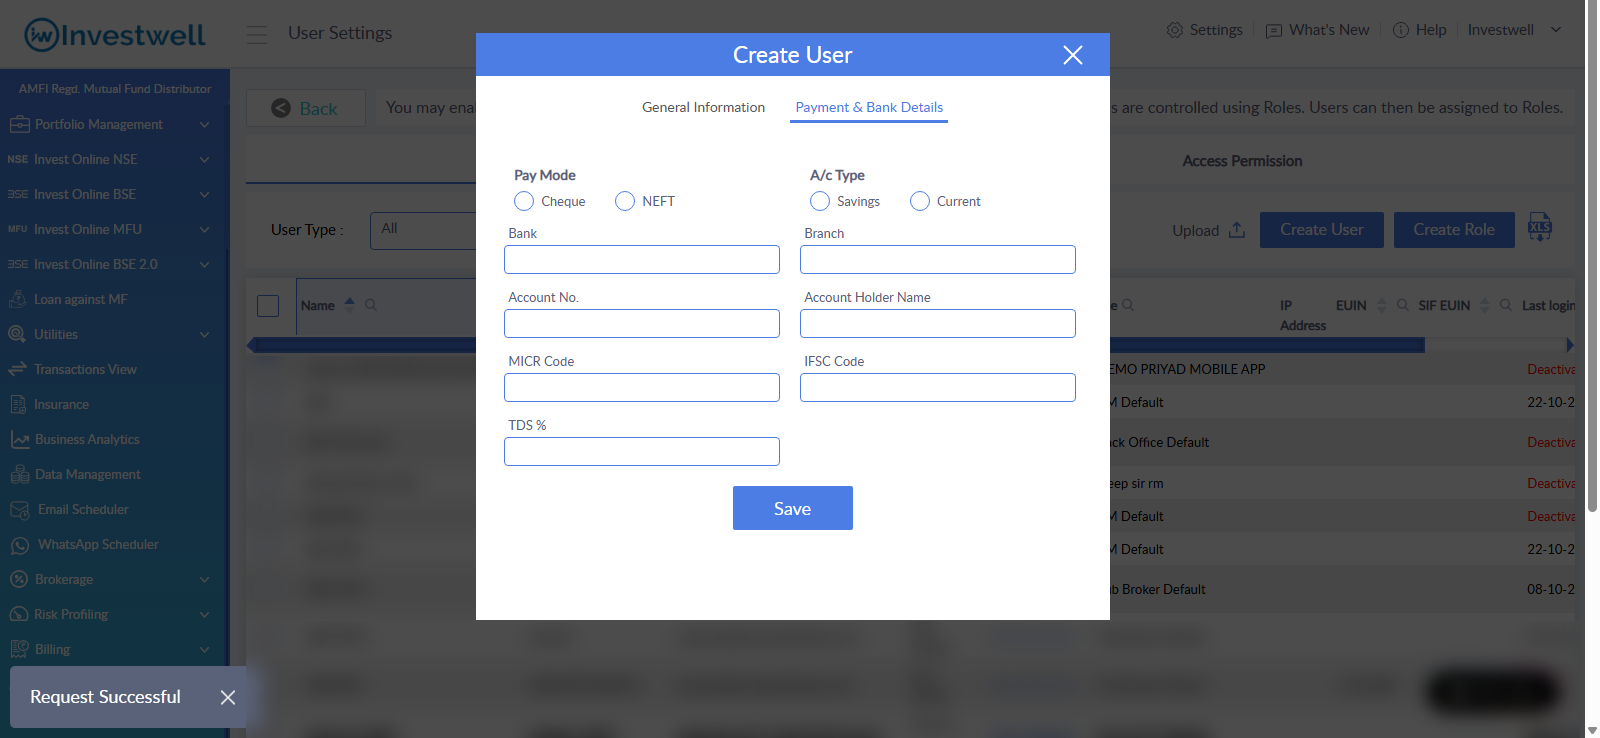
The fields are Pay Mode (Cheque or NEFT), A/c Type (Savings or Current), Bank, Branch, Account No., Account Holder Name, MICR Code, IFSC Code and TDS %. Click Save. A "Request Successful" message confirms that the user was saved.
To change which menus the new user can see, change the permissions of the role assigned to that user (see the next section).
Setting access permissions for a role
Access permissions are set per role, in the Access Permission tab of User Settings. Every user with that role gets the same permissions.
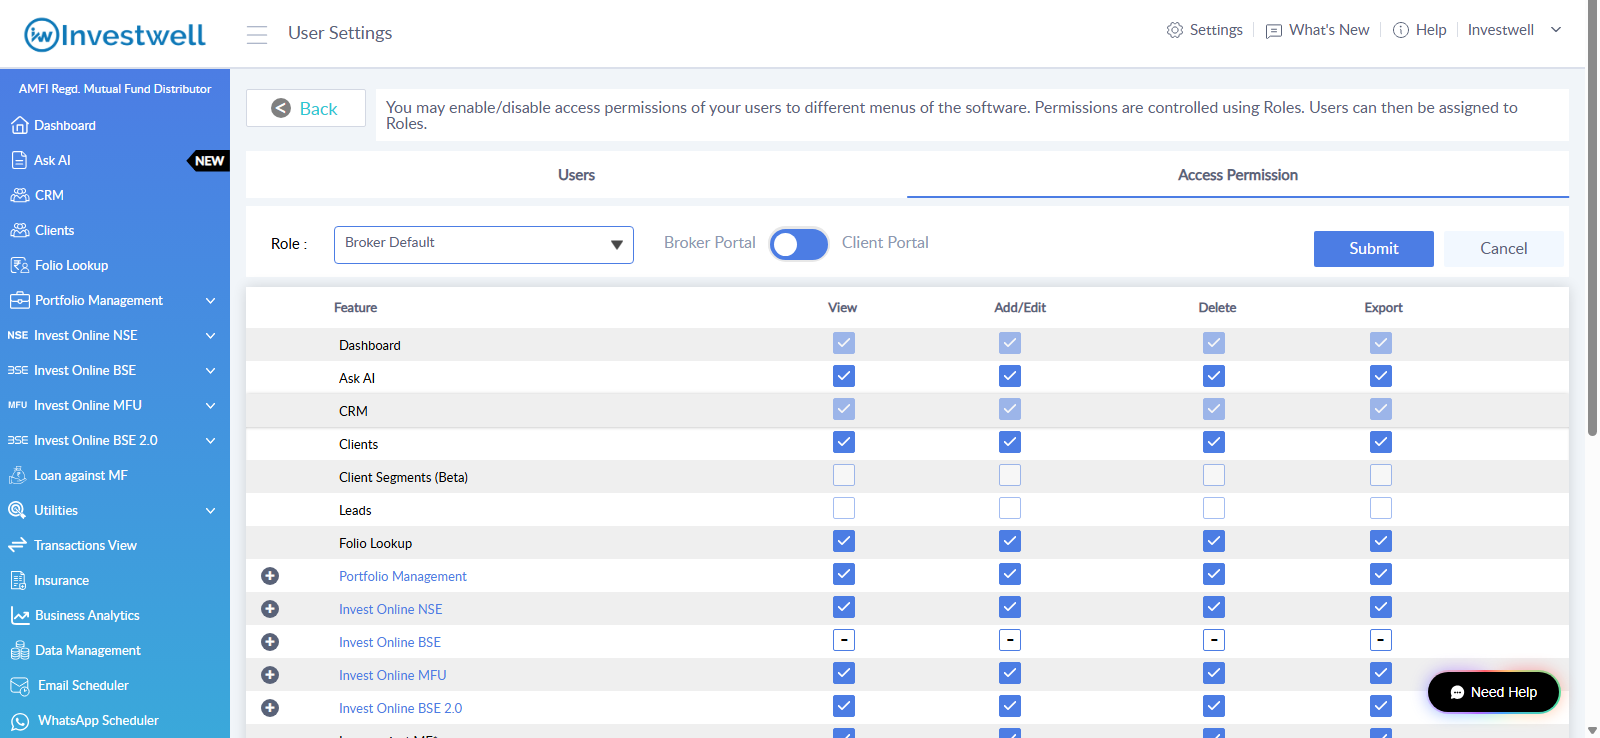
- Open User Settings and click the Access Permission tab.
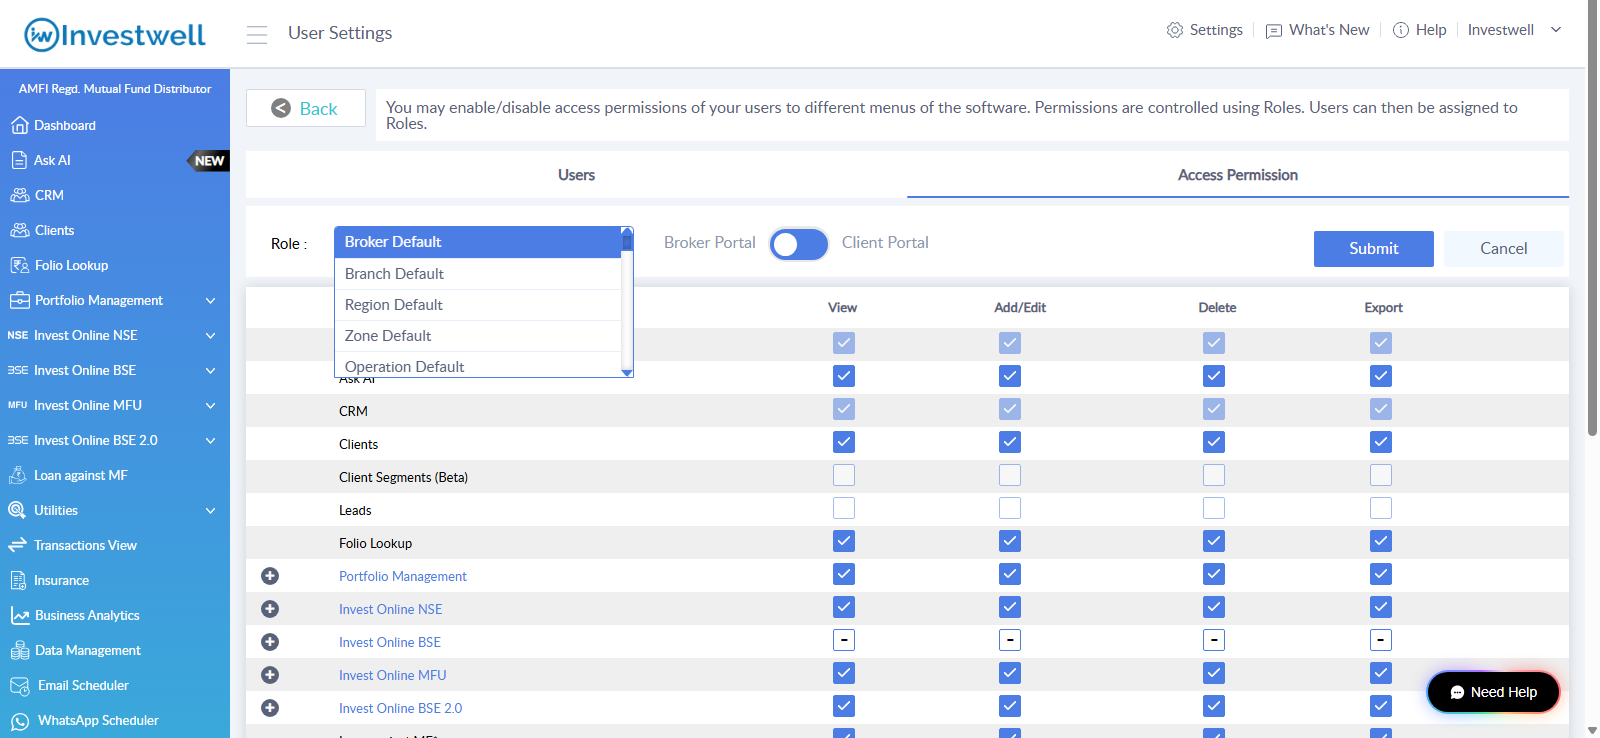
- In the Role list, select the role whose permissions are to be changed, for example Broker Default, Branch Default, Region Default, Zone Default or Operation Default.
- Choose the portal with the toggle beside the role: Broker Portal or Client Portal (explained below).
- Tick or untick the permissions for each menu.
- Click Submit to save. Cancel discards the changes.
Broker Portal and Client Portal
The toggle decides which login the permissions apply to:
- Broker Portal: the menus the user sees when logged in to their own Investwell login.
- Client Portal: the menus the user sees after hopping to the client portal, that is, when opening a client's portfolio by clicking the client's name. For the Investor role, it is the menus the client sees.
Both settings are saved per role, so a role can have one set of menus in the broker portal and a different set in the client portal.
Reading the permission table
Each menu (feature) has four permissions: View, Add/Edit, Delete and Export. The menus include Dashboard, Ask AI, CRM, Clients, Client Segments (Beta), Leads, Folio Lookup, Portfolio Management, Invest Online NSE, Invest Online BSE, Invest Online MFU, Invest Online BSE 2.0, Loan against MF, Utilities, Transactions View, Insurance, Business Analytics, Data Management, Email Scheduler, WhatsApp Scheduler, Brokerage, Risk Profiling, Billing, Sub Brokerage and Marketing Resources.
- A tick means the permission is allowed. An empty box means it is not.
- A dash in the box means only some of the sub-options of that menu are allowed.
- The plus icon beside a menu name opens its sub-options, which can be set one by one.
- Some menus, such as Dashboard and CRM, appear greyed out, with all four permissions ticked.
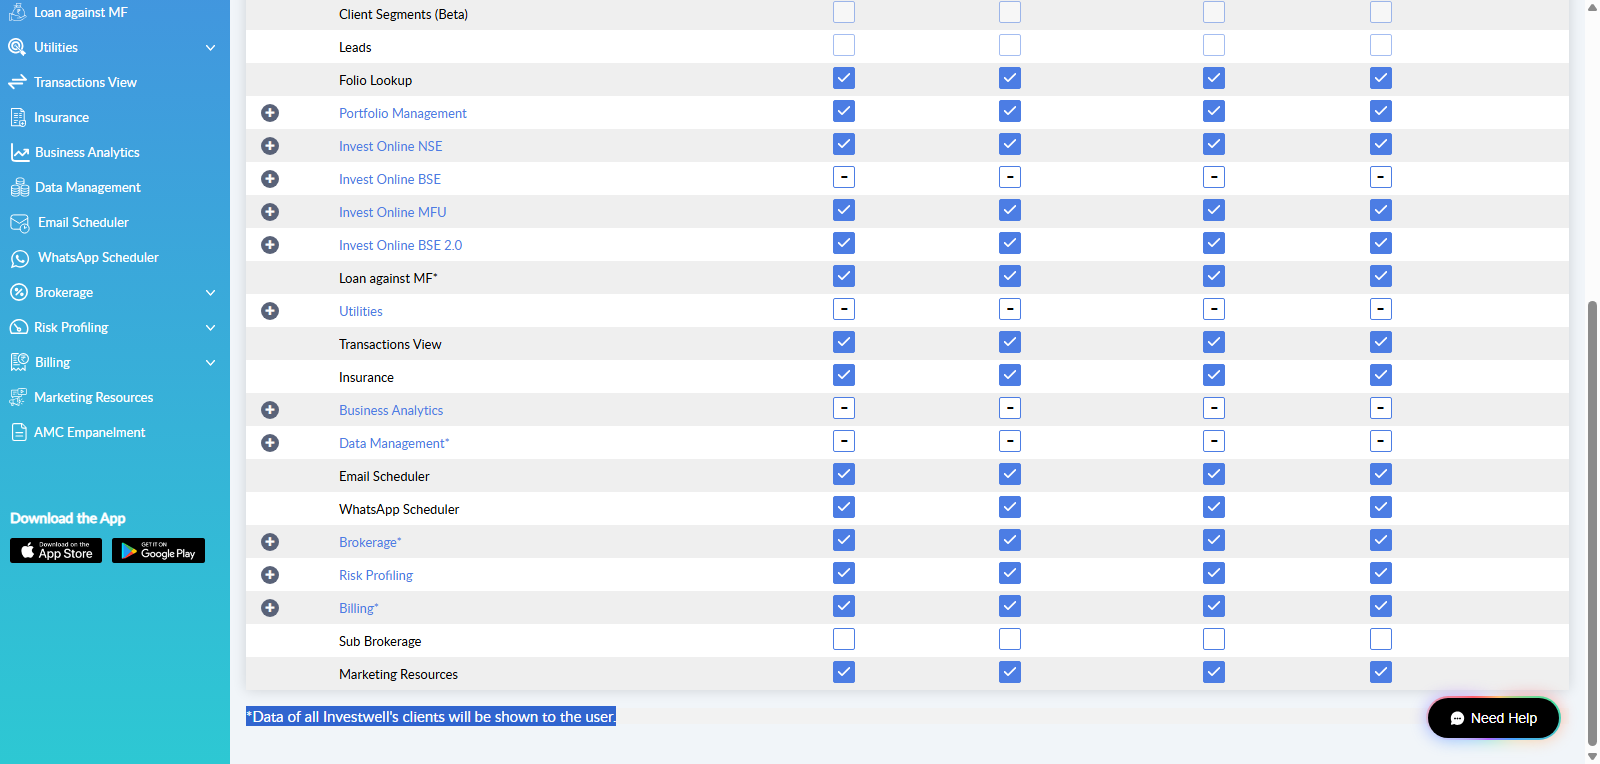
A star beside Loan against MF, Data Management, Brokerage and Billing leads to a note at the bottom of the table: "Data of all clients will be shown to the user." Enabling this for Relationship manager or sub broker or any other role should only be done if we want them to have access to all client's data in that menu. Eg. In data management -> Campaign logs if permission is given to Relationship Manager, he/she will be able to see all clients' email campiagn logs even when that client is not assigned to the Relationship Manager.
Hiding a menu from clients
To hide a menu from clients, the permission must be removed for the Investor role:
- Open User Settings and click the Access Permission tab.
- In the Role list, select Investor Default.
- Switch the toggle to Client Portal.
- Untick the permissions of the menu to be hidden.
- Click Submit.
Important: this cannot be done with the broker role. If the role selected is Broker Default, the toggle is on Client Portal and a permission is removed, the menu is not removed for the client. It is hidden for Broker Default users when they hop to the client portal to view a client's portfolio. Clients are not affected, because what a client sees is controlled by the Investor role.
In short:
- To change what broker users see in their own login: select their role and use the Broker Portal toggle.
- To change what broker users see when they hop to a client's portfolio: select their role and use the Client Portal toggle.
- To change what clients see: select the Investor role and use the Client Portal toggle.
Frequently asked questions
Where are users and roles managed?
In Settings, under User Settings. The Users tab lists users and has the Create User and Create Role buttons. The Access Permission tab sets the menu permissions of each role.
How is a role created?
In User Settings, on the Users tab, click Create Role, enter the role name and click Save. Then set its menu permissions in the Access Permission tab.
How is a user created and given a role?
Click Create User, select the User Type, then select the Role. Fill in the name, user name, email and mobile, and click Save.
Why is the Role field greyed out when creating a user?
Select the User Type first. The Role field is greyed out until then.
Can the default roles be deleted?
No. The Delete option is greyed out for the default roles.
What is the difference between Broker Portal and Client Portal in Access Permission?
Broker Portal sets the menus a user sees in their own login. Client Portal sets the menus a user sees after hopping to a client's portfolio. For the Investor role, Client Portal sets what the client sees.
How is a menu hidden from clients?
Select the Investor role (Investor Default), switch the toggle to Client Portal, untick the permissions for the menu and click Submit.
A menu was removed under Broker Default with the Client Portal toggle, but clients still see it. Why?
That setting only hides the menu for Broker Default users when they hop to the client portal. Clients are controlled by the Investor role, so the permission must be removed there.
What do the tick, empty box and dash mean in the permission table?
A tick means allowed, an empty box means not allowed, and a dash means only some sub-options of that menu are allowed. The plus icon opens the sub-options.
Do permission changes apply to all users of a role?
Yes. Permissions are saved per role and apply to every user who has that role.
Was this article helpful?
That’s Great!
Thank you for your feedback
Sorry! We couldn't be helpful
Thank you for your feedback
Feedback sent
We appreciate your effort and will try to fix the article