User Defined Securities
User Defined Securities gives an option to add investments that are not listed. Once created, these securities behave like any other holding: they carry a price history, accept transactions, and flow into portfolio reports.
Please refer to the below steps on how to create and view user defined securities. This article covers the end-to-end process for adding both Domestic and Foreign user defined securities
Where to find it
Log in to the broker portal and go to Data Management > User Defined Securities.
The screen has three tabs,
Category – create the Category and Sub Category the security will sit under.
Securities – create the security itself and define its asset mix.
Price History – add the price at which the security is valued.
Domestic Securities
Step 1. Create a Category and Sub Category
For every user defined security, a category needs to be defined. You can create a custom category and sub category which would be used for grouping in reports.
Go to Data Management > User Defined Securities > Category tab and click Add Categories.
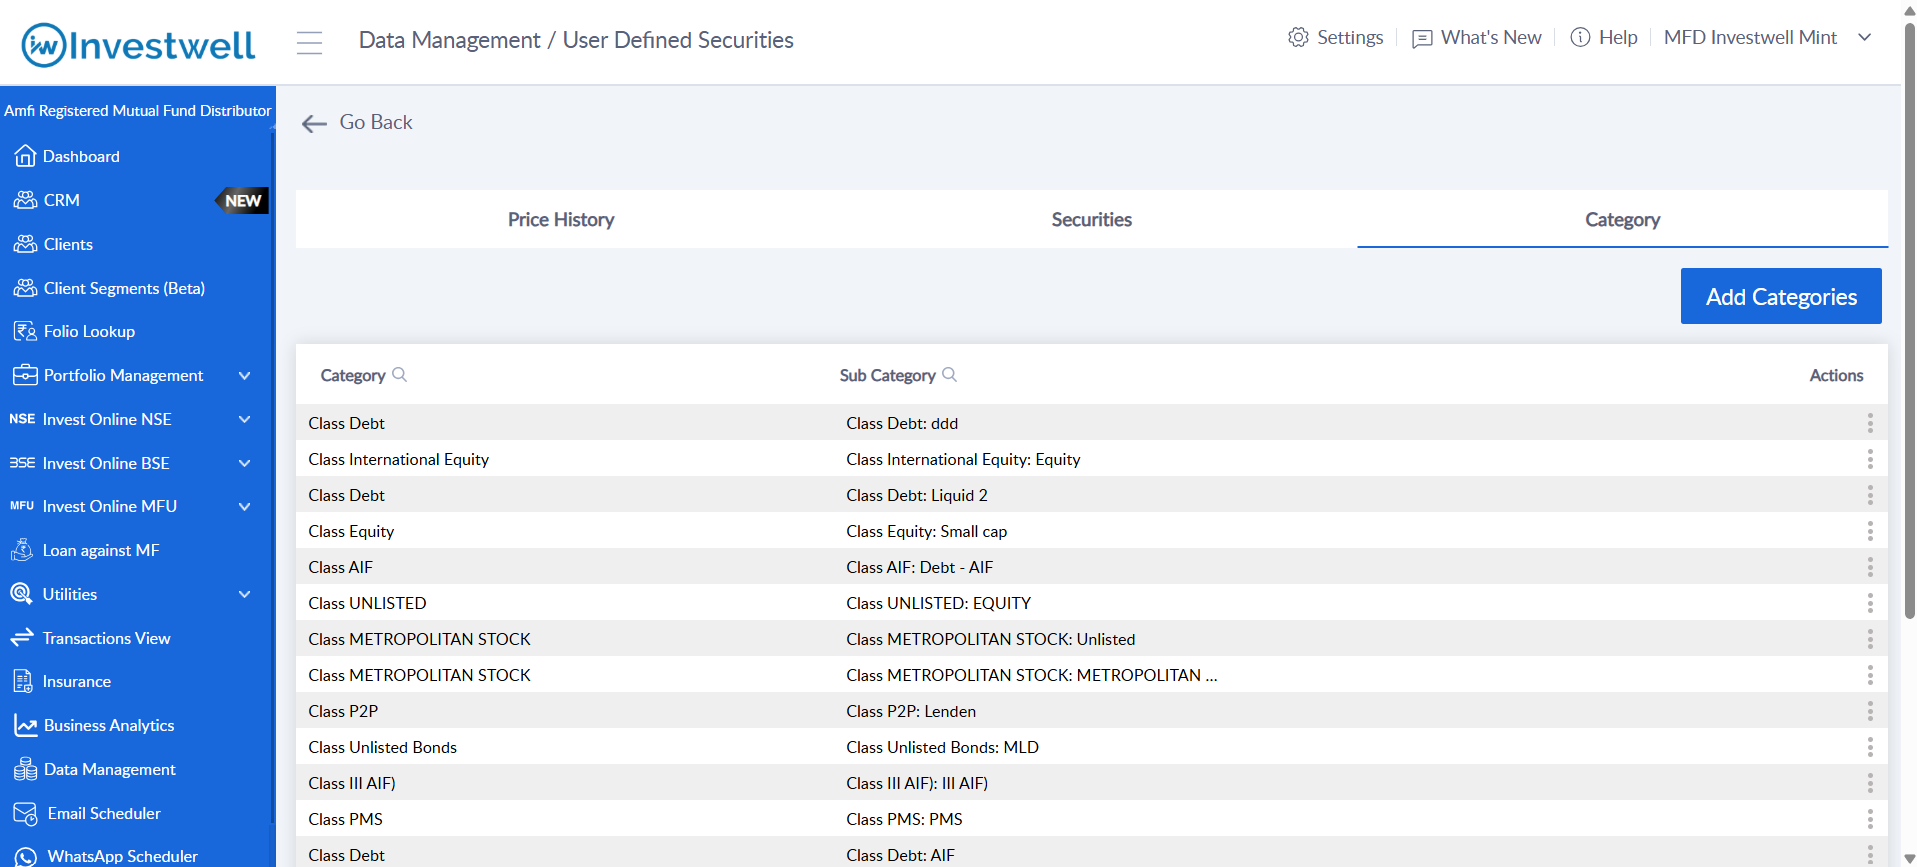
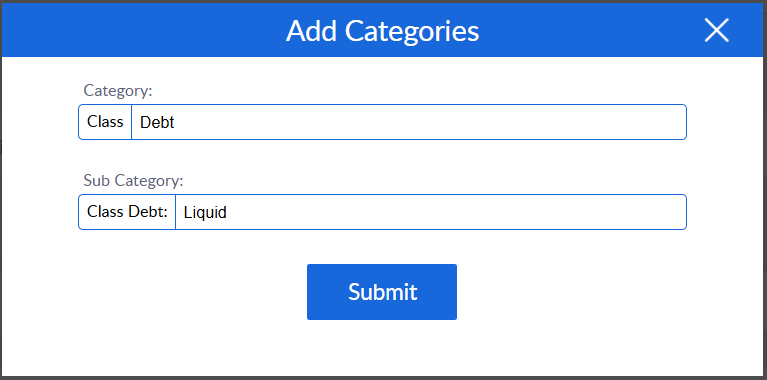
Fill in the two fields and click Submit.
Category – the broad class of the security
Sub Category – the sub-classification within that category
These would appear in the Category list and are now available while creating security.
Step 2. Create a Security
Go to the Securities tab. Keep the Domestic / Foreign toggle on Domestic and click Add Securities.
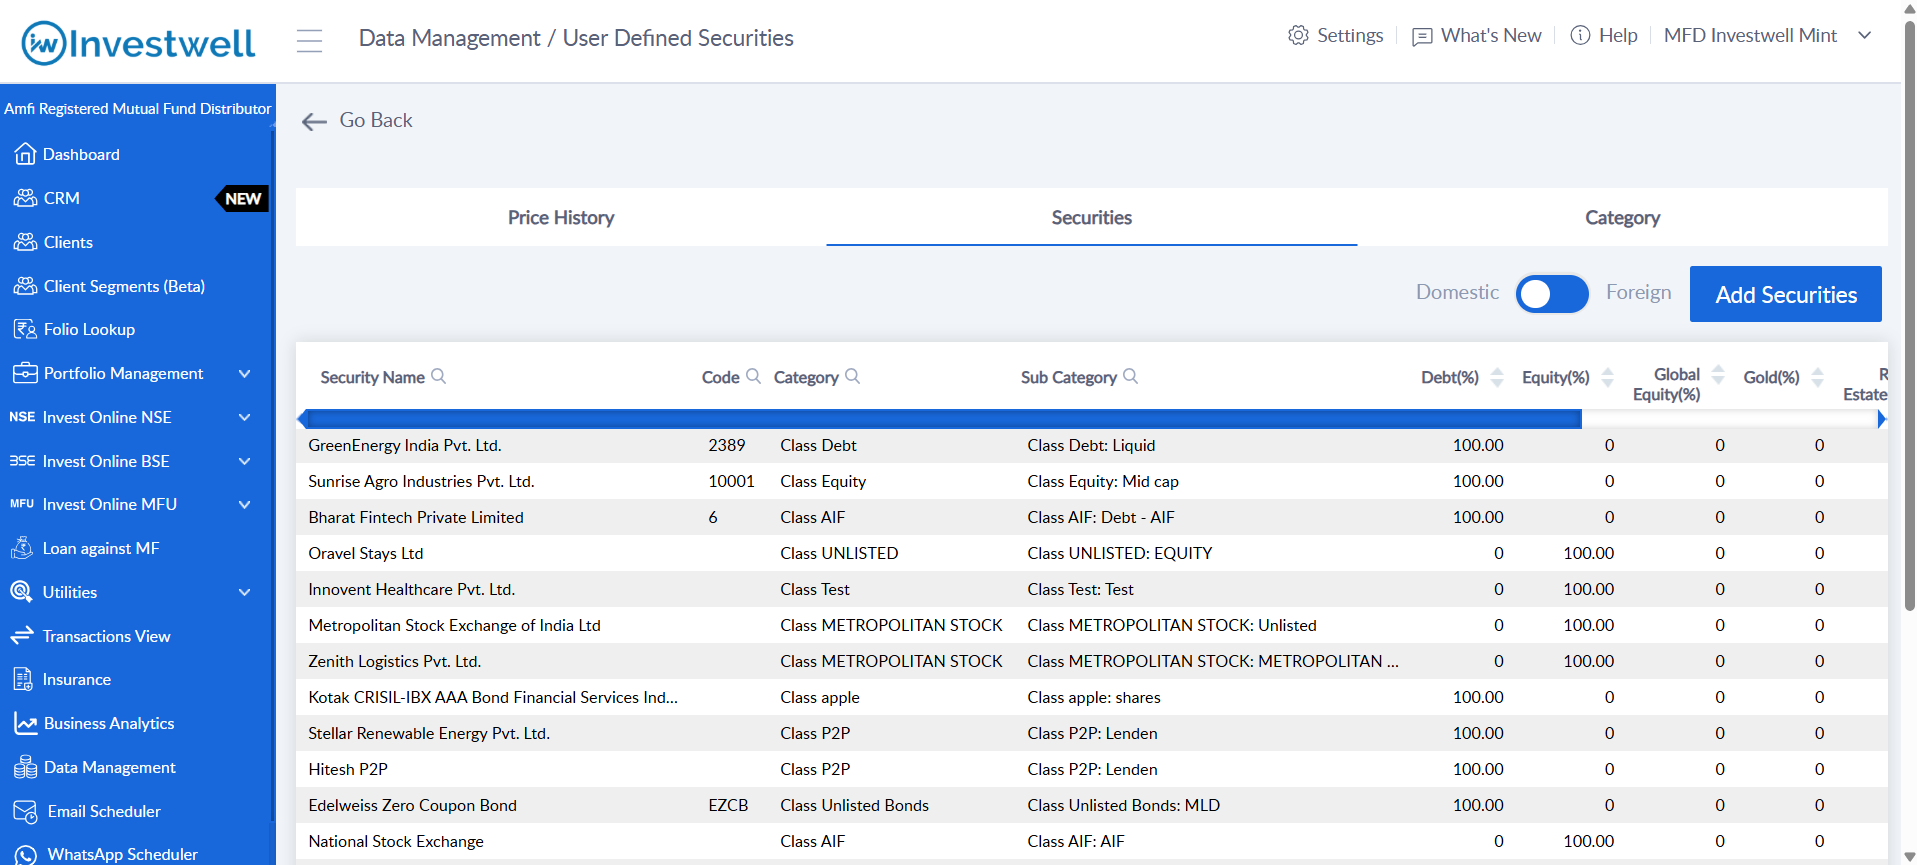
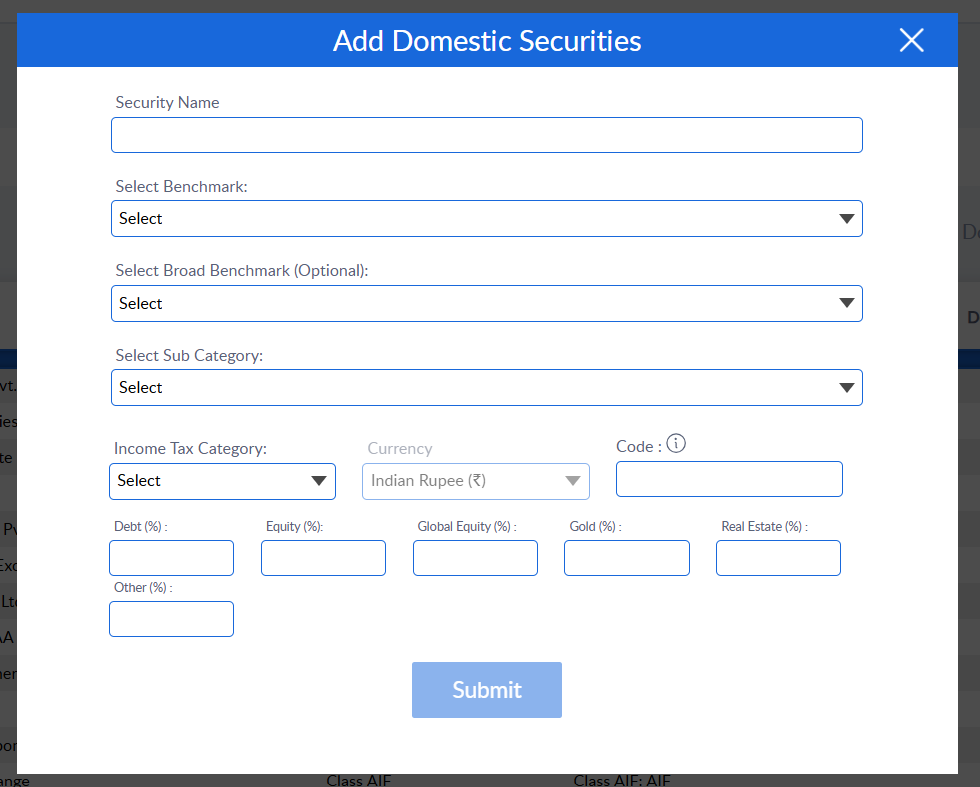
Enter the security details and click Submit.
Security Name – the name of the instrument as it should appear in the portfolio. This is what the client sees.
Select Benchmark – the index against which the security’s performance is compared.
Select Broad Benchmark – a broad index for comparison. Optional.
Select Sub Category – select the Sub Category created in Step 1.
Income Tax Category – Equity/Debt
Currency – fixed to Indian Rupee (₹) for domestic securities and cannot be changed.
Code – an identifier for the security(Optional)
Debt / Equity / Global Equity / Gold / Real Estate / Other (%) – the asset break-up of the security. The values must total 100.
The security now appears in the Securities list with its category, sub category and asset mix.
Step 3. Add Price History
A user defined security has no price, so its value has to be entered manually. Go to the Price History tab, keep the toggle on Domestic and click Add Price.
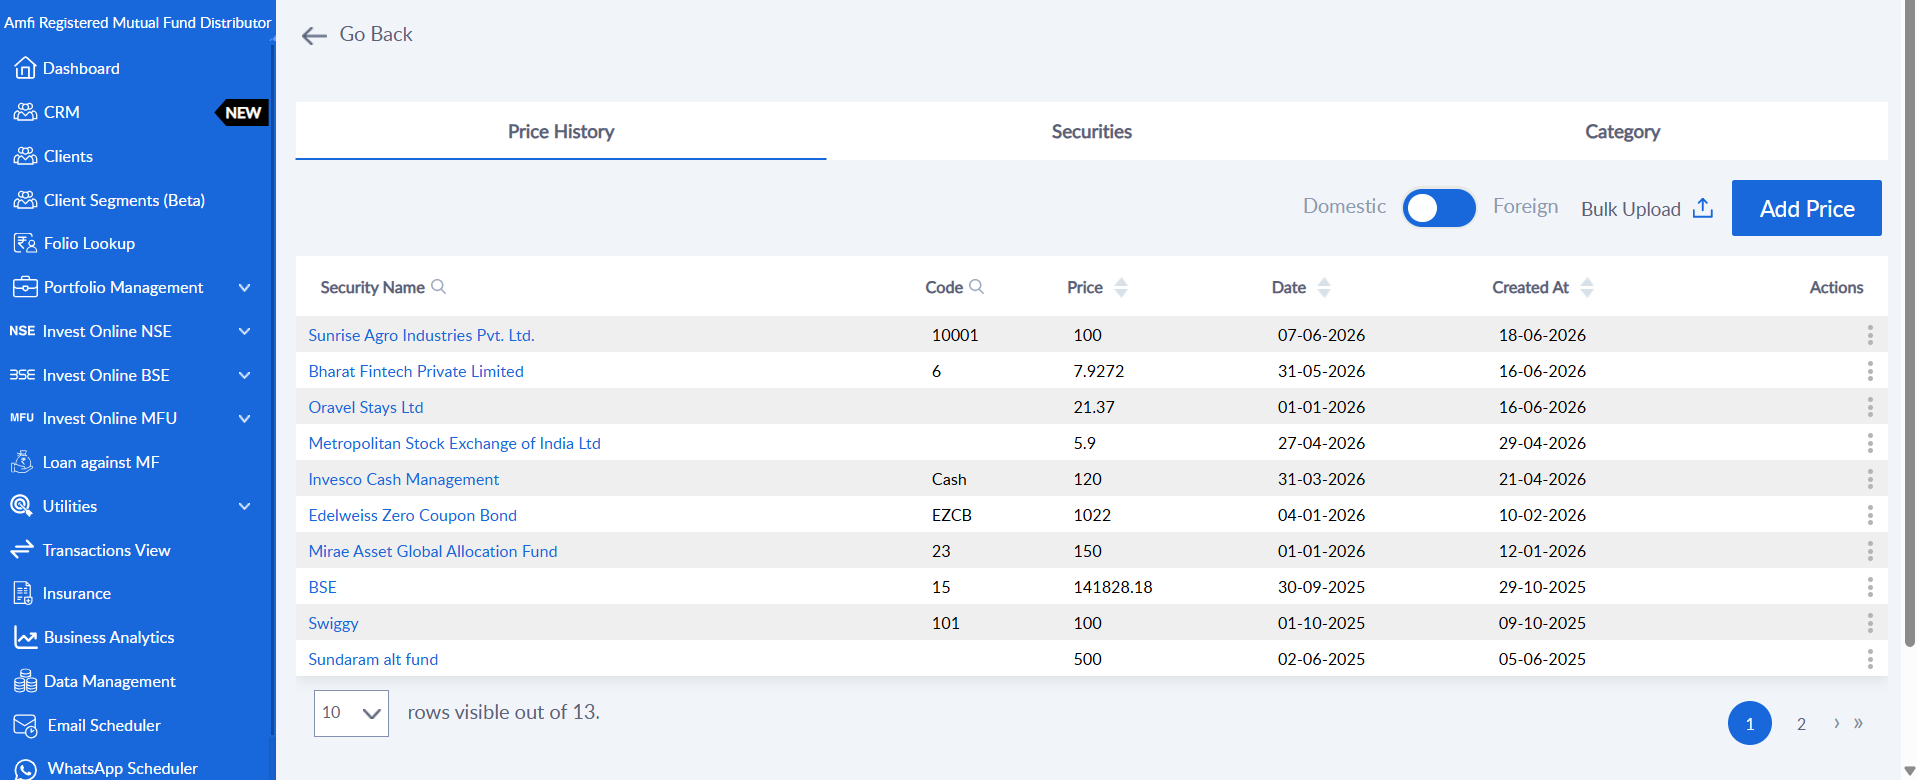
Enter the price details and click Submit.
Select Security – choose the security created in Step 2.
Current Price – the price per unit on the given date.
Date – the date this price is applicable from, in DD-MM-YYYY format.
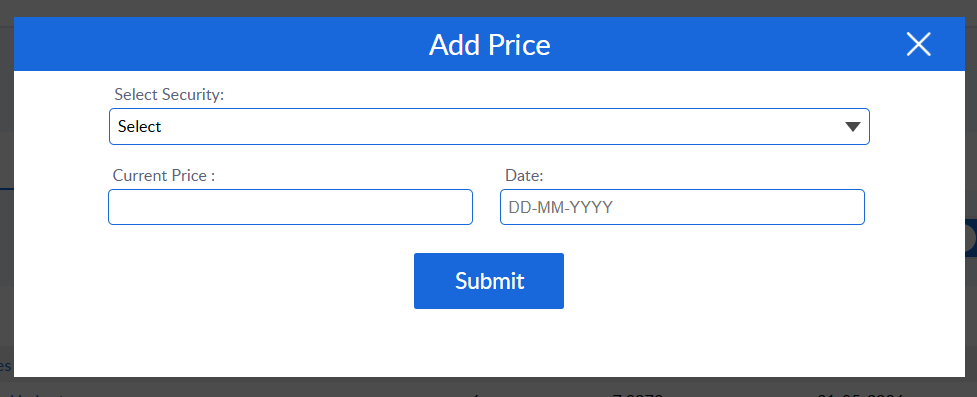
Note: Prices can be added for multiple dates. The portfolio always values the holding using the latest price on or before the report date. Use Bulk Upload to add prices for several securities at once.
Step 4: Add Transactions
Once the security exists, record the client’s transactions against it.
Go to Data Management > Create Transaction, open the Share & Bond tab and click Add Transaction.
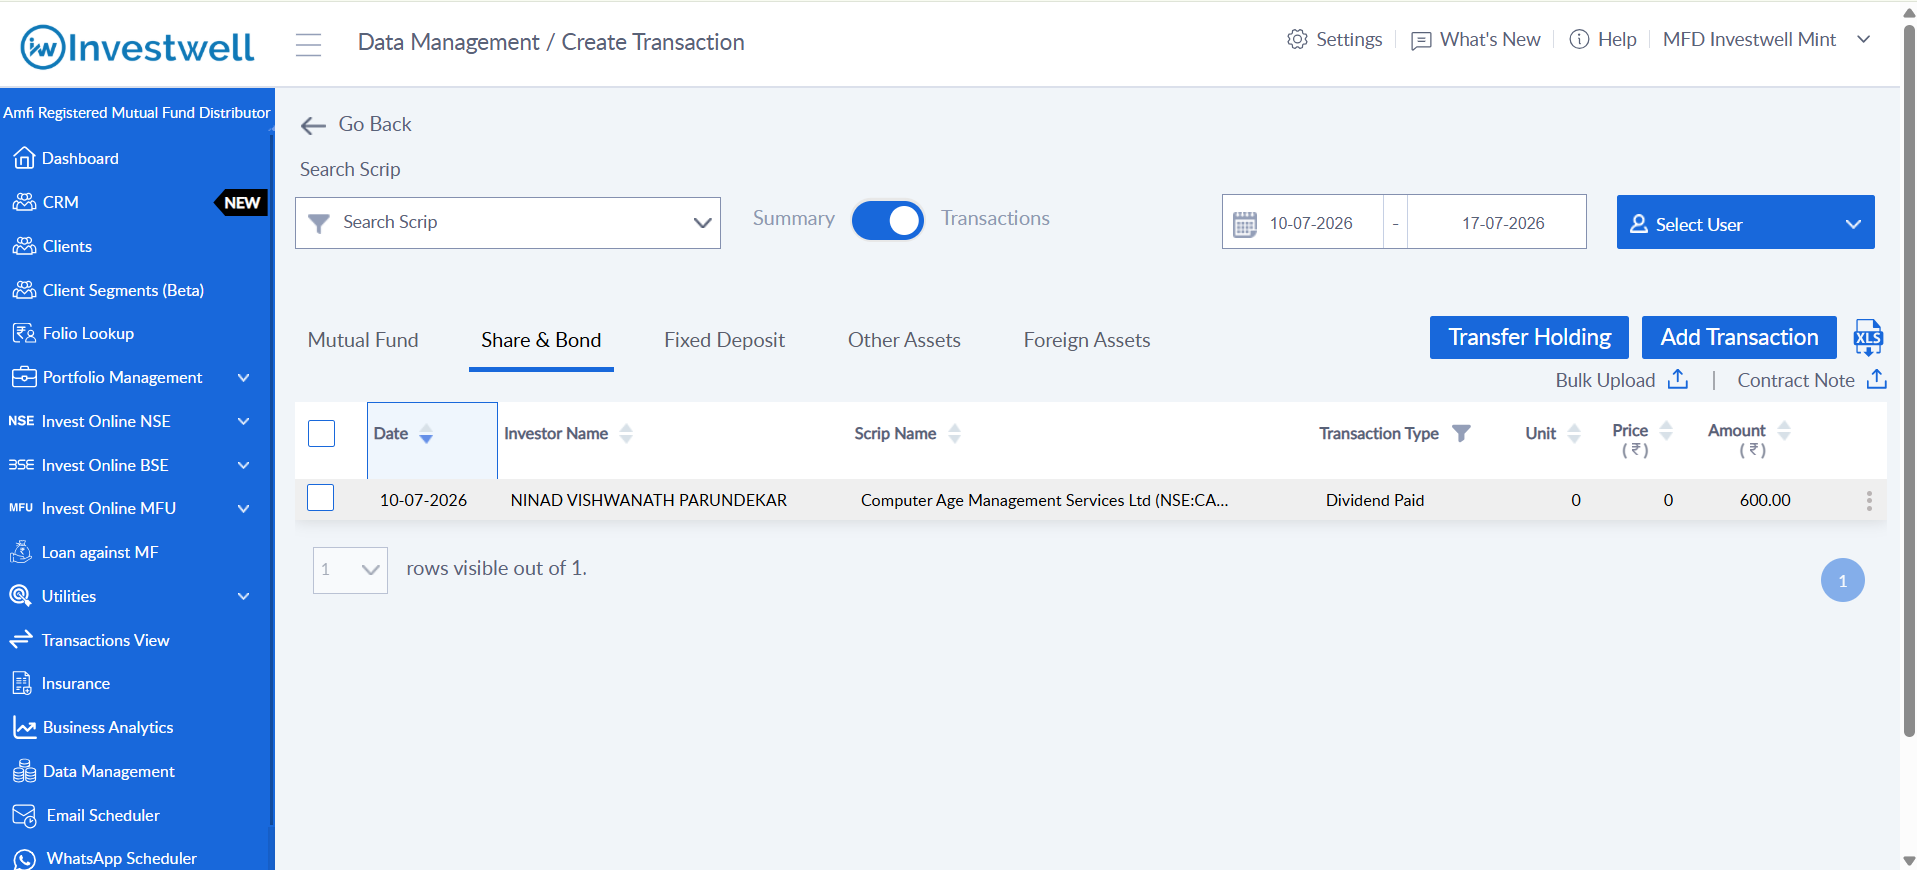
In the Share & Bond Transaction window, select User Defined Securities (Domestic), fill in the details and click Submit.
Select Investor – the client for whom the transaction is being recorded.
Transaction Date – the date on which the transaction took place.
Transaction Type – Purchase, Sell, Dividend Paid.
Select Scheme – the user defined security created in Step 2.
Price – the rate at which the transaction was executed.
Unit – the number of units transacted. Amount is calculated as Price × Unit.
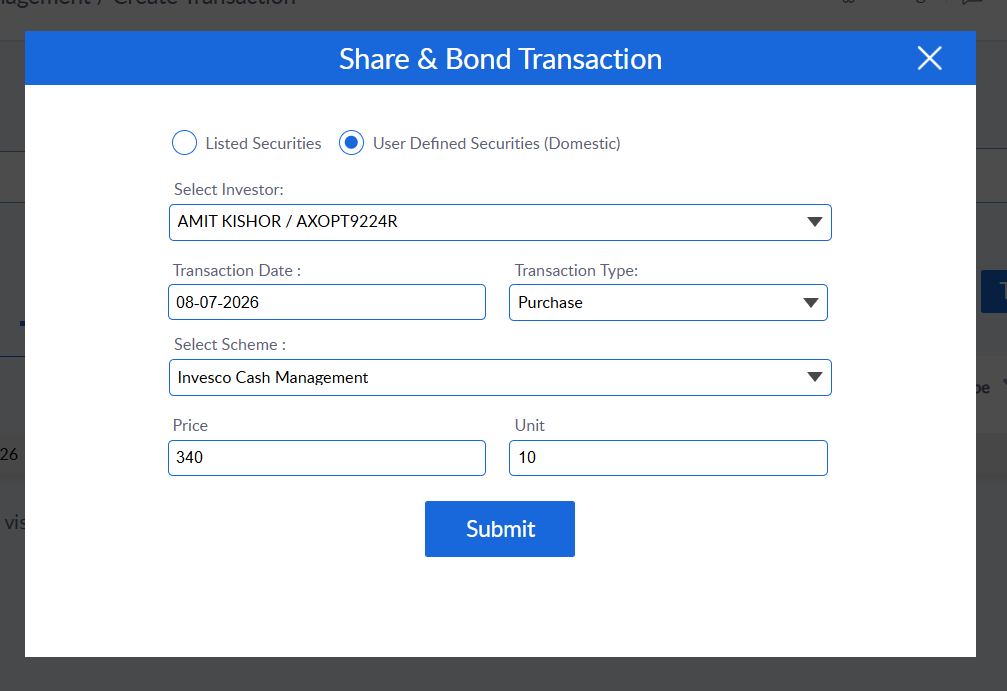
Note: The Listed Securities option is for listed scrips. For user defined securities, always select User Defined Securities (Domestic), otherwise the security will not appear in the Select Scheme list.
Use Bulk Upload on the same screen to add multiple transactions at once.
Step 5: View in Portfolio
Domestic user defined securities are treated as part of the Share & Bond product, so they appear wherever Share & Bond holdings are shown.
Statement of Account
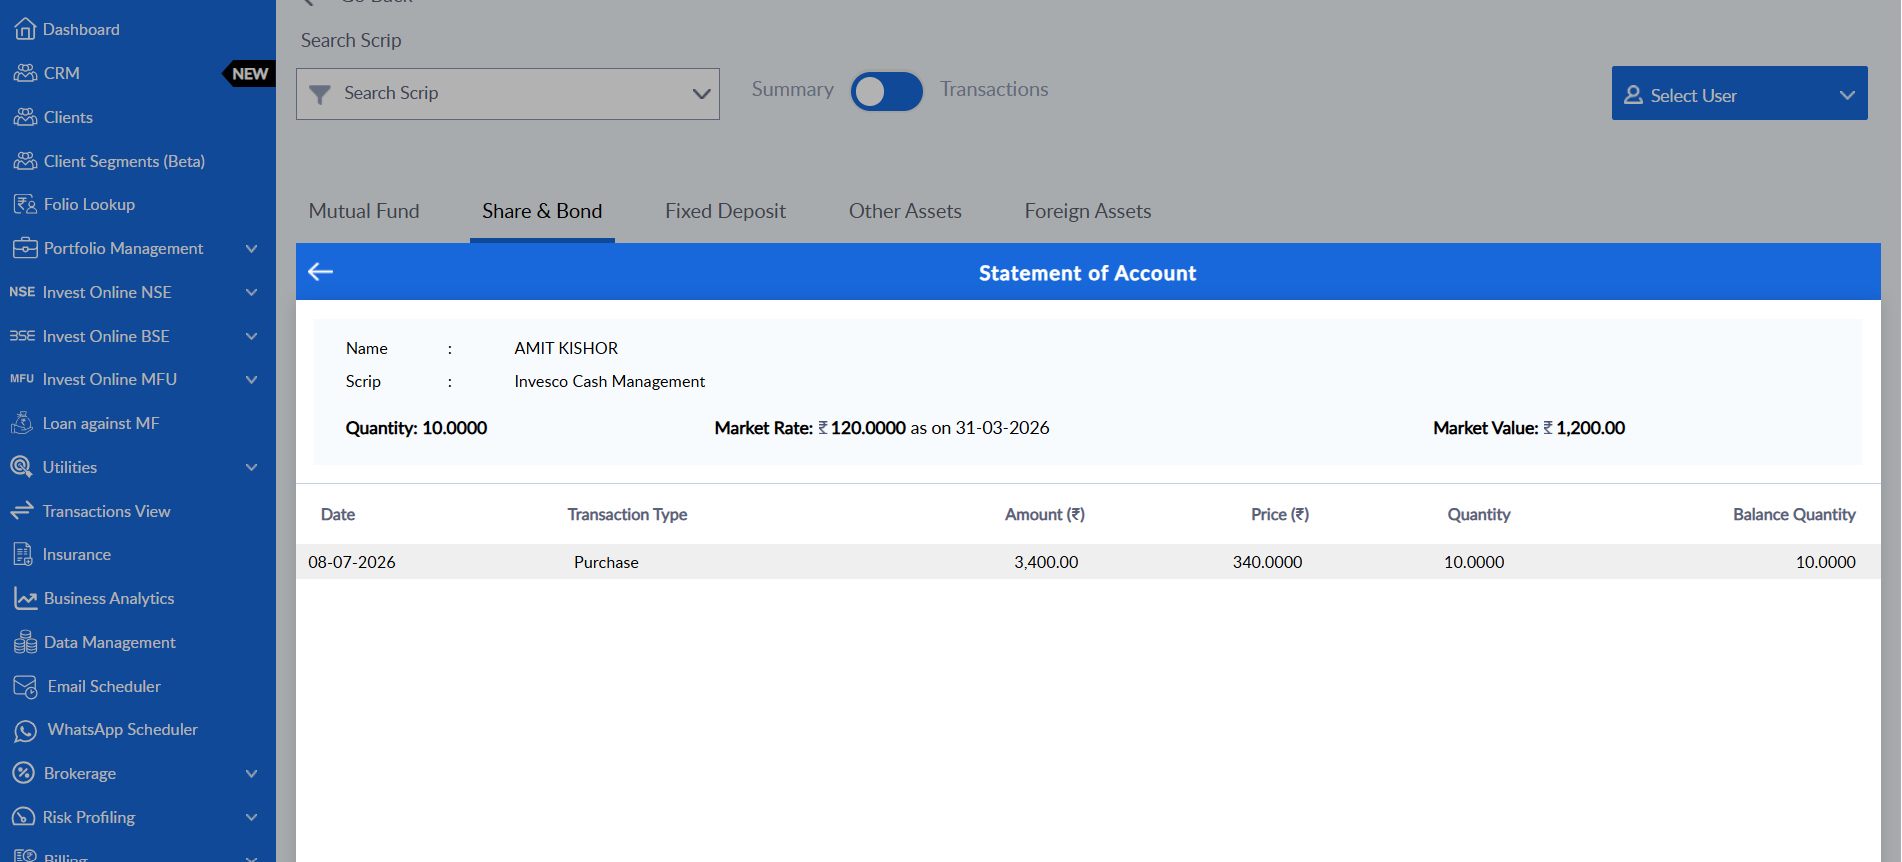
On Data Management > Create Transaction, switch the toggle to Summary and open the Share & Bond tab. Click the security to open its Statement of Account, showing the current quantity, market rate with the price date, market value and the full transaction history.
Reports
In reports these securities would be visible under Share and Bond section
For example:
Go to Client Portal > Report > Portfolio Valuation and set Choose Product to Share & Bond, then click Apply. The security appears with its purchase value, current value, gain etc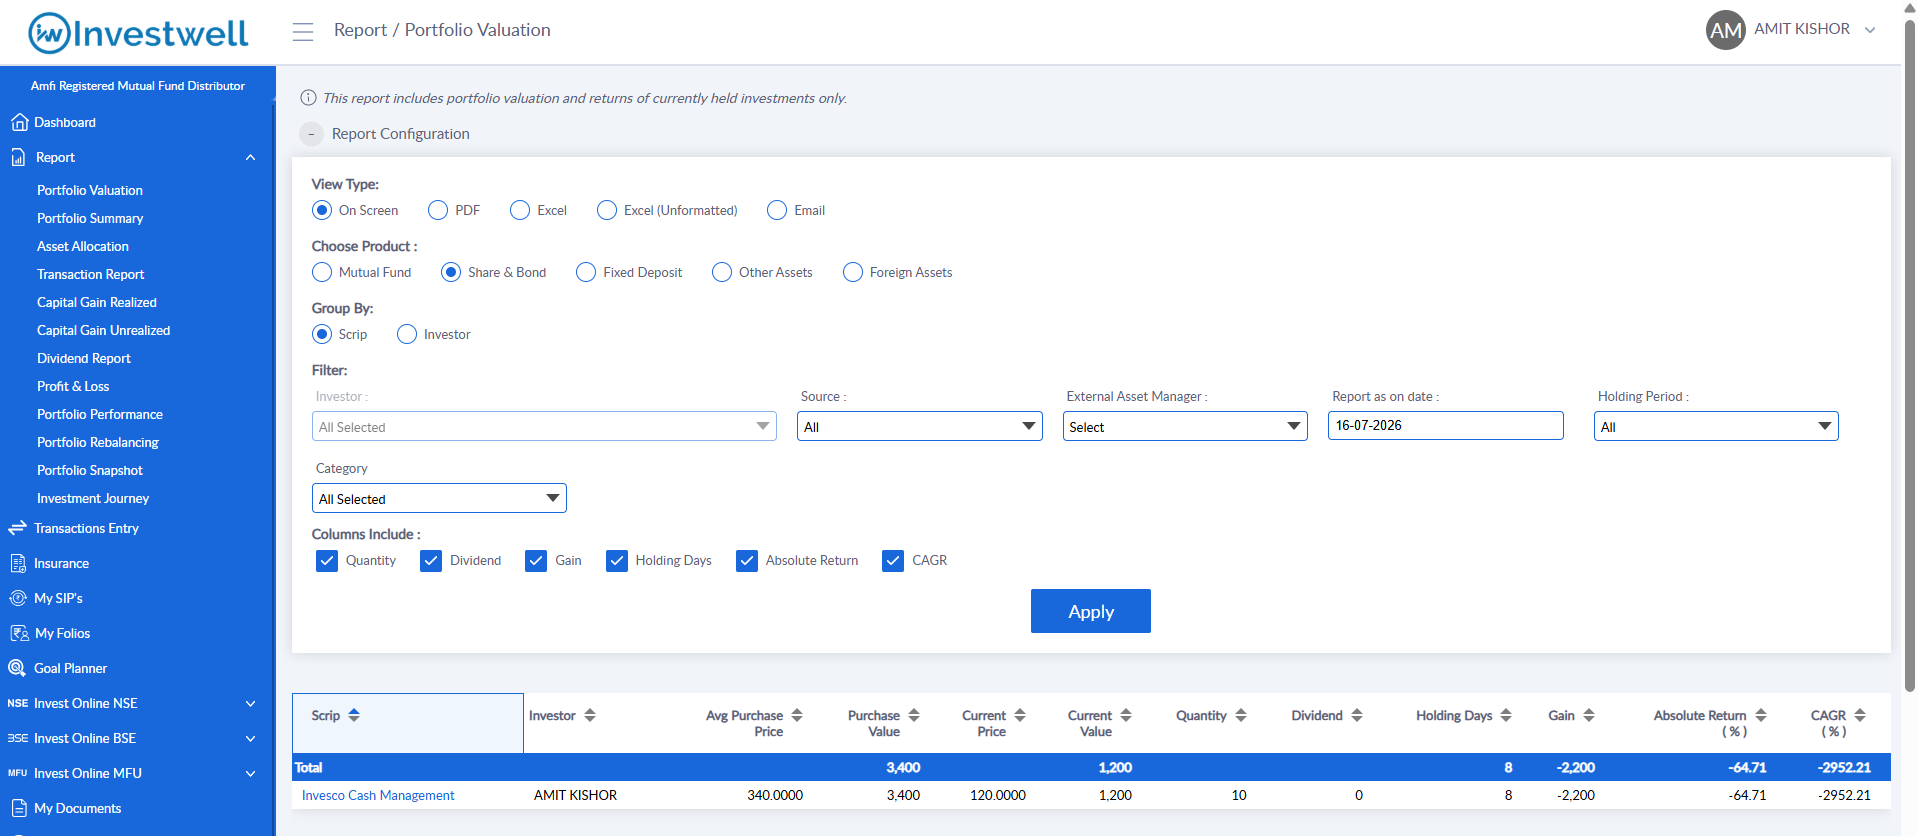
Note: The current value is derived from the price entered in Step 3.
Foreign Assets
Foreign user defined securities are created the same way as domestic ones, with two differences: the security carries its own currency, and it is viewed under the Foreign Assets product instead of Share & Bond.
Step 1. Create a Category and Sub Category
For every user defined security, a category needs to be defined. You can create a custom category and sub category which would be used for grouping in reports.
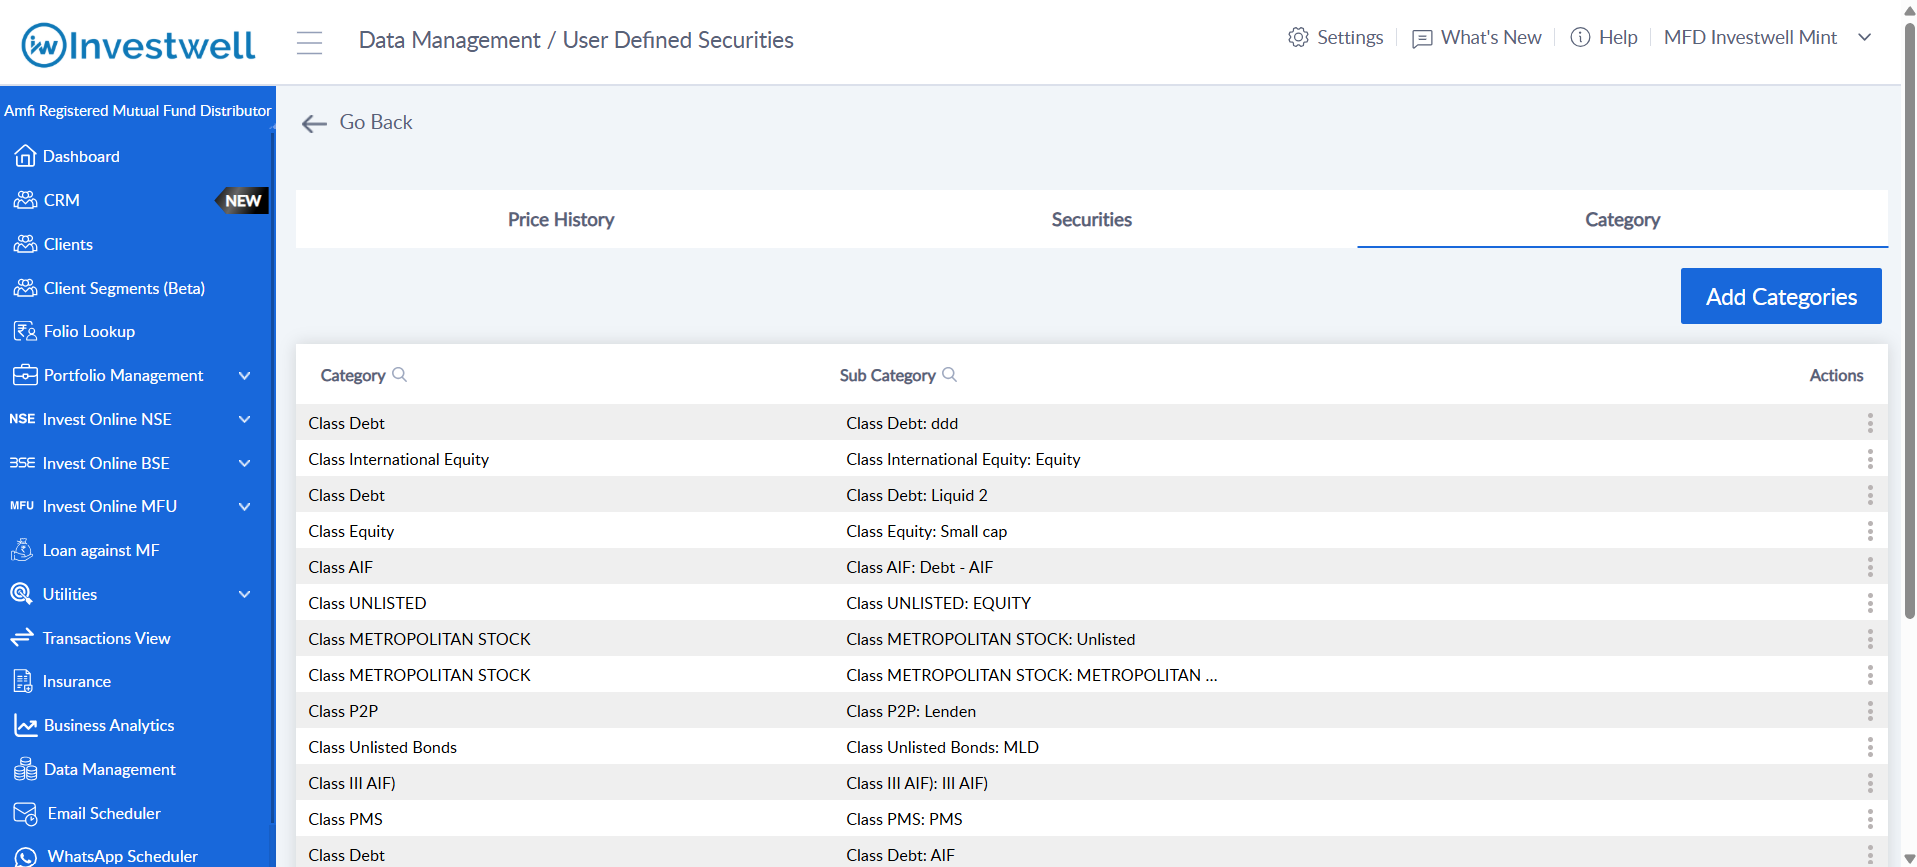
Go to Data Management > User Defined Securities > Category tab and click Add Categories.
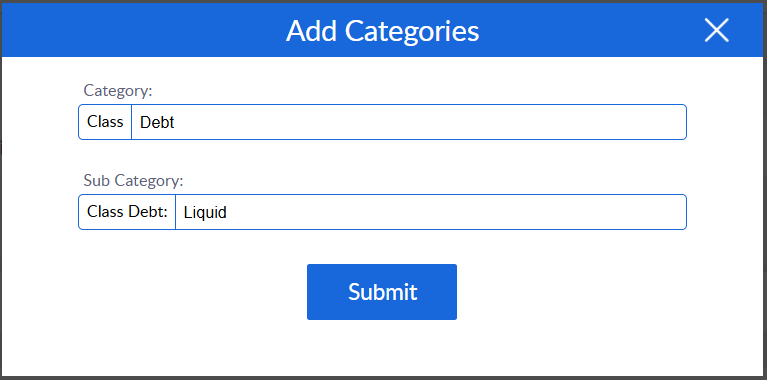
Fill in the two fields and click Submit.
Category – the broad class of the security
Sub Category – the sub-classification within that category
These would appear in the Category list and are now available while creating security.
Step 2. Create a Security
Go to the Securities tab. Switch the Domestic / Foreign toggle to Foreign and click Add Securities.
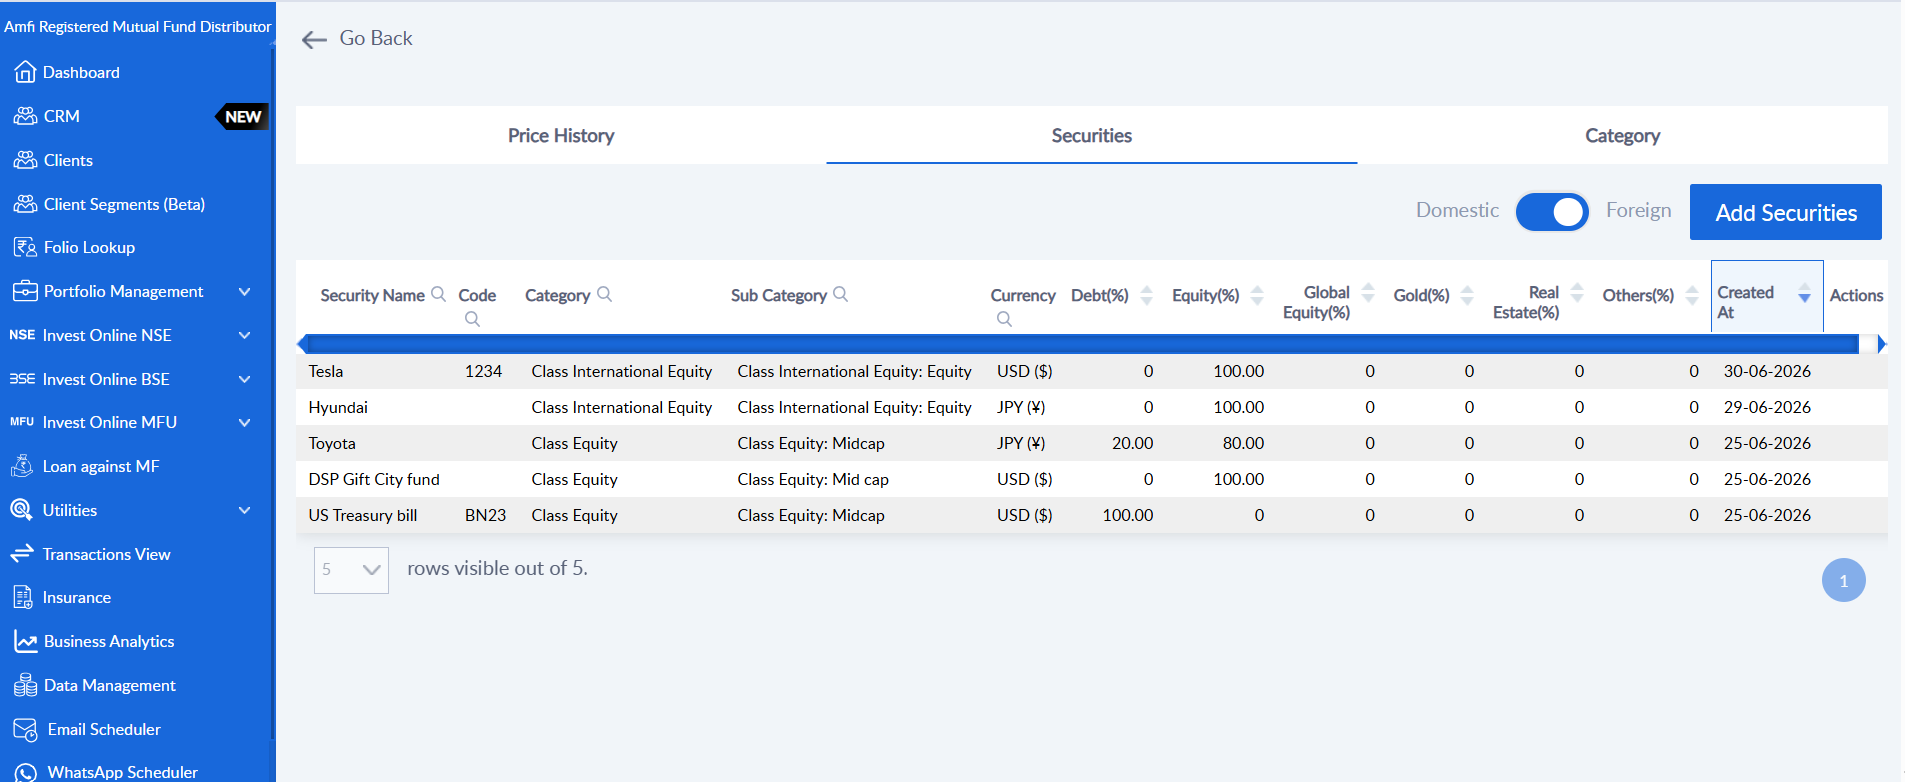
Enter the security details and click Submit.
Security Name – the name of the asset as it should appear in the portfolio. This is what the client sees.
Select Benchmark – the index against which the security’s performance is compared.
Select Broad Benchmark – a broad index for comparison. Optional.
Select Sub Category – select the Sub Category created in Step 1.
Income Tax Category – Equity/Debt
Currency – the currency in which the asset is held, for example US Dollar ($) or Japanese Yen (¥). This is the key difference from a domestic security.
Code – an identifier for the security(Optional)
Debt / Equity / Global Equity / Gold / Real Estate / Other (%) – the asset break-up of the security. The values must total 100.
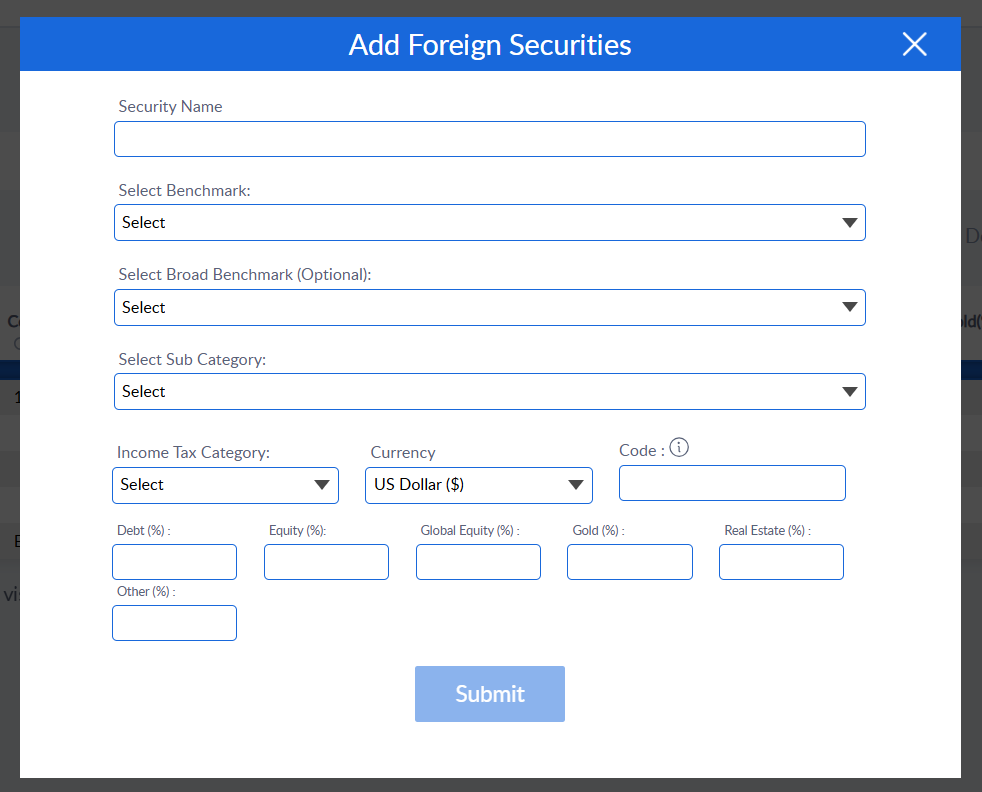
The security now appears in the Securities list with its currency, category, sub category and asset mix.
Step 3. Add Price History
A user defined security has no price, so its value has to be entered manually. Go to the Price History tab, switch the toggle to Foreign and click Add Price.
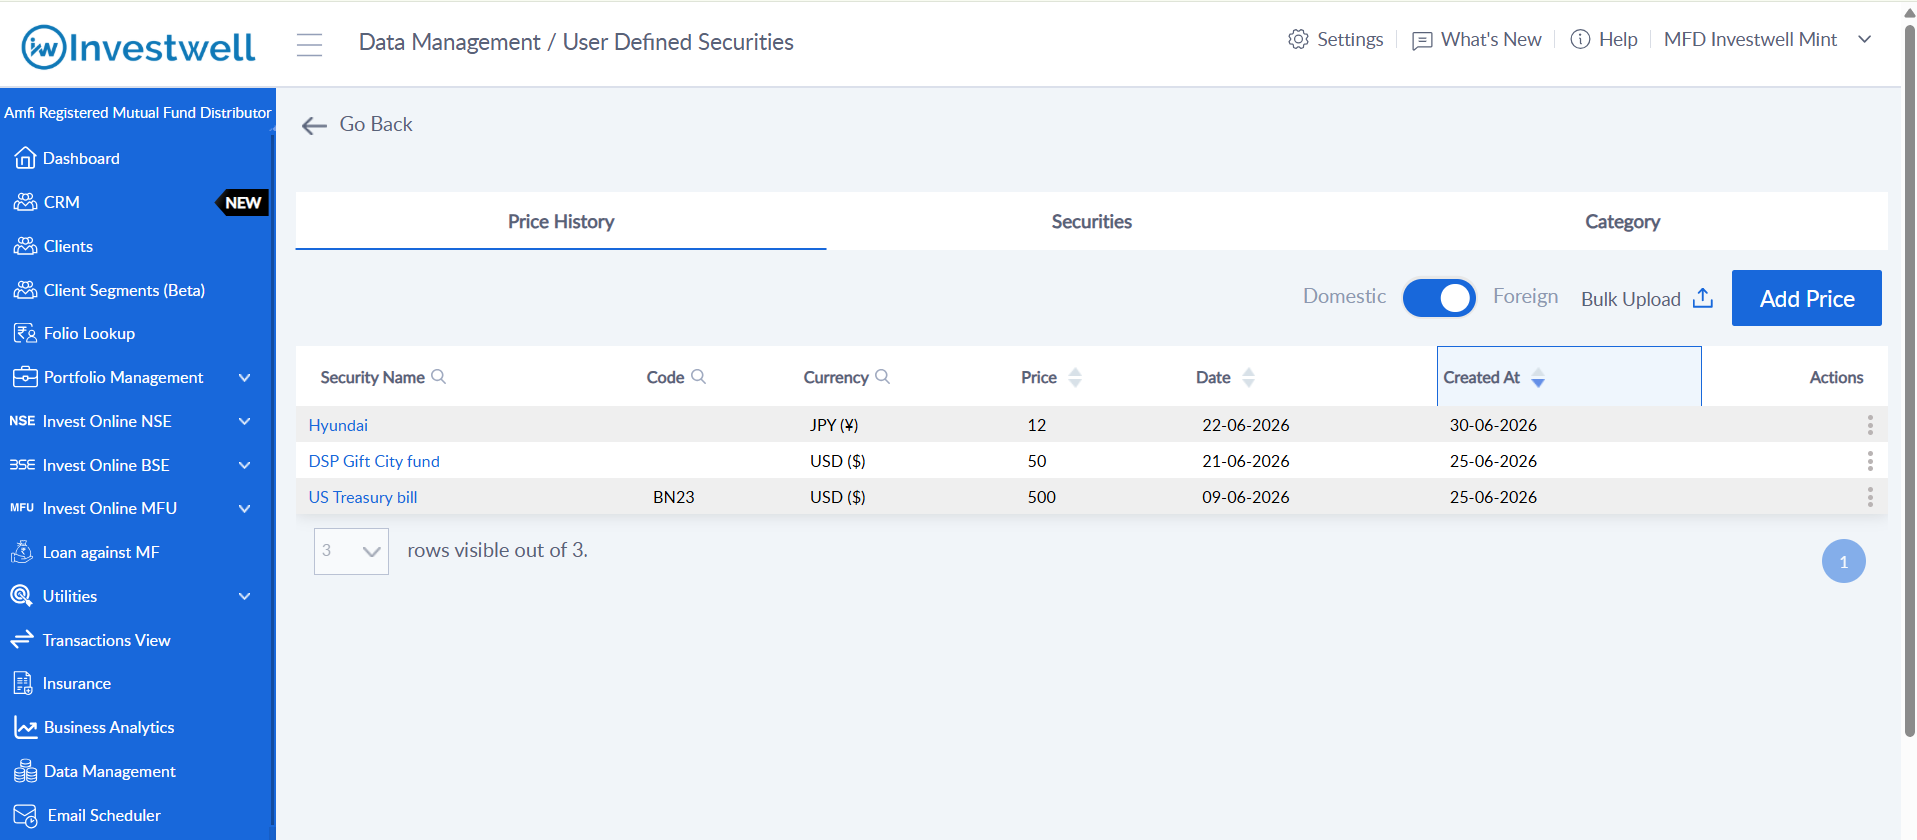
Enter the price details and click Submit.
Select Security – choose the security created in Step 2.
Current Price – the price per unit on the given date, in the security’s own currency.
Date – the date this price is applicable from, in DD-MM-YYYY format.
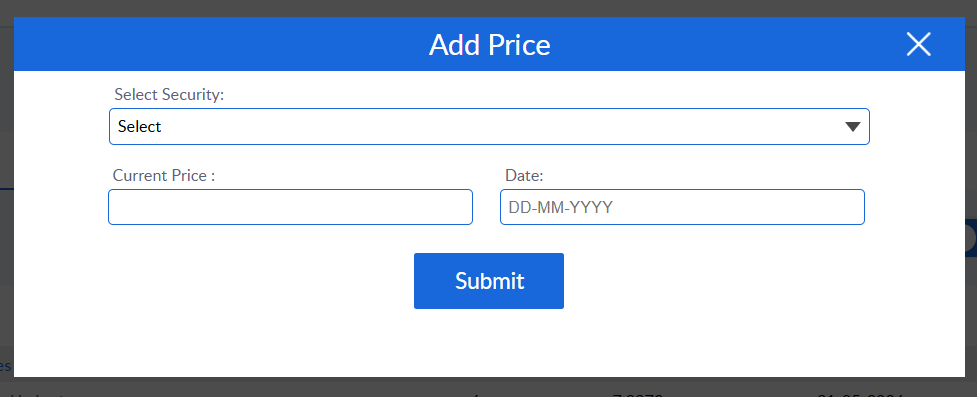
Note: Prices can be added for multiple dates. The portfolio always values the holding using the latest price on or before the report date. Use Bulk Upload to add prices for several securities at once.
Step 4: Add Transactions
Once the security exists, record the client’s transactions against it.
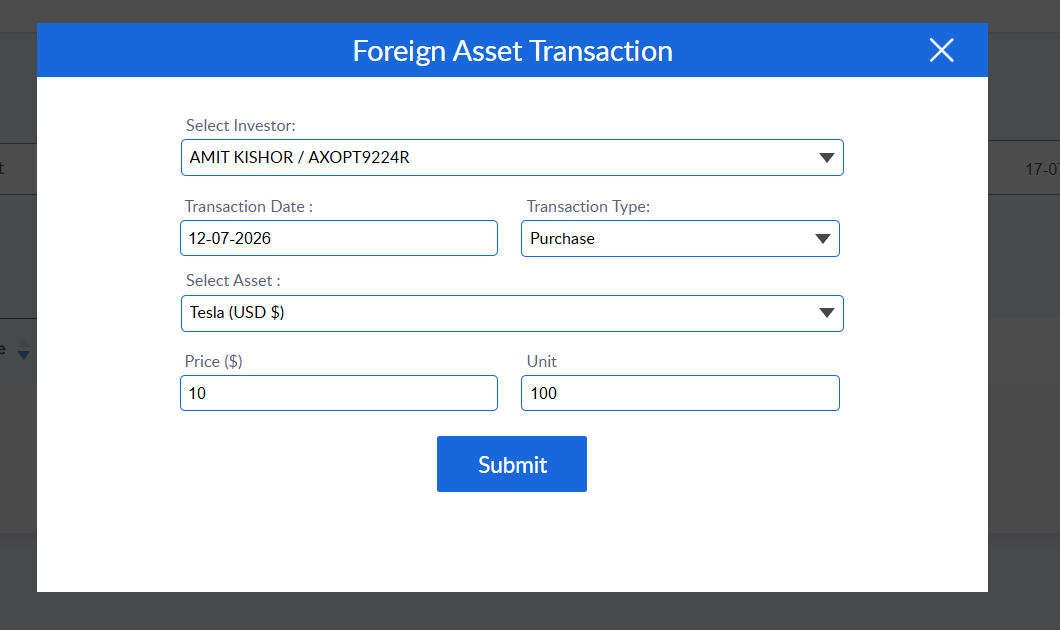
Go to Data Management > Create Transaction, open the Foreign Assets tab and click Add Transaction.
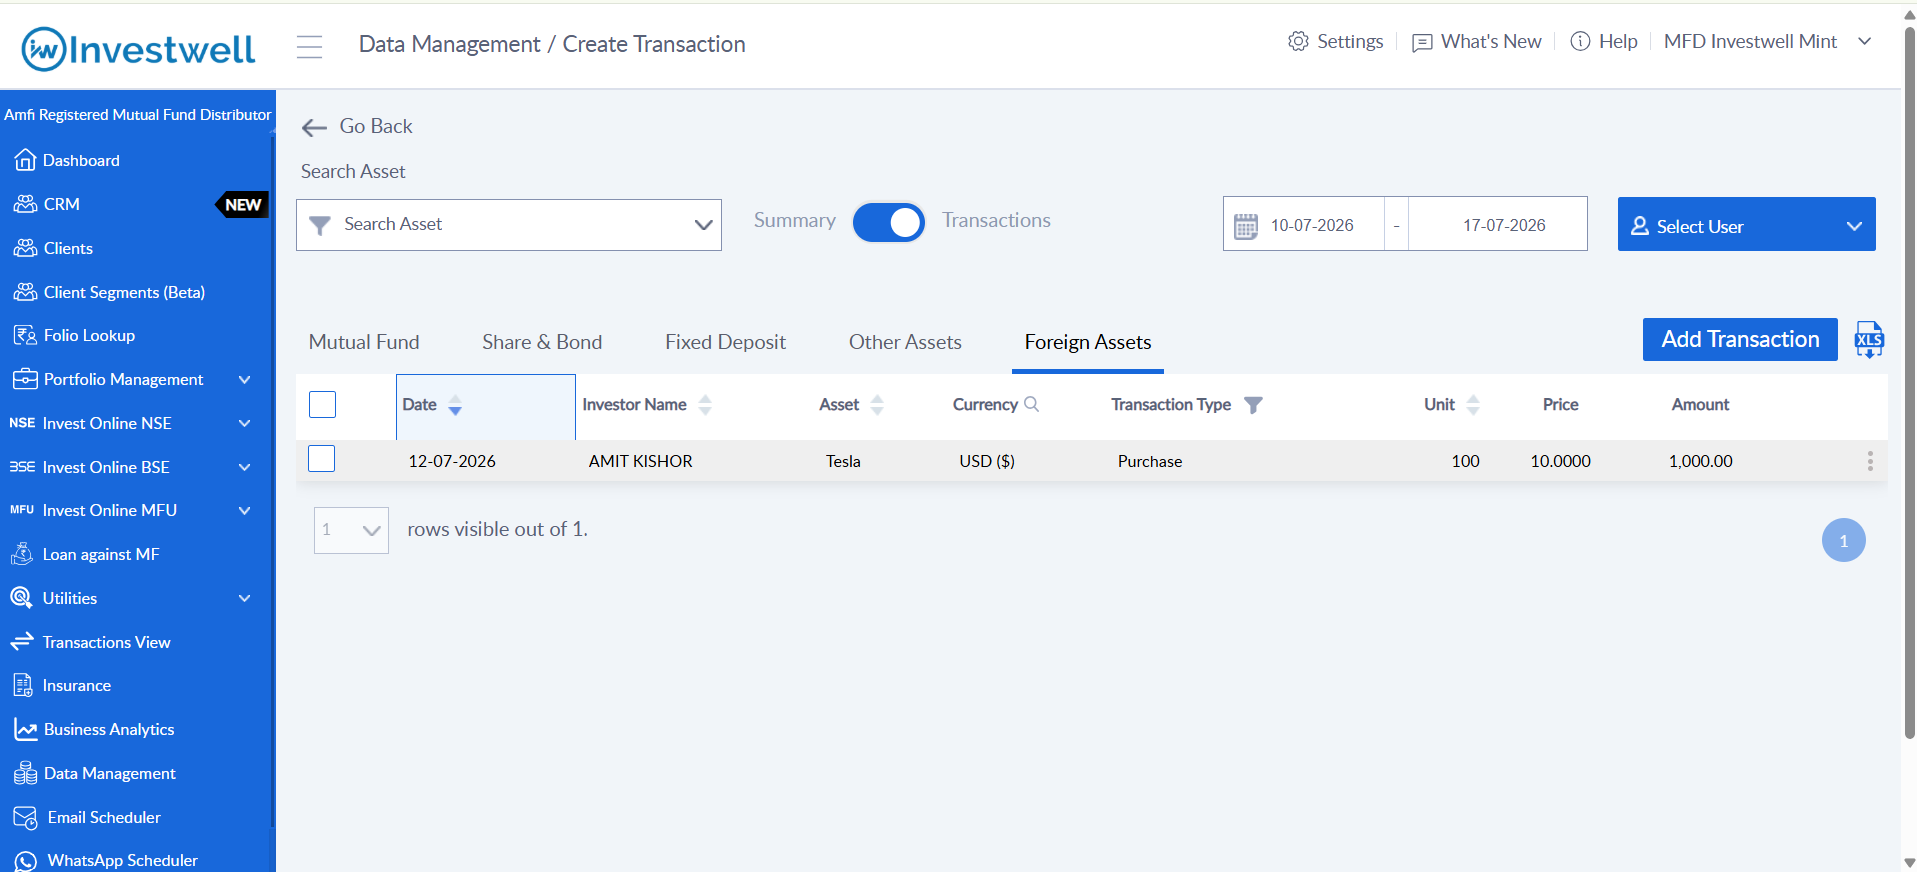
In the Foreign Asset Transaction window, fill in the details and click Submit.
Select Investor – the client for whom the transaction is being recorded.
Transaction Date – the date on which the transaction took place.
Transaction Type – Purchase, Sell, Dividend Paid.
Select Asset – the foreign security created in Step 2. The currency is shown next to the asset name.
Price – the rate at which the transaction was executed, in the asset’s currency.
Unit – the number of units transacted. Amount is calculated as Price × Unit.
Step 5: View in Portfolio
Foreign user defined securities are not part of Share & Bond. They are treated as a separate Foreign Assets product and appear wherever Foreign Assets holdings are shown.
Statement of Account
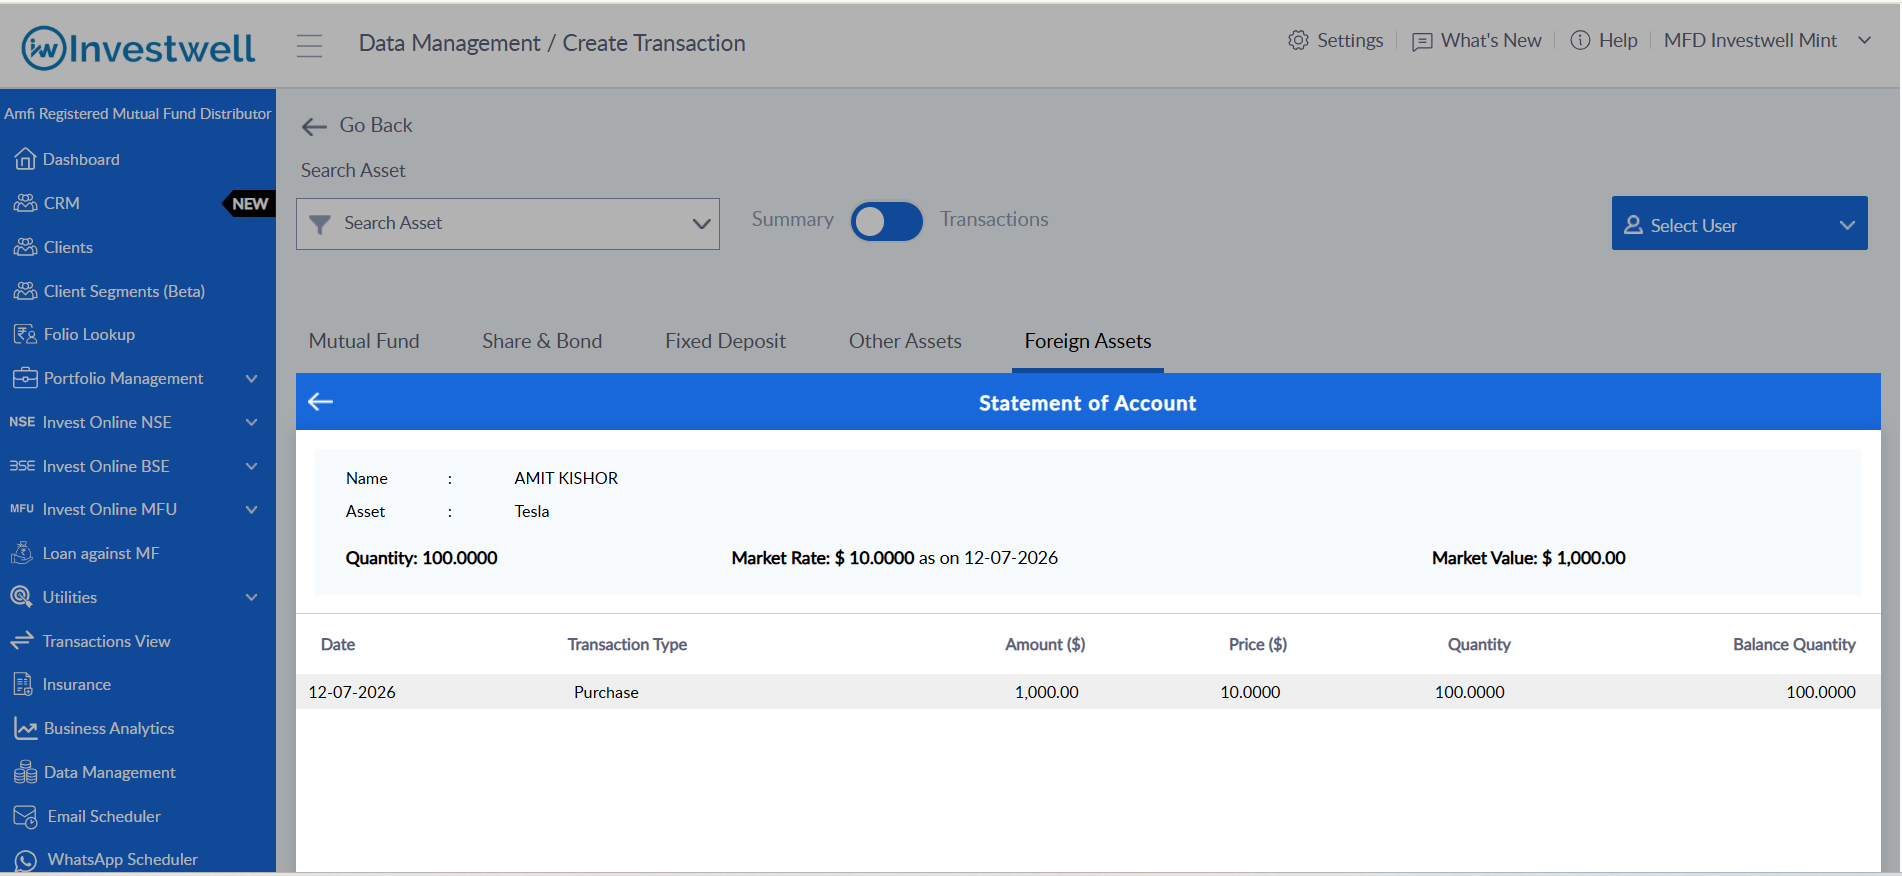
On Data Management > Create Transaction, switch the toggle to Summary and open the Foreign Assets tab. Click the asset to open its Statement of Account, showing the current quantity, market rate with the price date, market value and the full transaction history — all in the asset’s own currency.
Reports
In reports these securities would be visible under Foreign Assets section
For example:
Go to Client Portal > Report > Portfolio Valuation and set Choose Product to Foreign Assets, then click Apply. Holdings are grouped currency wise with a total for each currency, and the asset appears with its purchase value, current value, gain etc
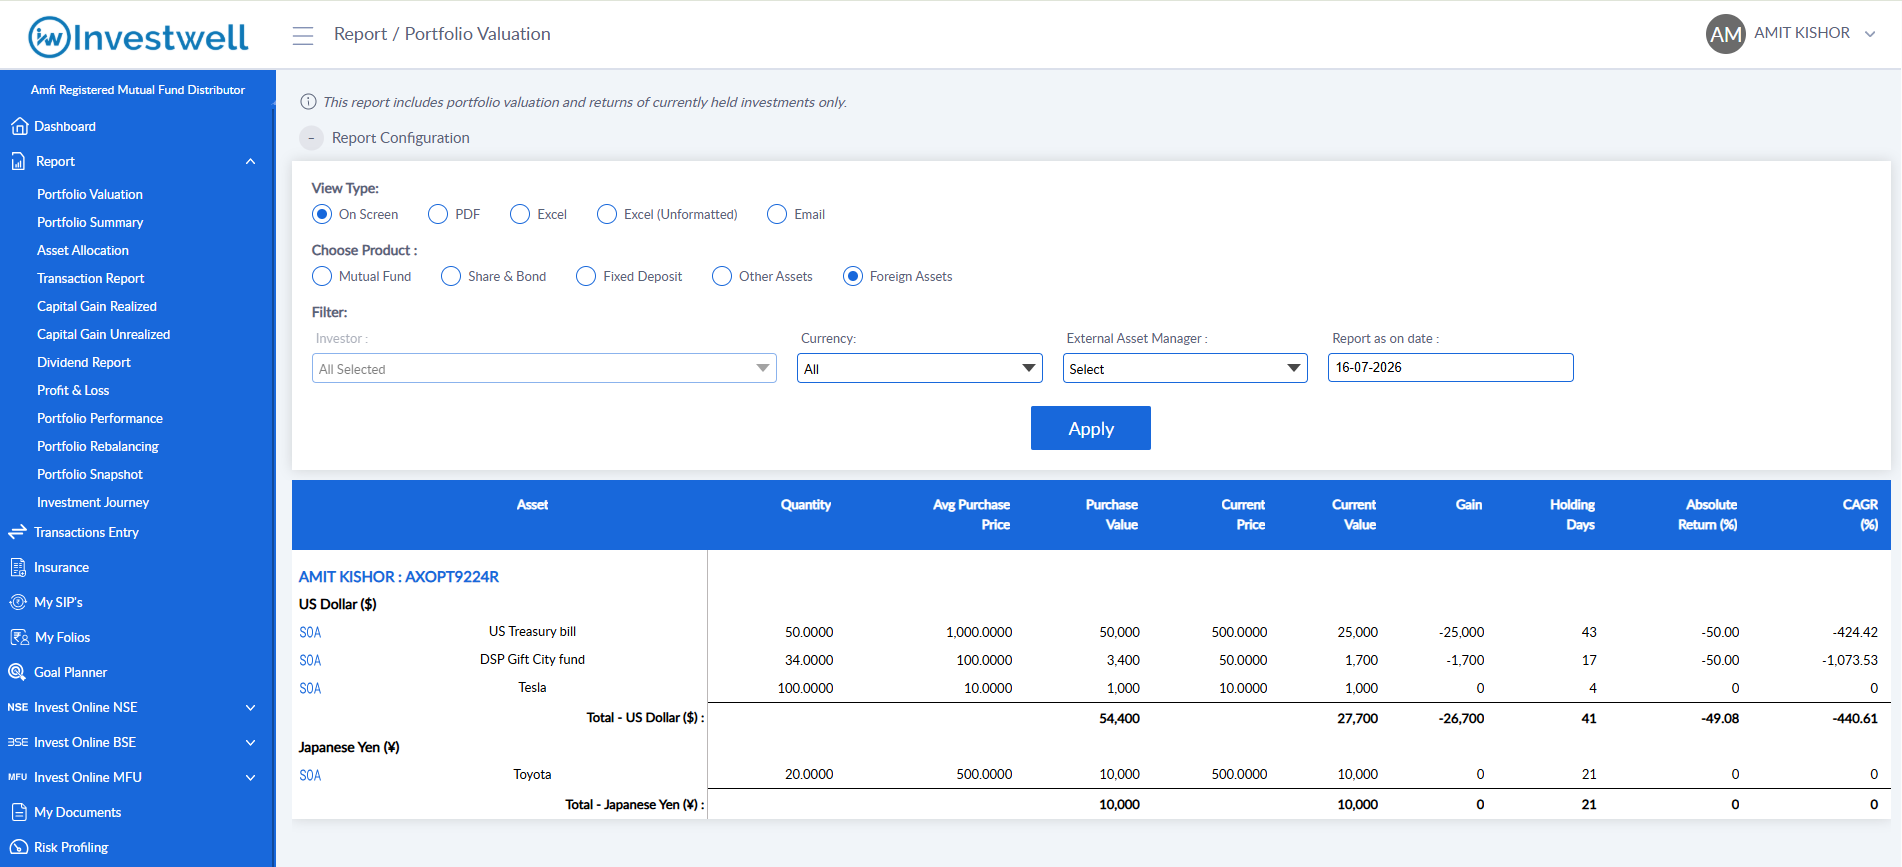
Note: Values are shown in the asset’s own currency and are not converted to Indian Rupee. Use the Currency filter to view holdings of a single currency.
Was this article helpful?
That’s Great!
Thank you for your feedback
Sorry! We couldn't be helpful
Thank you for your feedback
Feedback sent
We appreciate your effort and will try to fix the article