Label Maker lets you create printable address labels for your clients. You select the clients, choose which details should appear on the label, and the system prepares a PDF that you can download and print. Client names, addresses and mobile numbers in the screenshots in this guide are blurred for privacy.
1. When to use Label Maker
- Posting physical documents, statements or letters to clients.
- Sending festival greetings or invitations by post.
- Preparing address labels for a specific group of clients, such as one city, one RM or only family heads.
2. How to open Label Maker
- In the left menu, click Utilities. The Utilities menu expands.
- Click Label Maker.
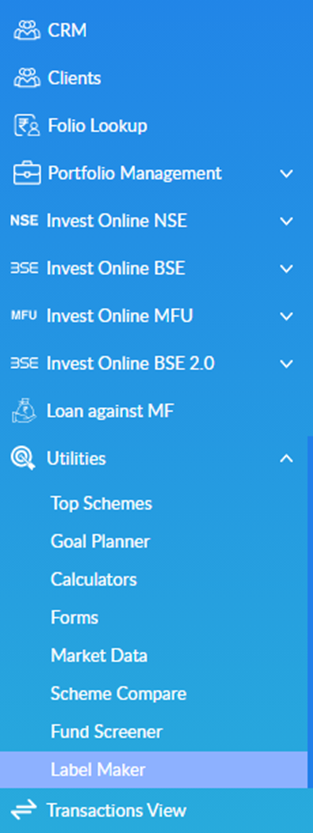
The Utilities menu also contains Top Schemes, Goal Planner, Calculators, Forms, Market Data, Scheme Compare and Fund Screener.
3. Step 1: Select the clients
The Label Maker page lists your clients with their Name, Family Head, RM, Address, City and Pincode. Use this page to choose the clients you want labels for.
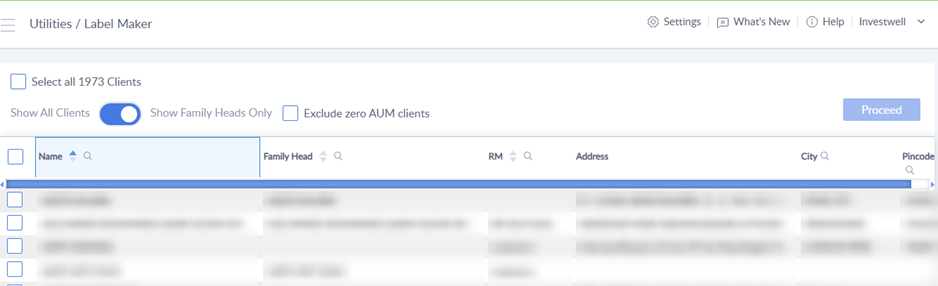
Options at the top of the page
- Select all clients: ticks every client in the list. The number of clients is shown next to it.
- Show All Clients / Show Family Heads Only: use the toggle to switch the list between all clients and family heads only. Choose family heads only if you want to send one label per family.
- Exclude zero AUM clients: tick this to leave out clients who have no AUM.
- Proceed: moves you to the next step. It is enabled only after you select at least one client.
Finding the clients you want
- Use the search icon next to Name, Family Head, RM, City or Pincode to find specific clients or a group of clients, for example everyone in one city or under one RM.
- Click the arrows next to Name, Family Head or RM to sort the list.
- Check the Address column before you select a client. A client with no address saved has nothing to print on the label.
To select clients
- Tick the checkbox beside each client you want, or tick the checkbox in the header row (or Select all clients) to select all of them.
- Click Proceed.
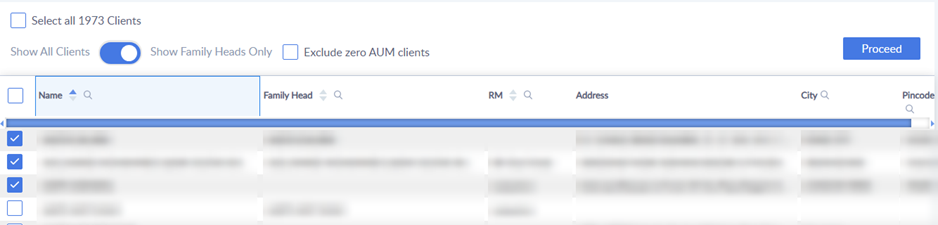
4. Step 2: Choose the details on the label
After you click Proceed, the Customize Columns page opens. It shows the details that can appear on the label, and a Label Preview on the right shows how a label will look.
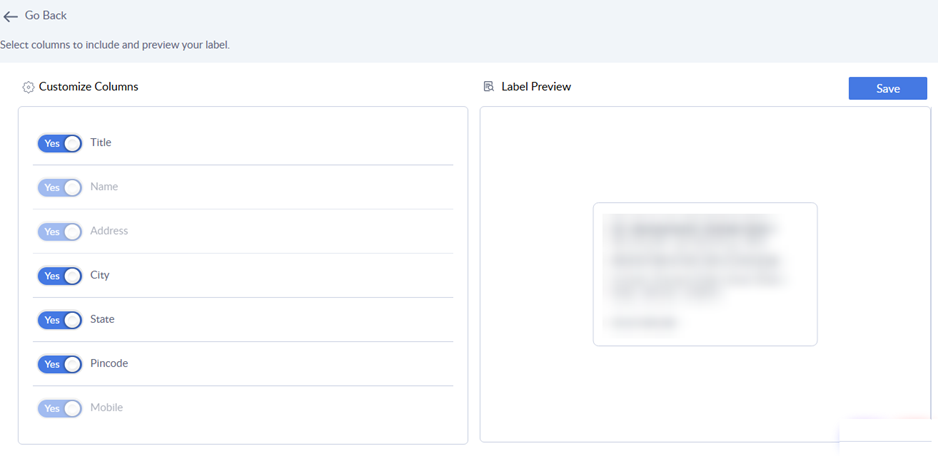
- Use the Yes / No switch beside each detail to include or leave it out. The preview updates as you change the switches.
- Details you can switch on or off: Title, City, State and Pincode.
- Name, Address and Mobile appear greyed out and are always included on the label.
- Click Save. Click Go Back at the top to return to the client list.
5. Step 3: Download your labels
After you click Save, a confirmation message appears. The labels are prepared in the background, so they are not downloaded immediately.
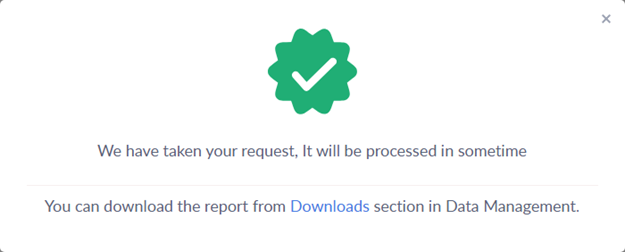
The message says: "We have taken your request, It will be processed in sometime. You can download the report from Downloads section in Data Management."
- Click Downloads in the message, or go to Data Management in the left menu and open Downloads.
- Find your file in the list. Label Maker files have the Report Type Label Maker and a file name that starts with clientLabels_.
- Click the download icon in the Status column. The PDF is saved to your computer.
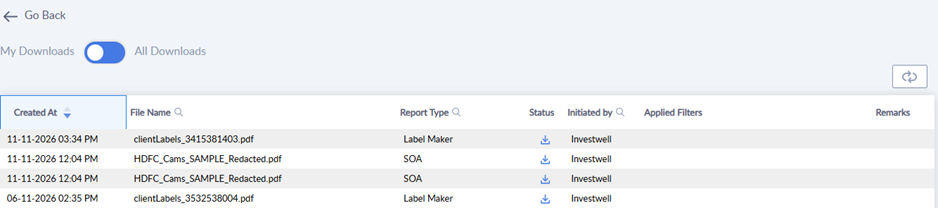
About the Downloads page
- My Downloads / All Downloads: use the switch at the top to see only the files you created or the files created by all users.
- Created At shows the date and time of the request, so the newest file is easy to find.
- If the download icon is not yet available, wait a little and refresh the page.
6. What the label looks like
The downloaded PDF contains one box for each client, with the client's name, address and mobile number (plus any optional details you switched on). Print the PDF and cut or stick the labels as needed.
7. Tips
- Create labels for a smaller group first, such as one city, to check how the labels look before printing for all clients.
- Use Show Family Heads Only if each family should receive one letter.
- If many labels have missing addresses, update the clients' addresses first, using Edit Profile on the Clients page or bulk upload.
- Each time you click Save, a new file is created in Downloads, so you can come back to earlier label files later.
8. Frequently asked questions
Q1. How do I print address labels for my clients?
Go to Utilities > Label Maker, select the clients and click Proceed, choose the details to show and click Save. Then download the PDF from Data Management > Downloads and print it.
Q2. Where can I find the label file after I click Save?
In Data Management > Downloads. Look for the Report Type Label Maker and a file name starting with clientLabels_.
Q3. Why was the file not downloaded straight away?
The labels are prepared in the background. You will see a message that the request has been taken, and the file appears in Downloads shortly.
Q4. Can I print labels for all clients at once?
Yes. Tick Select all clients on the Label Maker page and click Proceed. You can also tick Exclude zero AUM clients to leave out clients with no AUM.
Q5. How do I print only one label per family?
Switch the list to Show Family Heads Only, select the clients and click Proceed.
Q6. How do I print labels for clients of a particular city or RM?
Use the search icon next to City or RM on the Label Maker page to filter the list, then select the clients and click Proceed.
Q7. Can I remove the mobile number or address from the label?
No. Name, Address and Mobile are always included. You can switch Title, City, State and Pincode on or off.
Q8. Can I see how the label will look before saving?
Yes. The Label Preview on the Customize Columns page shows a sample label and changes as you switch details on or off.
Q9. A client's address is missing on the label. What should I do?
The label uses the address saved for the client. Update the address in the client's profile (Clients > Edit Profile) or through bulk upload, and create the labels again.
Still need help? Contact the Investwell support team by raising a ticket.
Was this article helpful?
That’s Great!
Thank you for your feedback
Sorry! We couldn't be helpful
Thank you for your feedback
Feedback sent
We appreciate your effort and will try to fix the article