Email Scheduler in Investwell sends reports and messages to clients by email on a schedule, using email templates and campaigns.
Overview
Email Scheduler is in the left menu. It has two tabs:
- Templates: the email layouts used for each type of email, such as Portfolio Summary, Capital Gain Realized or Birthday Wishes. Ready-made default templates are provided, and custom templates can be created.
- Campaigns: the scheduled sends. A campaign picks the clients who receive the email, the report to send, and when to send it.
The general order of work is to set up the email account, review or create a template, and then create a campaign.
Setting up the email account
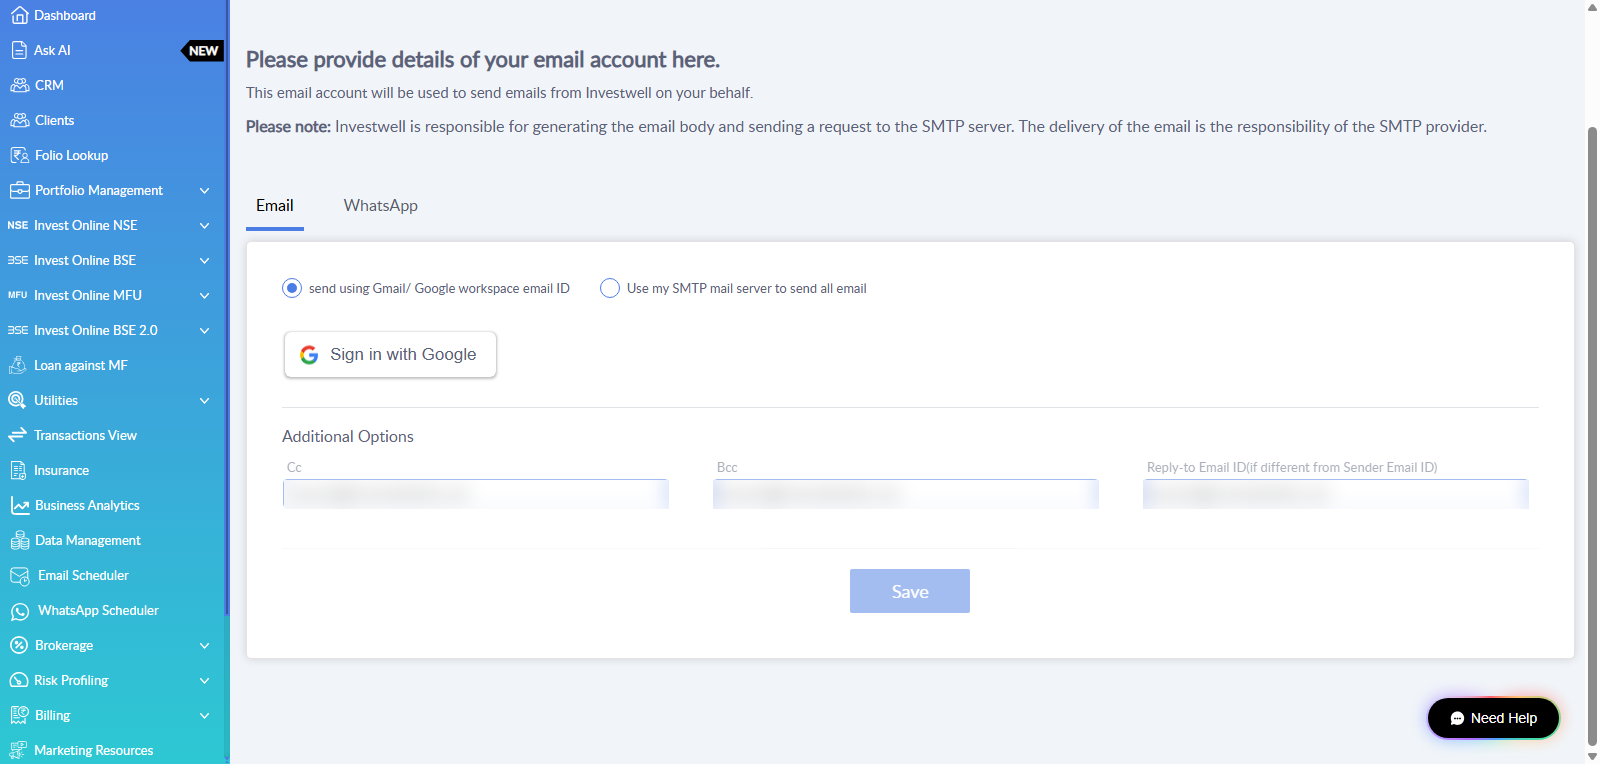
Emails from Email Scheduler are sent through an email account that is set up under Settings, in the Email tab of the email and WhatsApp configuration page. The page explains that this email account is used to send emails from Investwell on the user's behalf.
The page offers two ways to send email, and one option is selected at a time.
Option 1: Gmail or Google Workspace
- Open the email account settings page and select the Email tab.
- Select the option "send using Gmail/ Google workspace email ID".
- Click Sign in with Google and sign in with the Gmail or Google Workspace account that should send the emails.
- Optionally, fill in Additional Options: Cc and Bcc (addresses copied on every email) and Reply-to Email ID (used when replies should go to an address different from the sender address).
- Click Save.
Option 2: SMTP mail server
To set it up:
- Open the email account settings page and select the Email tab.
- Select the option "Use my SMTP mail server to send all email".
- Fill in the fields described below.
- Click Save.
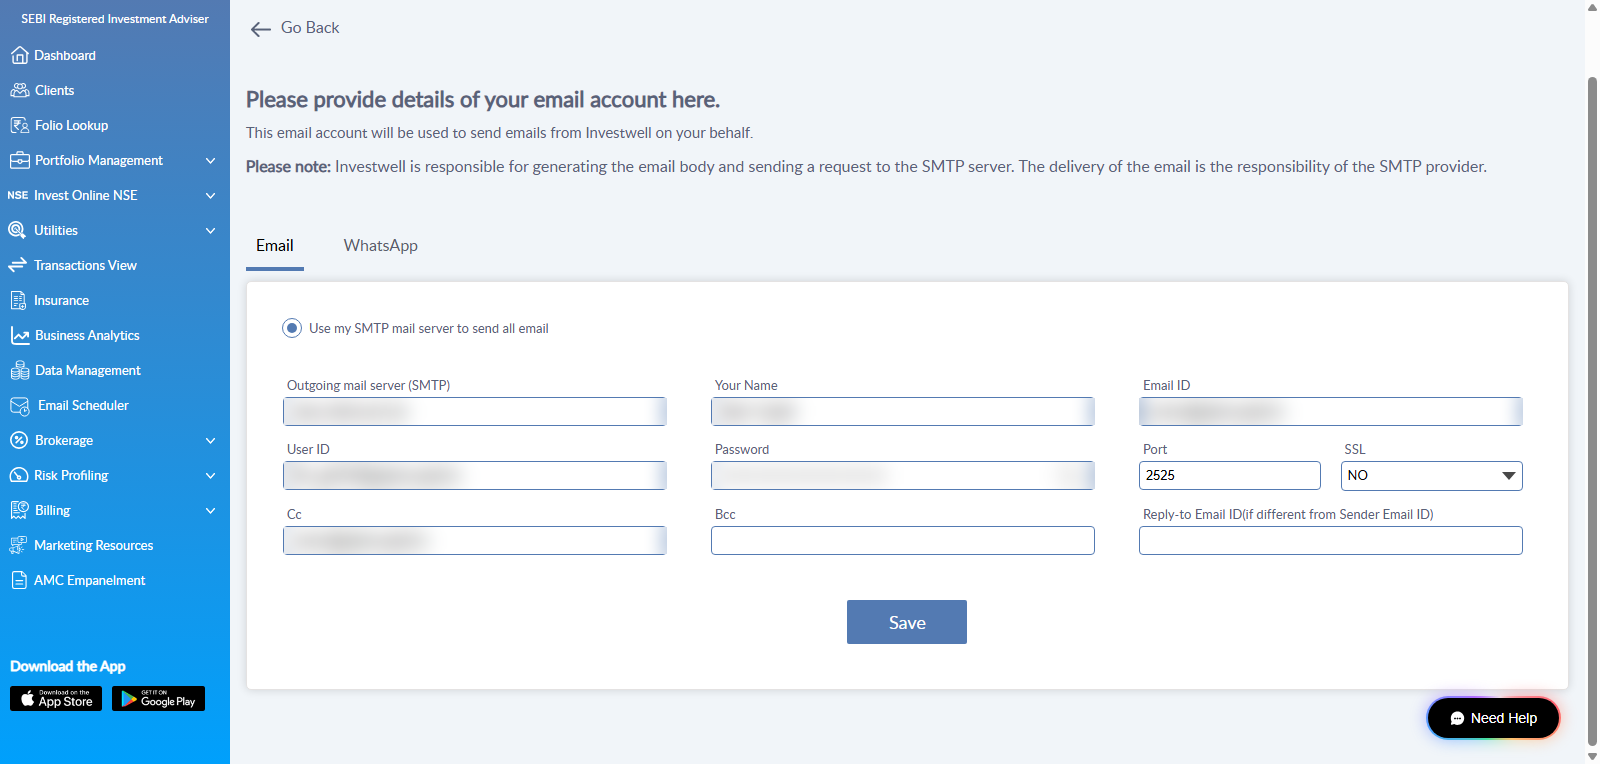
The fields are:
- Outgoing mail server (SMTP): the address of the SMTP server.
- Your Name: the sender name shown to the recipient.
- Email ID: the sender email address.
- User ID and Password: the login details for the SMTP account.
- Port and SSL: the port number and whether SSL is used (Yes or No).
- Cc and Bcc: optional addresses to copy on every email.
- Reply-to Email ID: optional, used when replies should go to an address different from the sender address.
The page notes that Investwell generates the email body and sends the request to the SMTP server. Delivery of the email is the responsibility of the SMTP provider.
Templates
A template is the layout and wording of an email. Open Email Scheduler from the left menu and select the Templates tab.
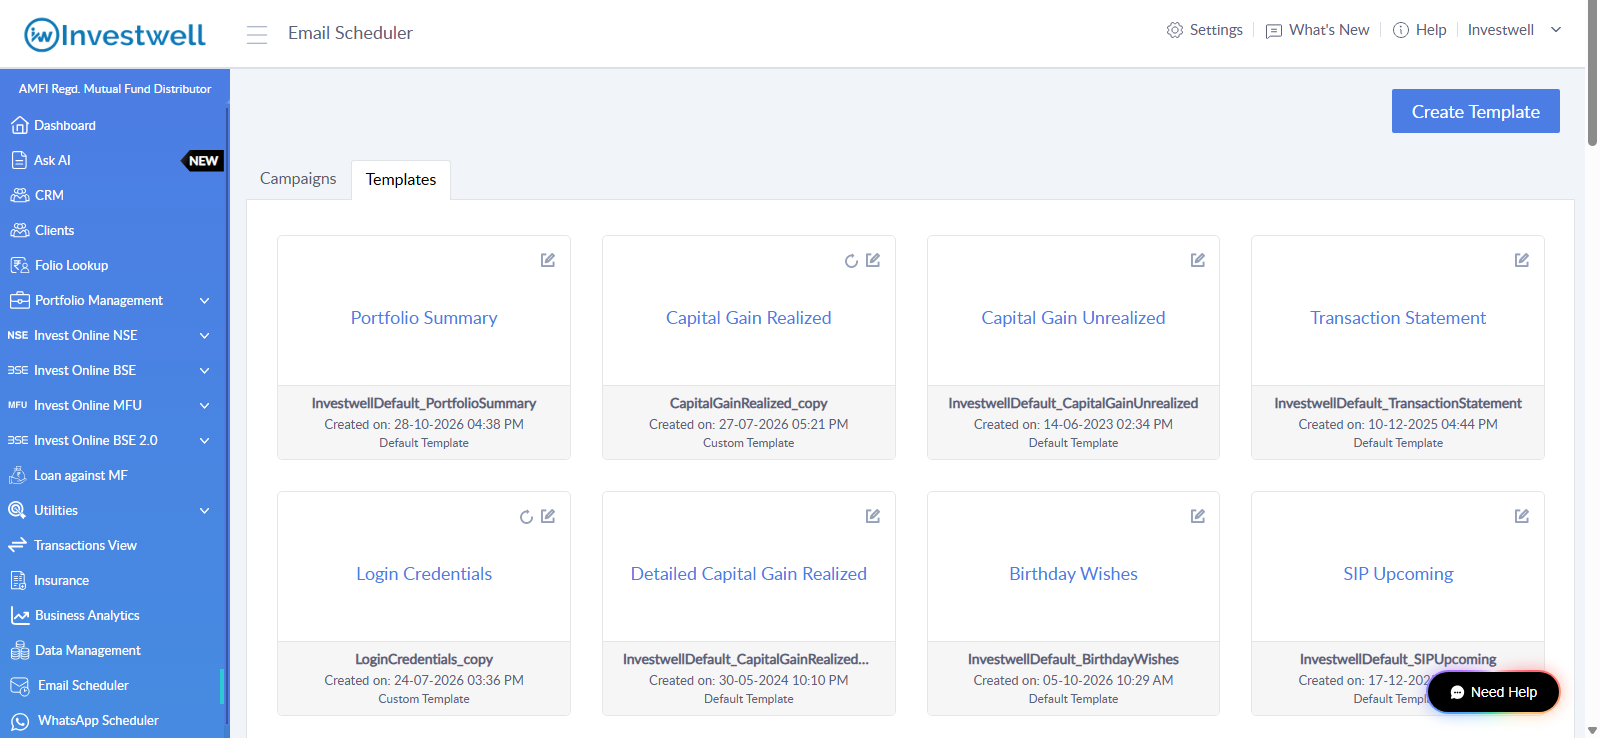
Each template appears as a card showing its name, the date and time it was created, and a label that says whether it is a Default Template or a Custom Template. Default templates are named InvestwellDefault followed by the report name, for example InvestwellDefault_PortfolioSummary. Cards are available for Portfolio Summary, Capital Gain Realized, Capital Gain Unrealized, Transaction Statement, Login Credentials, Detailed Capital Gain Realized, Birthday Wishes, SIP Upcoming and others.
Creating a template
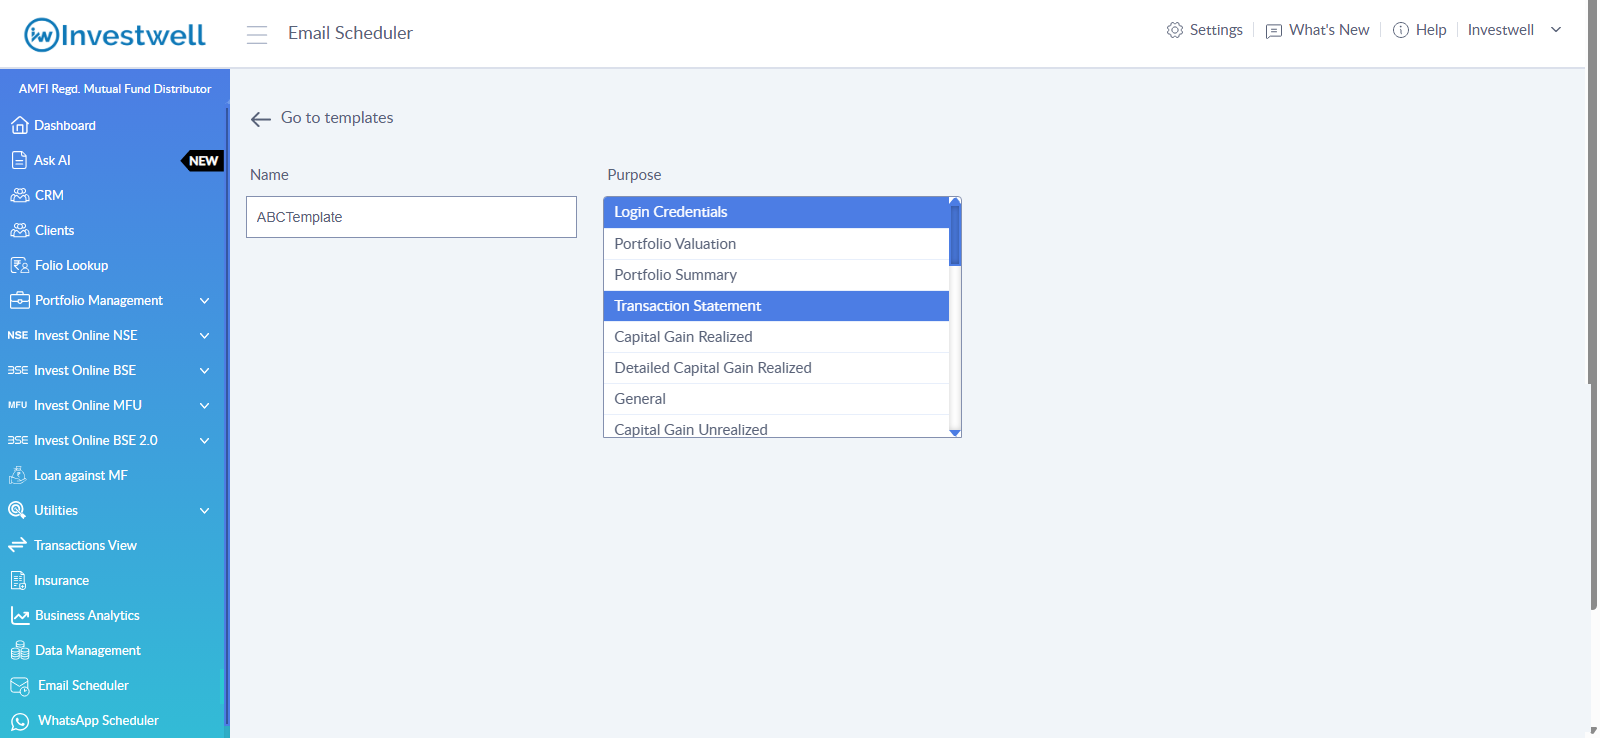
- In the Templates tab, click Create Template.
- Enter a Name for the template.
- Select a Purpose. The purpose decides which report or message the template is used for. The list includes Login Credentials, Portfolio Valuation, Portfolio Summary, Transaction Statement, Capital Gain Realized, Detailed Capital Gain Realized, General and Capital Gain Unrealized.
- Write the email in the editor.
- Click Save.
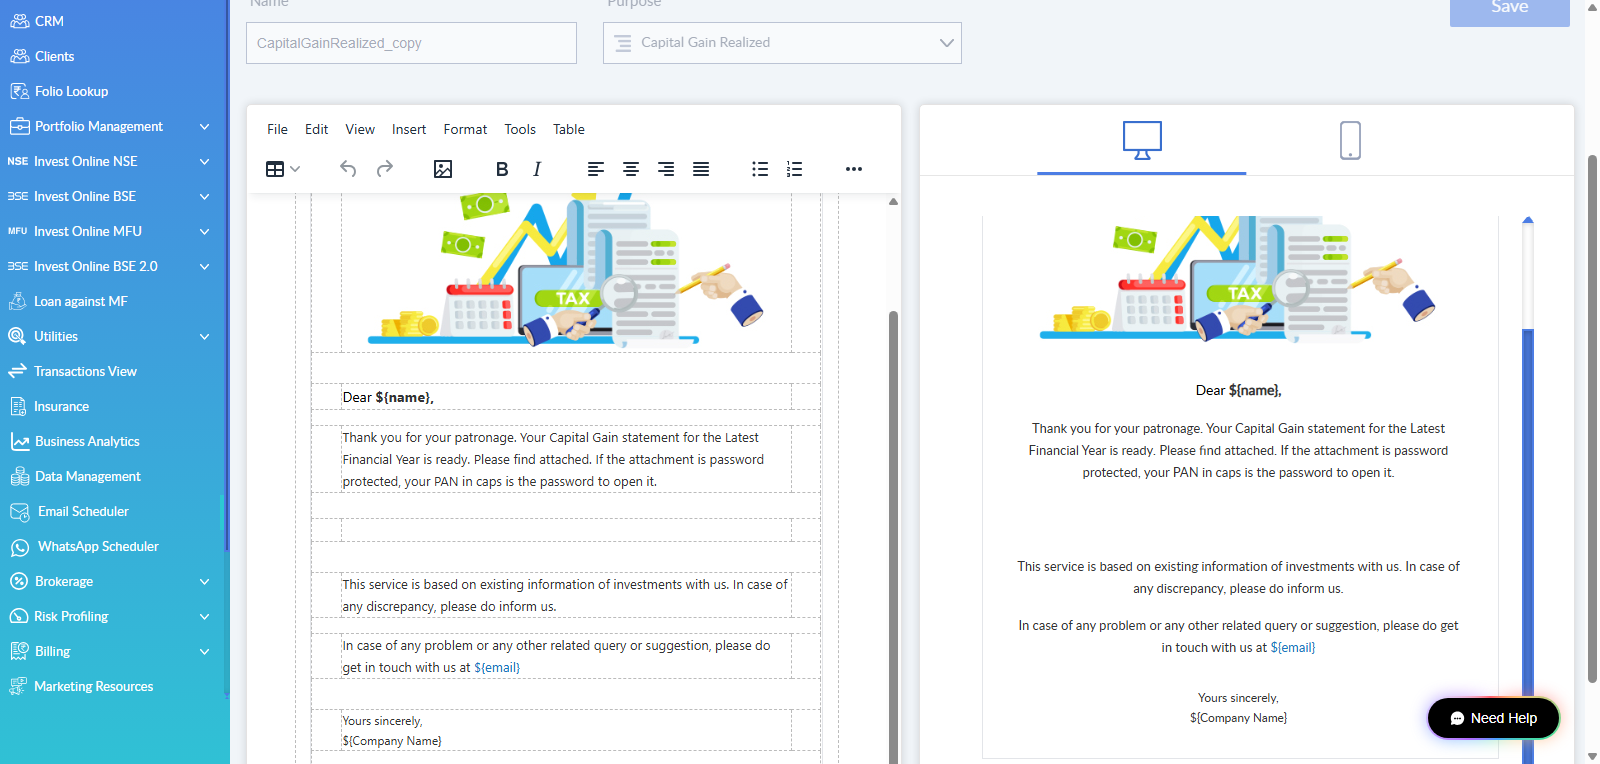
The editor has a menu bar (File, Edit, View, Insert, Format, Tools, Table) and a toolbar for tables, undo and redo, images, bold, italic, alignment and lists. A live preview of the email is shown on the right. The preview can be switched between a desktop view and a mobile view.
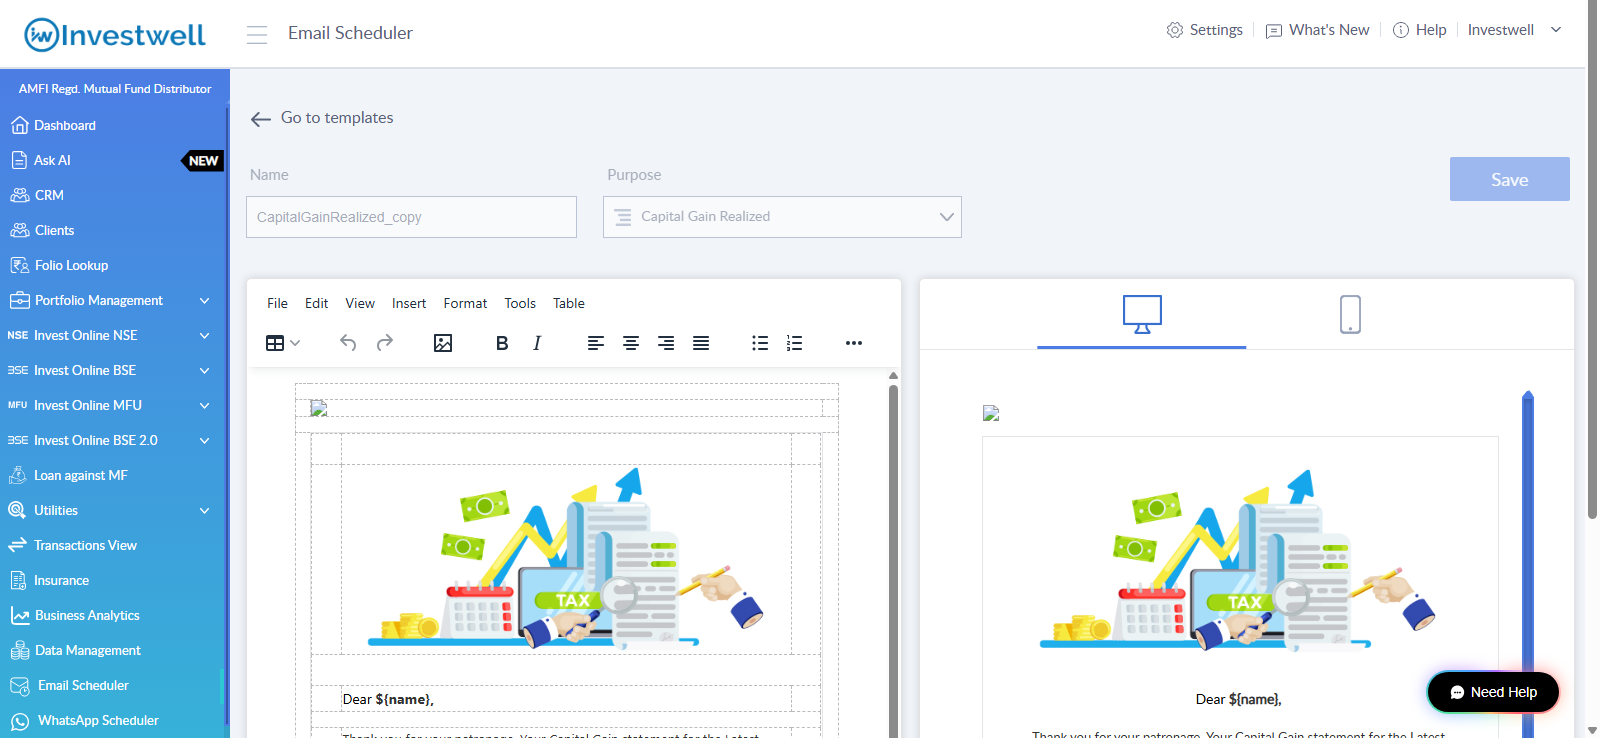
The default templates contain placeholders such as ${name}, ${email} and ${Company Name}. These are filled in automatically for each recipient when the email is sent, so they should be left in place where the client's name or the company details are needed.
Investwell Mint – Email Scheduler Variable Glossary
This documents all variable names used in the Investwell Mint Email Scheduler. Variables are placeholders that are automatically replaced with actual data when an email is sent. They must be used exactly as shown — including capitalisation, brackets, and special characters.
Investwell Mint – Email Scheduler Variable Glossary
This glossary documents all variable names used in the Investwell Mint Email Scheduler. Variables are placeholders that are automatically replaced with actual data when an email is sent. They must be used exactly as shown — including capitalisation, brackets, and special characters.
General Templates
Template-wise Variable Reference
The following tables list the variables used in each email template.
Video KYC
Transaction Statement
Tax Package
SIP Upcoming
Reset Password
Forgot Password
Portfolio Summary
Portfolio Return / Valuation
Login Credentials
Insurance Renewal
FMP Maturity
FD Maturity
Comprehensive Portfolio
Client Registration
Client Bill
Capital Gain Unrealized
Detailed Capital Gain Realized
Capital Gain Realized
Birthday Wishes
Anniversary
Goal Status Report
Risk Profiler
MF Transaction Confirmation
Profit And Loss
Dividend Report
SIP Renewal
Email OTP Verification
Editing a template
In the Templates tab, click the edit icon at the top right of the template card. The same editor opens. Make the changes and click Save. The Go to templates link at the top returns to the template list.
Campaigns
The Campaigns tab lists every scheduled send. Open Email Scheduler from the left menu to land on this tab.
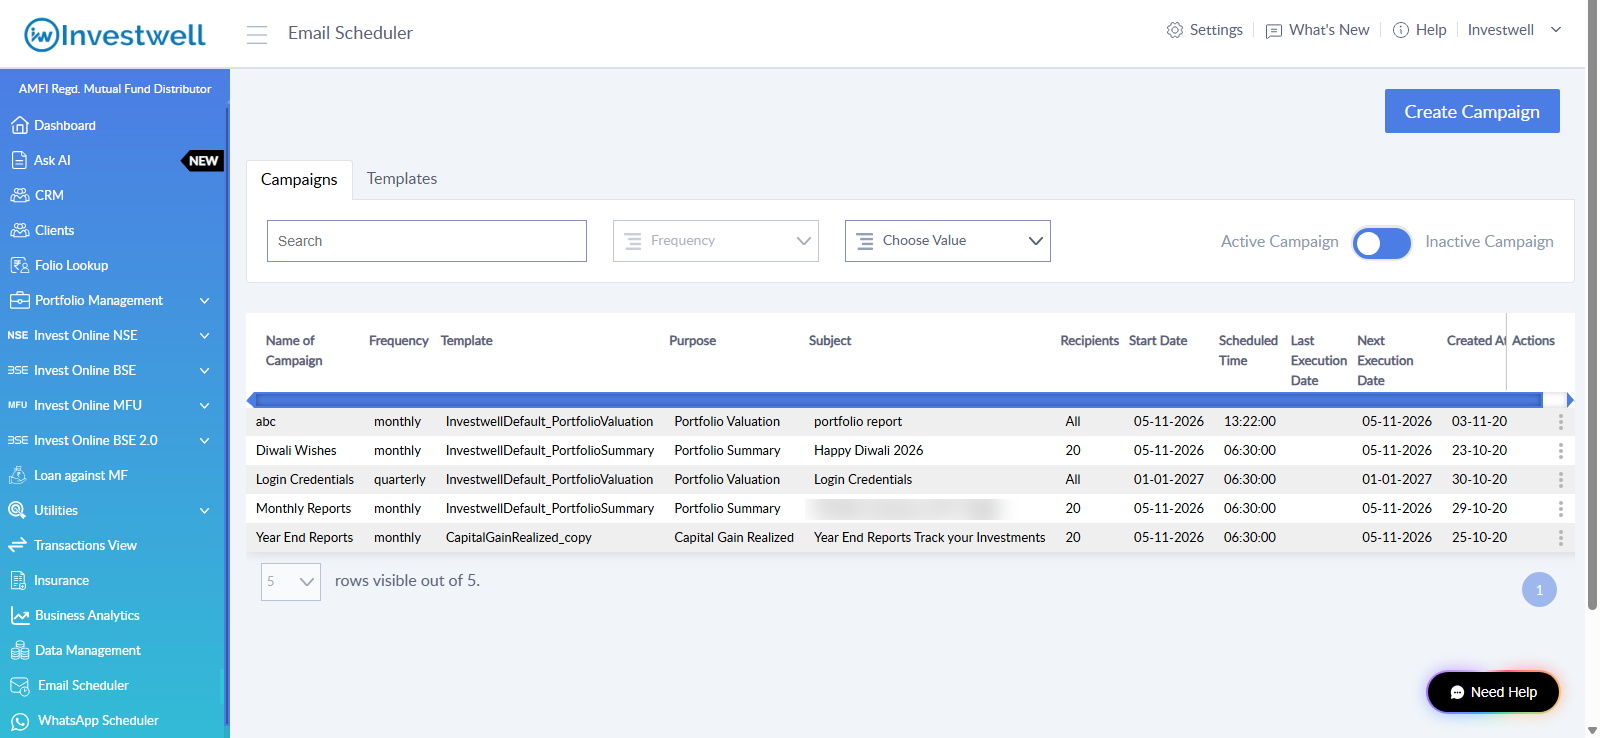
Each campaign shows these details:
- Name of Campaign
- Frequency, such as monthly or quarterly
- Template used
- Purpose, the report or message type
- Subject of the email
- Recipients, either a number of clients or All
- Start Date and Scheduled Time
- Last Execution Date and Next Execution Date
- Created At
- Actions, the three-dot menu at the end of each row.
- For active campaigns, you can edit, pause or delete an ongoing active campaign using the actions given in 3 in the row of each campiagn name.
The list can be narrowed down with the Search box and the Frequency filter, which offers Daily, Weekly, Monthly, Quarterly and Yearly. The toggle at the top right switches between Active Campaign and Inactive Campaign lists. Rows visible at the bottom sets how many campaigns are shown per page.
Creating a campaign
Creating a campaign has two parts: naming it, and then three steps named Choose Users, Choose Report and Schedule.
Name the campaign
- In the Campaigns tab, click Create Campaign.
- Enter the Name for the campaign and the Subject Line for the email, for example "August Newsletter".
- Click Save.
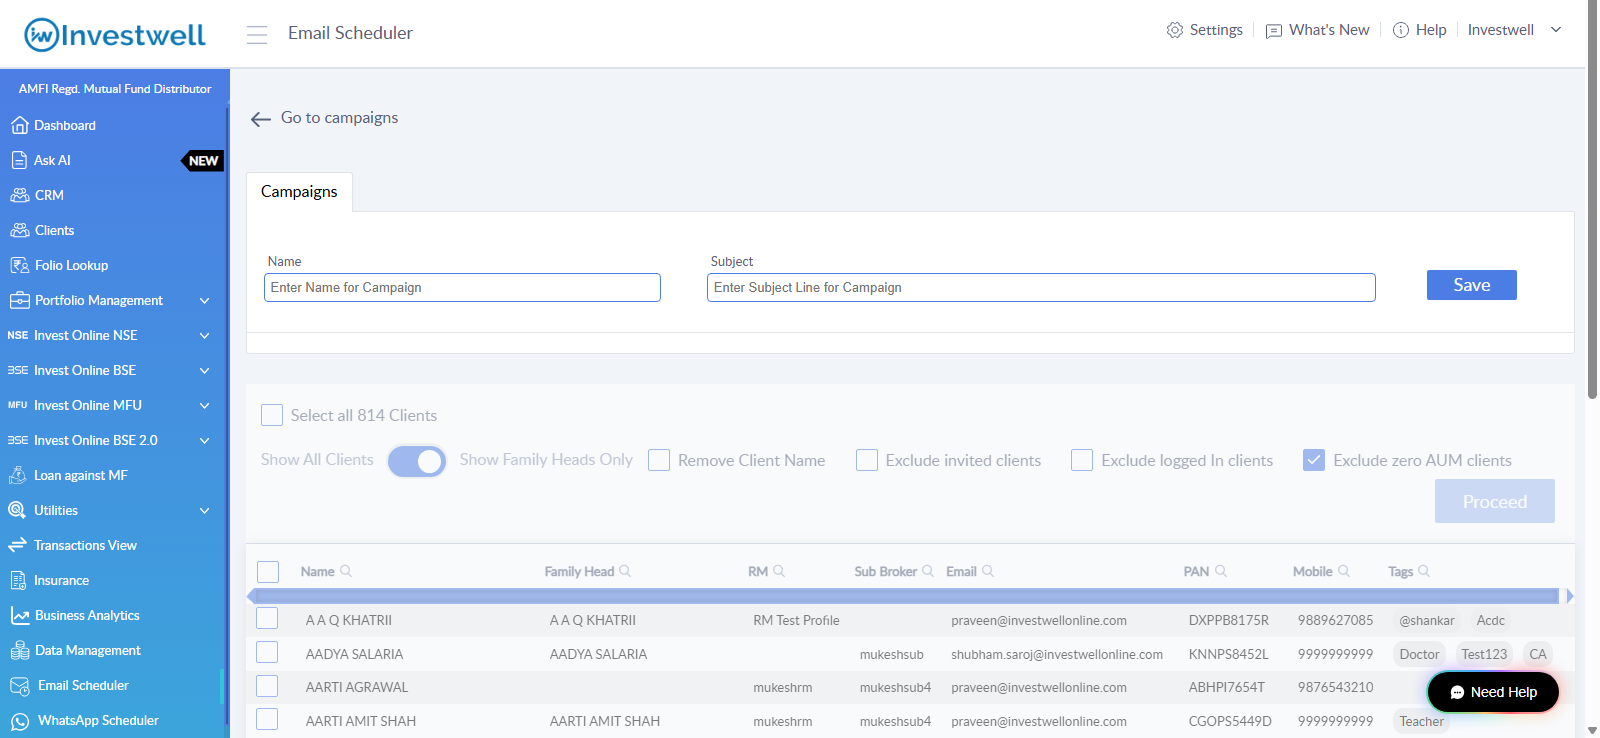
The Go to campaigns link at the top returns to the campaign list.
Step 1: Choose Users
This step selects the clients who will receive the email.
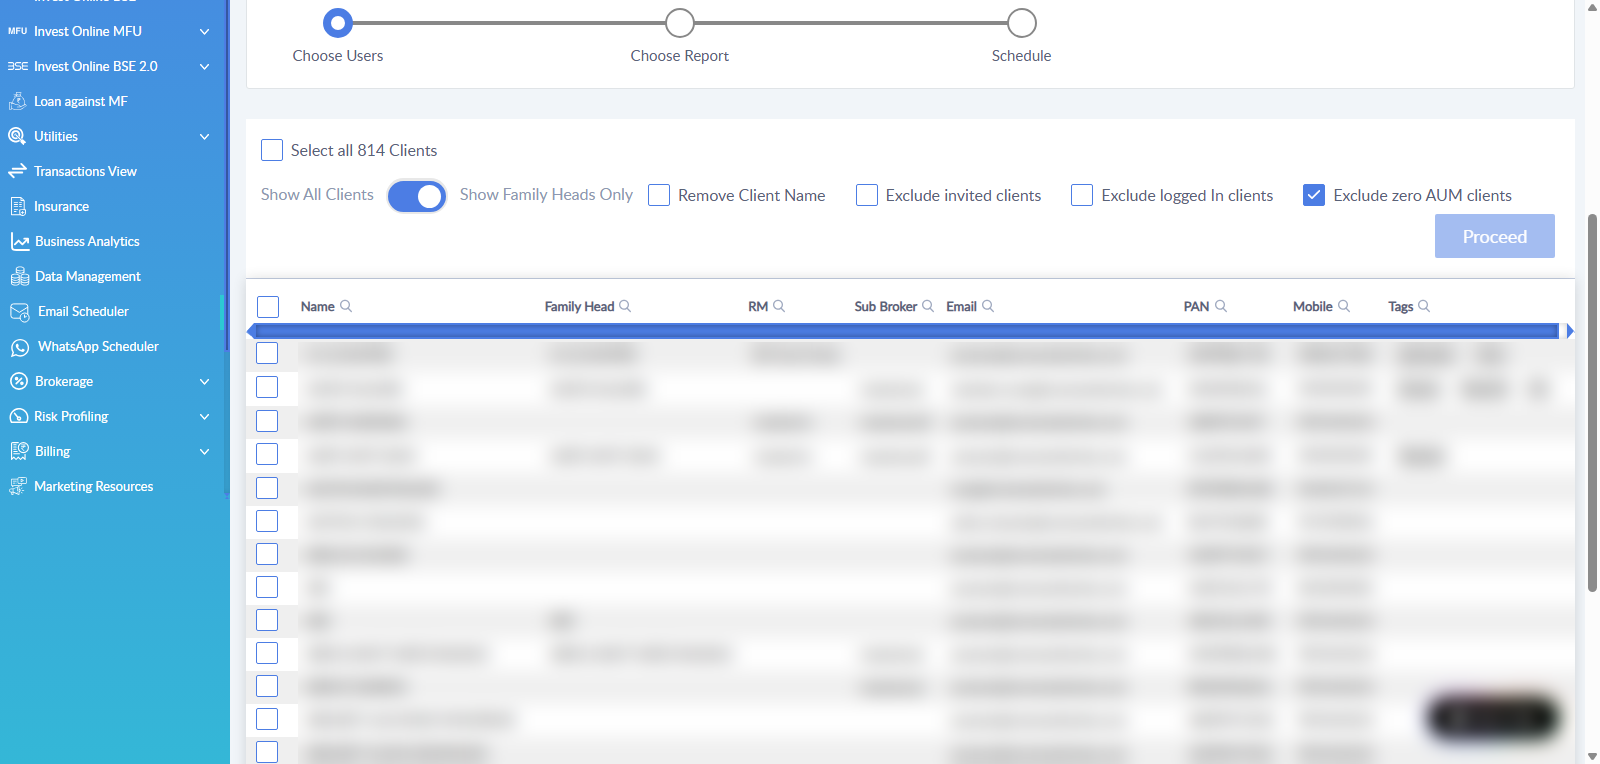
- Select all clients: ticks every client in the list. The total number of clients is shown beside it.
- Show All Clients / Show Family Heads Only: a toggle that limits the list to family heads.
- Remove Client Name, Exclude invited clients, Exclude logged In clients and Exclude zero AUM clients: tick boxes that change which clients are included. Exclude zero AUM clients is ticked by default.
- Client list: shows Name, Family Head, RM, Sub Broker, Email, PAN, Mobile and Tags. The search icons beside the column names, and the filter under RM, narrow the list.
Tick the box beside each client to be included, then click Proceed. The Proceed button becomes active once at least one client is selected.
Step 2: Choose Report
This step selects the report or message to send. The Featured tab shows these options:
- Login Credentials: invitation for client portal account setup.
- Portfolio Valuation: CAGR of currently held investments, showing unrealized gains only.
- Portfolio Summary: XIRR of all folios with realized and unrealized gains.
- Transaction Statement: list of transactions in a given period.
- Capital Gain Realized: taxable capital gain summary in the chosen financial year.
- Detailed Capital Gain Realized: transaction-wise detail of taxable capital gain in the chosen financial year.
- Capital Gain Unrealized: the capital gain if the investments were sold as on today, helpful for planning a redemption.
- Tax Package: capital gain summary PDF, capital gain detailed Excel, transaction statement PDF and Schedule 112A Excel.
- Goal Status Report: progress of all goals for specific users during a set time period.
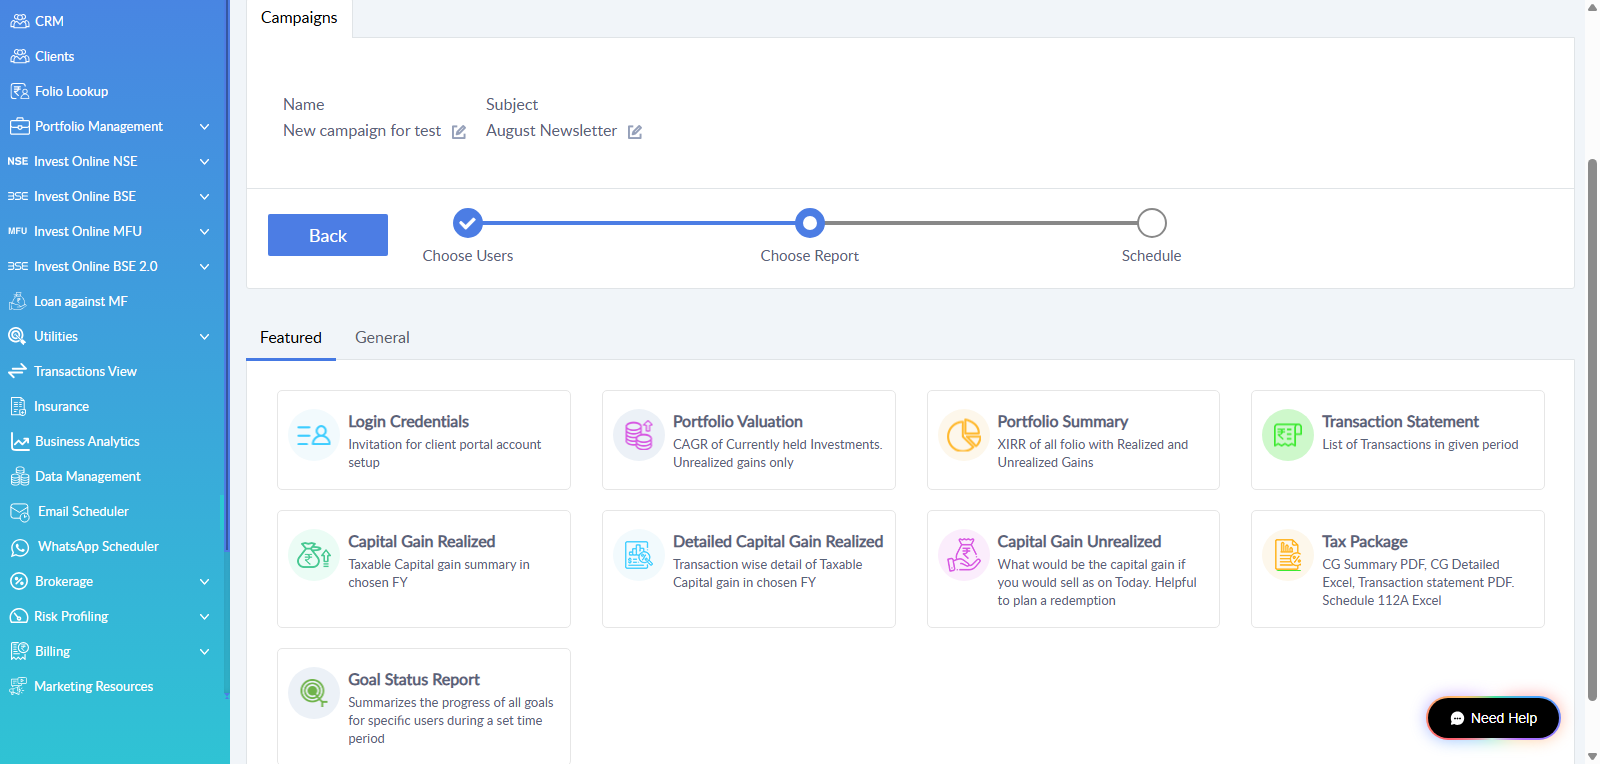
Click the report to use. The Back button returns to the previous step.
Step 3: Schedule
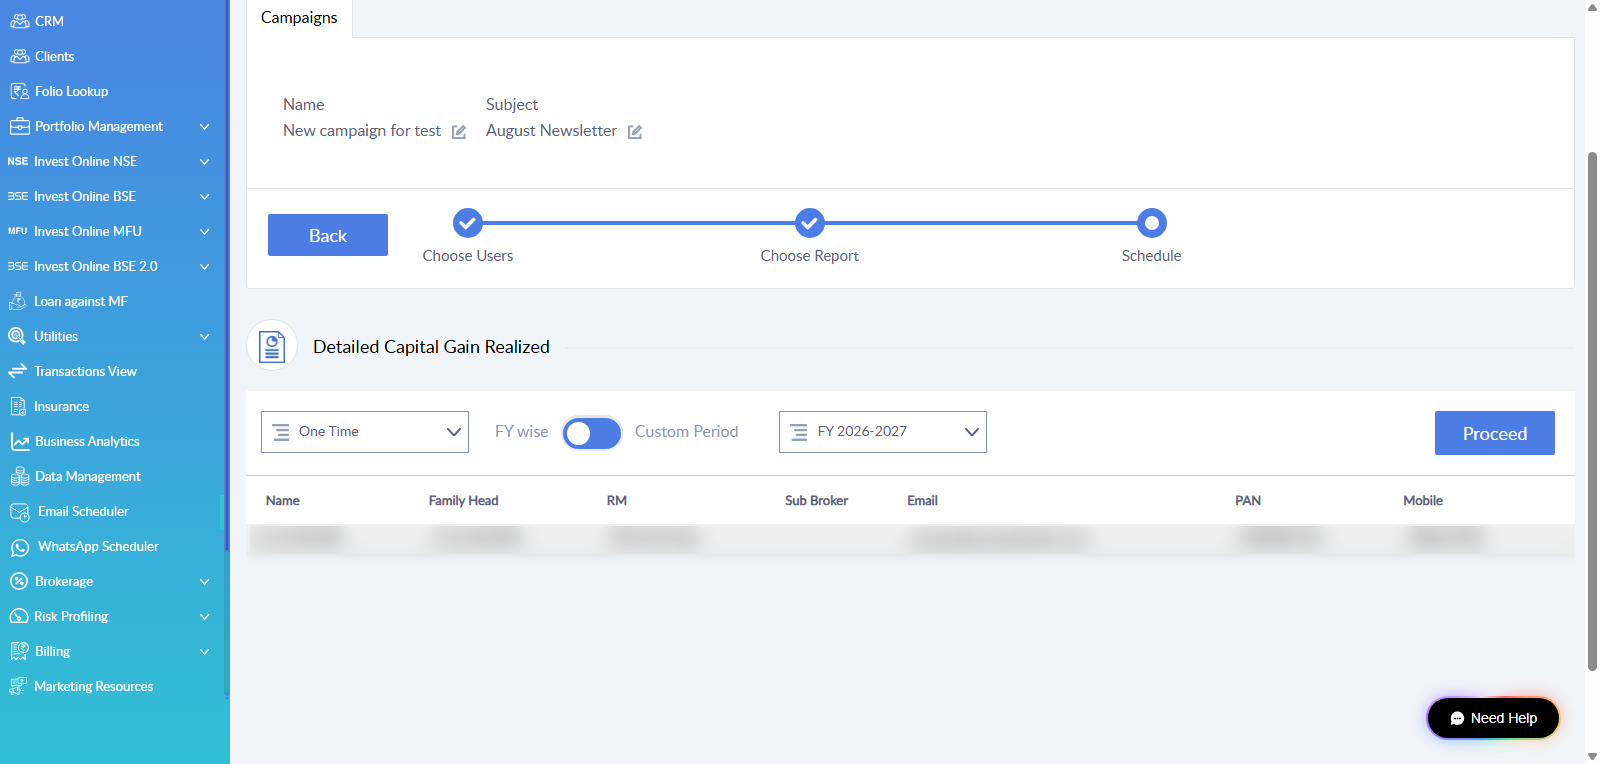
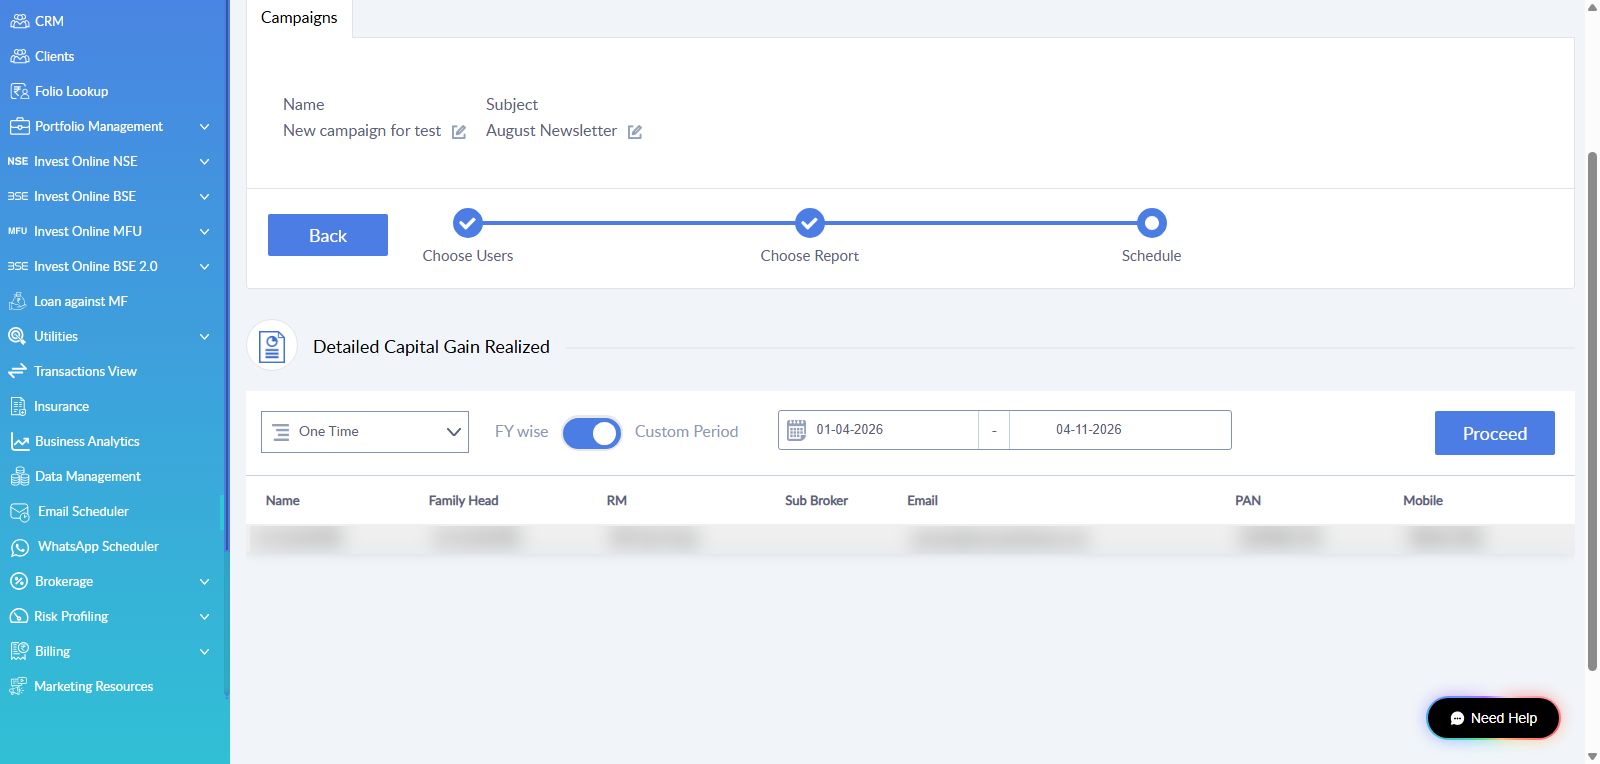
This step sets when and how often the email is sent. The chosen report is shown at the top, with the selected clients listed below.
- In Select Type, choose how often the campaign runs, for example One Time.
- For reports that cover a period, such as Detailed Capital Gain Realized, choose the period. FY wise lets a financial year be picked from the list, for example FY 2026-2027. Custom Period lets a start and end date be entered.
- Click Proceed.
A "Request Successful" message confirms that the campaign was created, and it then appears in the Campaigns list.
Checking sent emails
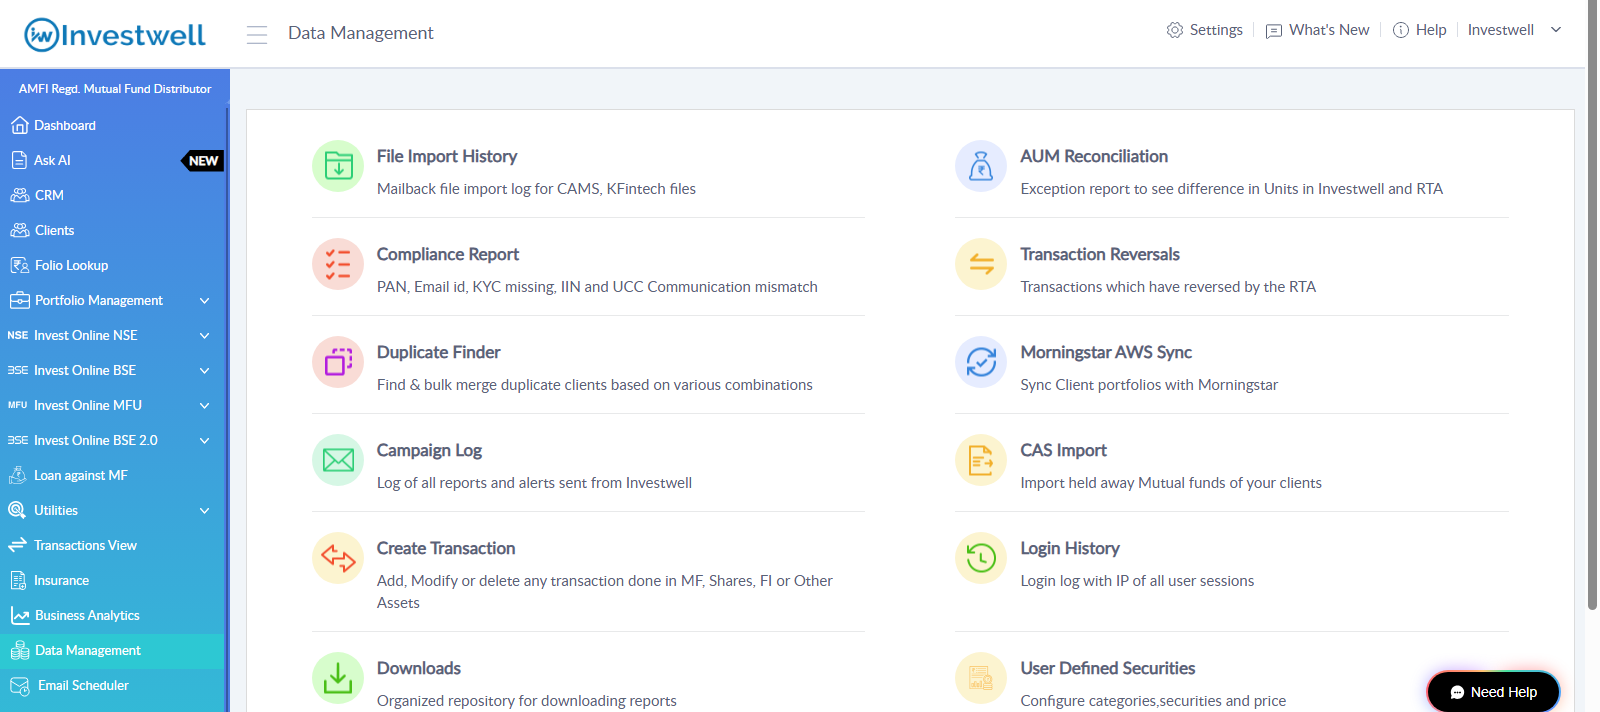
Emails sent from Investwell are recorded in the Campaign Log, which holds a log of all reports and alerts sent.
- In the left menu, open Data Management.
- Select Campaign Log.
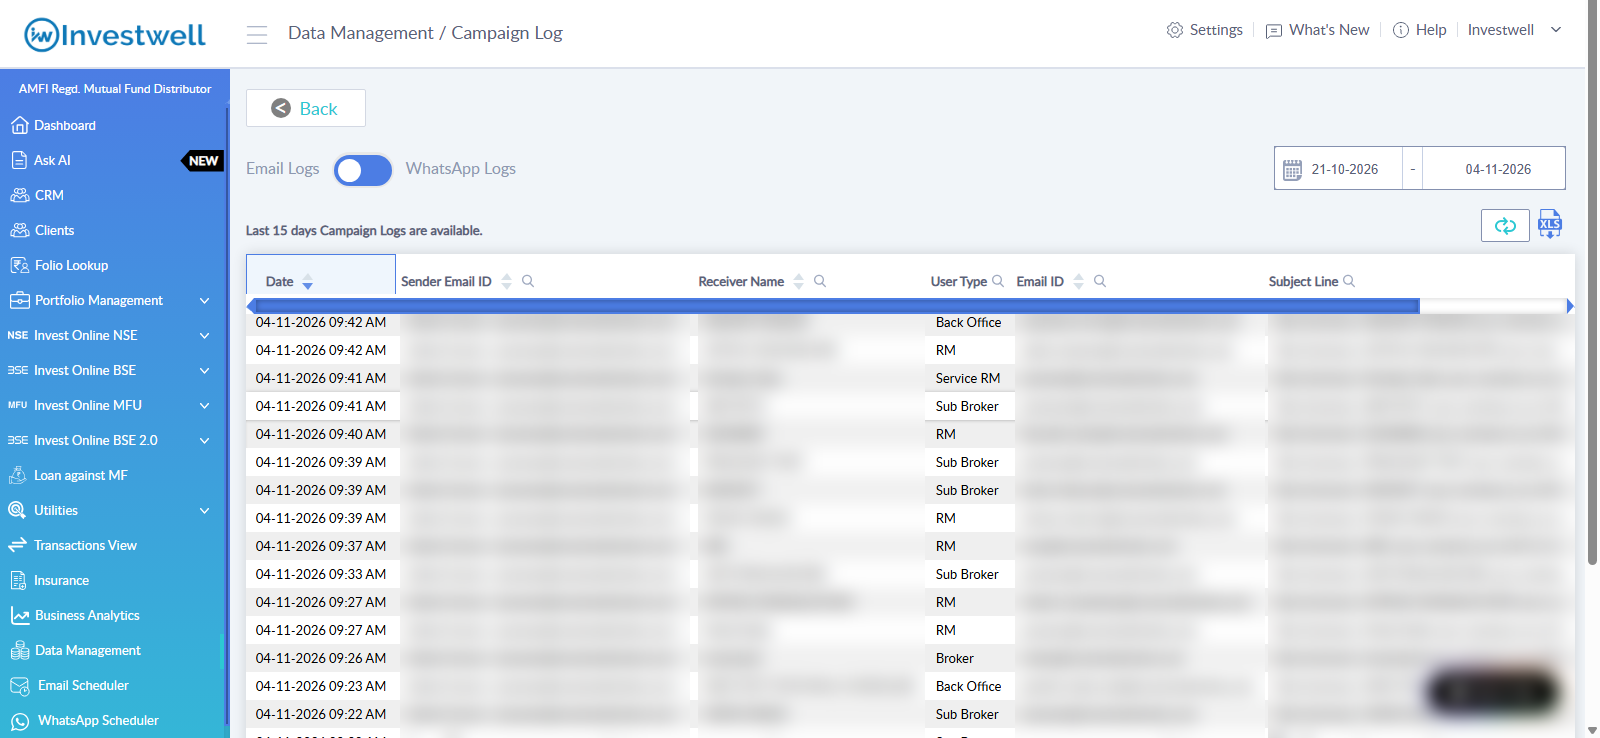
- Keep the toggle on Email Logs, or switch it to WhatsApp Logs.
- Set the date range at the top right.
The Email Logs view shows the date and time, sender, receiver name, user type, email address, subject line and status of each email. The refresh button reloads the log and the XLS button downloads it as an Excel file. Campaign logs are available for the last 15 days only.
Frequently asked questions
Where is Email Scheduler?
In the left menu of Investwell. It has a Campaigns tab and a Templates tab.
What is the difference between a template and a campaign?
A template is the layout and wording of an email. A campaign is a scheduled send that uses a template, a report and a list of clients.
How are emails sent from Investwell on a company's behalf?
Through the email account saved under the email settings page, in the Email tab. The account can be a Gmail or Google Workspace account, linked with Sign in with Google, or an SMTP mail server. With SMTP, Investwell sends the request to the SMTP server, and delivery is the responsibility of the SMTP provider.
How is a new template created?
In the Templates tab, click Create Template, enter a name, select a purpose, write the email in the editor and click Save.
Can a default template be changed?
The edit icon on a template card opens the editor. Custom templates, such as copies of a default template, can be edited the same way.
What do ${name} and ${email} in a template mean?
These are placeholders. They are replaced with each recipient's details when the email is sent.
How is a campaign created?
In the Campaigns tab, click Create Campaign, enter the name and subject, and click Save. Then choose the users, choose the report and set the schedule, clicking Proceed after each step.
Which reports can a campaign send?
Login Credentials, Portfolio Valuation, Portfolio Summary, Transaction Statement, Capital Gain Realized, Detailed Capital Gain Realized, Capital Gain Unrealized, Tax Package and Goal Status Report are listed on the Featured tab.
Why is the Proceed button not active when choosing users?
At least one client must be selected with the tick box before Proceed becomes active.
How can inactive campaigns be seen?
Use the Active Campaign / Inactive Campaign toggle at the top right of the Campaigns tab.
Where can it be checked whether an email was sent?
In Data Management, under Campaign Log, in Email Logs. Logs for the last 15 days are available.
What is the Tax Package?
A Featured report in Email Scheduler that sends four files together: a capital gain summary PDF, a capital gain detailed Excel file, a transaction statement PDF and a Schedule 112A Excel file.
Where is the Tax Package found?
In Email Scheduler, when creating a campaign. In the Choose Report step, it is on the Featured tab.
What does the Schedule 112A file contain?
Schedule 112A is the part of the income tax return that reports long-term capital gains on listed equity shares and equity-oriented mutual fund units. The Excel file in the Tax Package is provided for this purpose.
How is the Tax Package sent to a client?
Create a campaign in Email Scheduler, choose the clients, choose Tax Package as the report, set the schedule and click Proceed.
How is it checked that the Tax Package was sent?
In Data Management, open Campaign Log and view Email Logs for the date range. Logs for the last 15 days are available.
What is the difference between the Tax Package and the Capital Gain Realized report?
Capital Gain Realized is a single report with the taxable capital gain summary for the chosen financial year. The Tax Package bundles the capital gain summary and detailed reports with the transaction statement and the Schedule 112A file.
Was this article helpful?
That’s Great!
Thank you for your feedback
Sorry! We couldn't be helpful
Thank you for your feedback
Feedback sent
We appreciate your effort and will try to fix the article