INTRODUCTION
The Bulk Upload option on the PMS Credentials page lets you update the current value of your clients' PMS accounts yourself. Download the daily AUM file from the PMS portal and upload it as it is. The current value of every account in the file is updated for every date the file covers.
Path: Settings → PMS Credentials → Bulk Upload
TABLE OF CONTENTS
- Purpose
- Before You Start
- Downloading the File from the PMS Portal
- Uploading the File
- Viewing Rejected Records
- What Gets Updated
- Things to Keep in Mind
Purpose
- Fill in backdated values: update current values that were missed because of an error on the PMS portal.
- Catch up when sync isn't working: update current values for all clients of a PMS in one go.
- Stay in control: upload whenever you need, for any date range.
Before You Start
- The PMS must be added in your system.
- Every account in the file must also be added in your system. Values for accounts that are not added will be rejected.
Downloading the File from the PMS Portal
This section applies to all PMS whose portals run on Wealth Spectrum. The example below uses the Alchemy portal.
Path: PMS Portal → Queries → Clientwise Daily AUM
Steps to Download the File
- Log in to the PMS portal and click Queries in the left menu.
- Under Query List, click Clientwise Daily AUM.
- Set Scope to Intermediary. Your intermediary name appears in the next field.
- Select the From Date and To Date for the period you want to update.
- Keep Output set to Excel and click Execute to download the file.
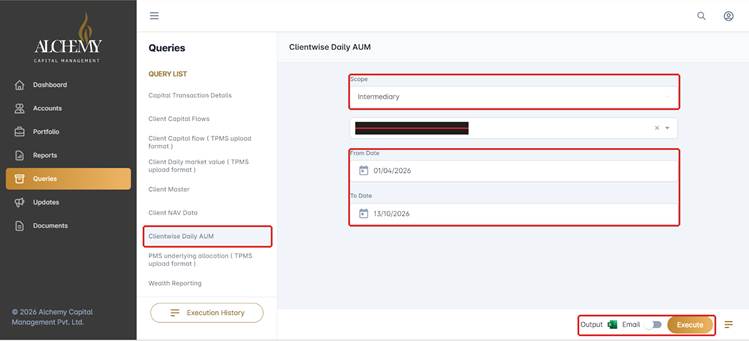
Figure 1: Clientwise Daily AUM query on the PMS portal (Alchemy)
Note: Do not edit, rename or re-save the file. Upload it exactly as it was downloaded.
Uploading the File
Path: Settings → PMS Credentials
Steps to Upload the File
- Go to Settings and open PMS Credentials.
- Find the PMS in the list and click the upload icon in the Bulk Upload column against it.
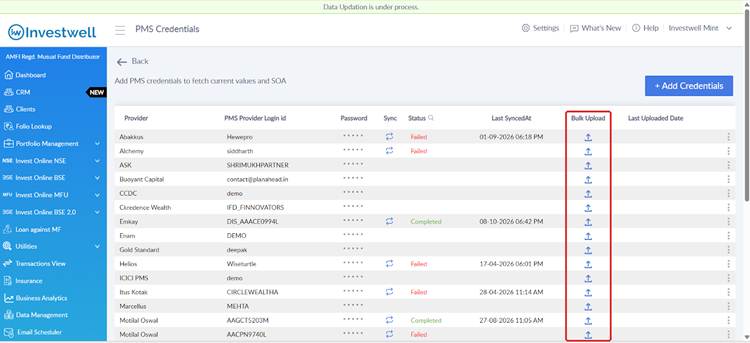
Figure 2: PMS Credentials page with the new Bulk Upload and Last Uploaded Date columns
- The Bulk Upload window opens with the PMS already selected.
- Drag the file into the upload area, or click Choose File and select it.
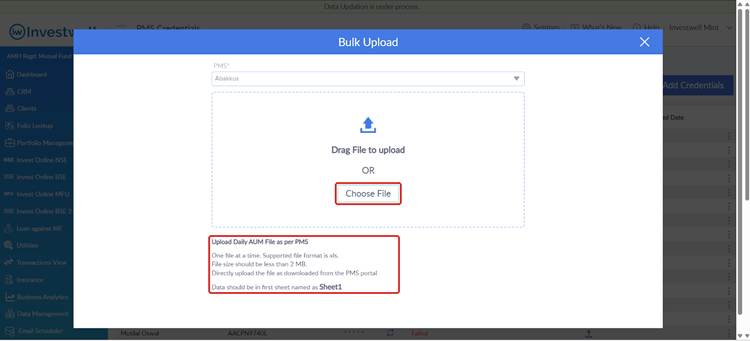
Figure 3: Bulk Upload window with the PMS pre-selected
Notes
- Upload one file at a time.
- Supported file format: .xls, xlsx
- File size must be less than 2 MB.
- The data must be in the first sheet, named Sheet1. Files downloaded from the PMS portal already follow this format.
Once the file is processed, the Last Uploaded Date column on the PMS Credentials page shows the date of your latest upload for that PMS.
Viewing Rejected Records
If any records in your file could not be updated, you can see them in File Import History, along with the reason for each rejection.
Path: Data Management → File Import History
- Total Records - the number of records in the file.
- Rejected Records - the number of records that were not updated. Click the number to see the rejected records and the reason.
- Download - download the file you uploaded.
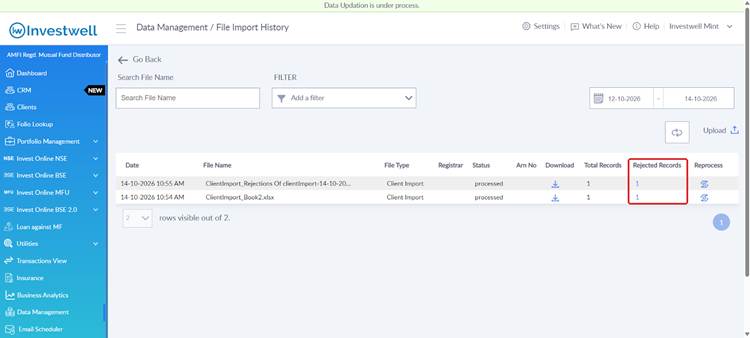
Figure 4: File Import History showing total and rejected records
The most common reason for a rejection is that the account is not added in your system. Add the account, then upload the file again. Or you can re process the same file from the Rejected records row as well.
What Gets Updated
- The current value of every account in the file, for every date in the file's date range.
- Existing values for those dates are replaced with the values from the file.
- Example: if you upload a file for 2 Sep 2026 – 14 Oct 2026, values for all accounts in the file are updated for every date in that range, even if a value was already present.
Things to Keep in Mind
- This is a manual process. No sample sheet is needed. Download the file from the PMS portal and upload it as it is.
- Make sure the PMS and all its accounts are added before uploading.
- Only the Current AUM file type is supported right now. Support for SOA upload is coming soon in the same window.
- Values in the file replace any existing values for the same dates, so check the date range before you upload.
Was this article helpful?
That’s Great!
Thank you for your feedback
Sorry! We couldn't be helpful
Thank you for your feedback
Feedback sent
We appreciate your effort and will try to fix the article