
Clients Menu: User Guide
On this page
- Use case 1: Add many new clients
- Use case 2: Set the portfolio review frequency for all clients
- Use case 3: Assign an RM or Sub Broker to many clients
- Use case 4: Group family members under a family head
- Use case 5: Update contact and address details
- Use case 6: Switch emails off for selected clients
- Use case 7: Maintain birthday and anniversary wishes
- Use case 8: Tag and rate your clients
- Use case 9: Record the client's financial profile
- Use case 10: Set billing preferences
- Use case 11: Add demat, equity and NPS details
- Use case 12: Complete KYC and compliance details
- Use case 13: Add overseas (NRI) address details
- Use case 14: Change a client's User Name
- How to assign a Sub Broker to a client
- How to merge a client
- Fields you can view on screen
- How to download the Excel file
- Fields that are available only in the Excel download
- Fields available both on screen and in the download
- Common uses of the Excel download
The Clients menu is where you view, create, search, segment and manage all your investors. This guide explains the page layout and the most common tasks, such as creating a client, assigning a Sub Broker, uploading clients in bulk and using bulk actions.
1. Understanding the Clients page
Click Clients in the left menu to open the page. Client names, PAN numbers and RM names in the screenshots in this guide are blurred for privacy.
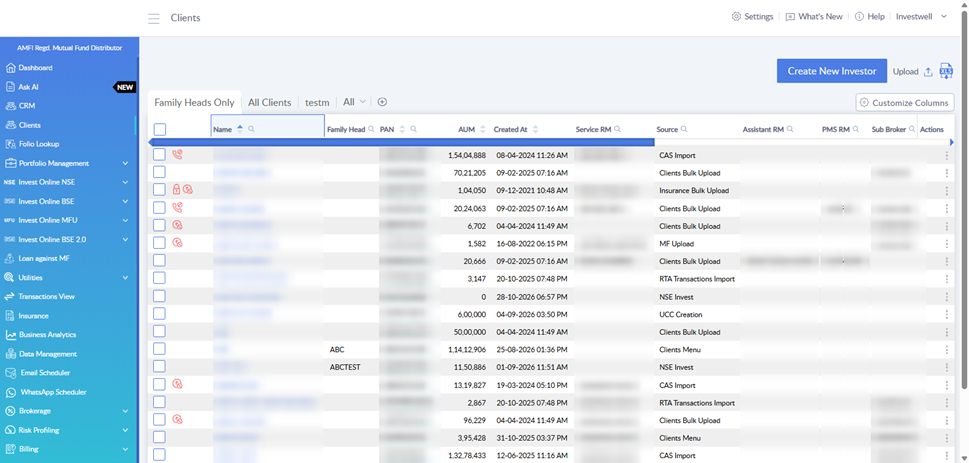
The page has the following parts:
- Tabs: Family Heads Only, All Clients and any custom segments you have created. The + icon next to the tabs adds a new segment.
- Create New Investor: adds a single client manually.
- Upload: adds many clients together from an Excel (.xls) file. Use sample file attached to see the format in which client data can be uploaded.
- Customize Columns: lets you choose which columns appear in the table.
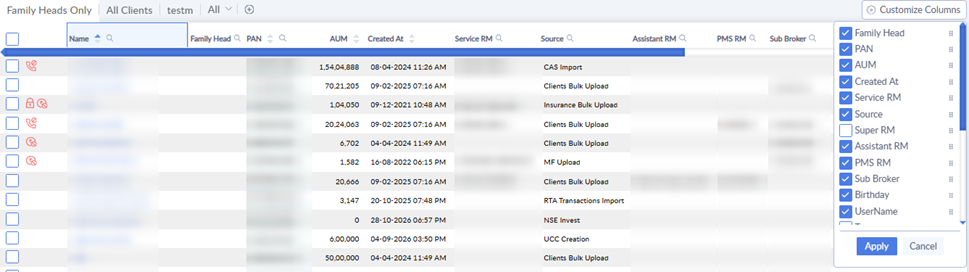
- Client table: shows columns such as Name, Family Head, PAN, AUM, Created At, Service RM, Source, Assistant RM, PMS RM, Sub Broker, Birthday and UserName. Name, AUM and Created At can be sorted. Name, PAN, Service RM, Source, Assistant RM, PMS RM and Sub Broker have a search icon for filtering.
These filters can be used to find inactive clients (Clients which have zero AUM) and also filter out clients corresponding to one particular sub broker or RM. Using the excel export of clients multiple filters can be applied in the downloaded data to get the filtered out list of clients based on these parameters. - Checkboxes: at the start of every row, used to select clients for bulk actions.
- Actions (three dots): at the end of every row, for actions on a single client.
The Source column shows how a client was added, for example CAS Import, Clients Bulk Upload, Clients Menu, NSE Invest, UCC Creation, MF Upload, RTA Transactions Import or Insurance Bulk Upload.
2. How to create a new client
- Go to Clients.
- Click Create New Investor.
- Fill in the Personal Information section. Name and User Name are required.
- Fill in the Residential Address section.
- Fill in the optional details at the bottom of the form, if needed.
- Save the client. Click Go Back at the top of the form to return to the list without saving.
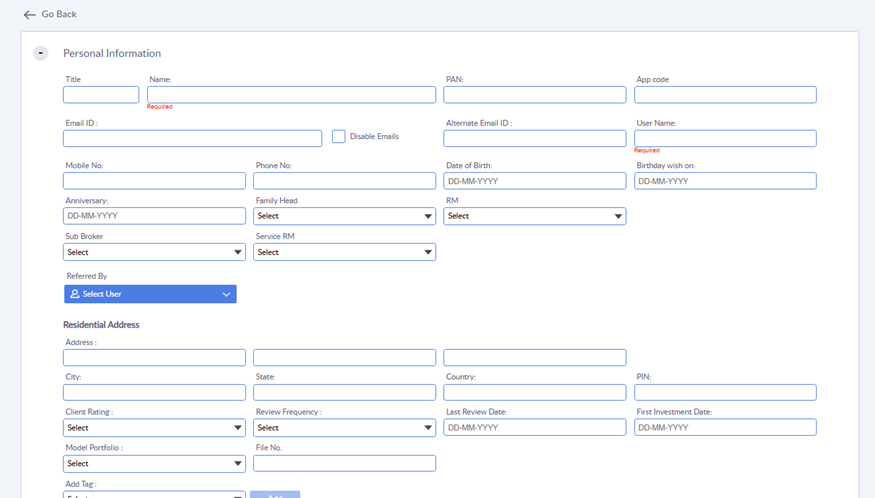
Fields available in the form
- Personal Information: Title, Name, PAN, App code, Email ID, Alternate Email ID, User Name, Mobile No, Phone No, Date of Birth, Birthday wish on, Anniversary.
- Residential Address: Address, City, State, Country, PIN.
- Other details: Client Rating, Review Frequency, Last Review Date, First Investment Date, Model Portfolio, File No, Add Tag (tags added in the tags master in settings shown to the admin user are visible here).
Tick Disable Emails next to the Email ID field if the client should not receive system emails.
3. How to upload clients in bulk
- On the Clients page, click Upload at the top right.
- In the Client Bulk Upload window, click Download Sample File and fill in your client data in that format.
- Drag the file into the box, or click Choose File and select it.
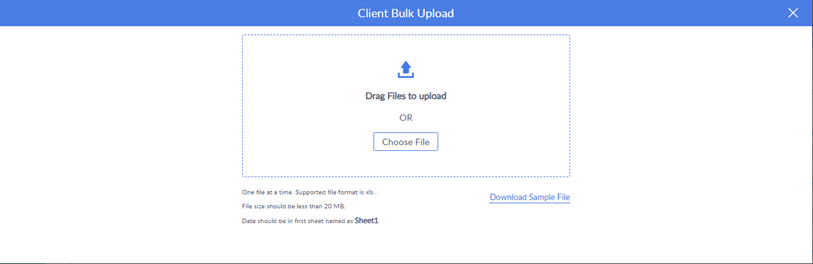
File rules
- Upload one file at a time.
- The supported file format is .xls.
- The file size must be less than 20 MB.
- The data must be in the first sheet, named Sheet1.
4. Bulk upload: preparing the file
Always start from the sample file. Click Upload on the Clients page, then click Download Sample File. The sample file has two sheets:
- Sheet 1: the data sheet, with 75 column headings and one row per client. This is the only sheet the system reads during upload.
- Annexure: a reference sheet that lists, for every column, whether it is mandatory, whether it can be updated through bulk upload, a sample value, the data type and the accepted values. It is not uploaded.
Important rules
- Name, PAN and User Name are mandatory. They cannot be left blank. All other columns are optional.
- Name and PAN cannot be changed for an existing client through bulk upload. If you change the PAN of an existing client and upload the row with all the client details, the system creates a new client record instead of updating the old one.
- User Name can be updated through bulk upload, but a blank User Name is not accepted.
- Do not rename or delete the column headings, and keep the data in Sheet 1. Keep the sheet name exactly as it is in the sample file.
- Dates must be in date format, for example 01-01-1962 (DD-MM-YYYY).
- Special characters are not allowed in Name and User Name.
- Where a column says "Check Master from Edit Client profile" in the Annexure (for example Client Rating, Tax Status, Mode of Holding, Occupation, Nationality), enter a value exactly as it appears in the matching dropdown in the client's Edit Profile screen.
- One file at a time, .xls format only, and less than 20 MB.
Before you upload
- Keep a copy of the file you are uploading.
- Try the file with a few rows first. Check those clients in the Clients list, and then upload the full file.
- Fill only the columns you want to set for that upload. Use the same Name, PAN and User Name that the client already has in the Clients list.
5. Bulk upload use cases
Bulk upload is the quickest way to add or update client details for many clients at once. For every use case below, each row must contain the client's Name, PAN and User Name, along with the columns listed for that use case.
Use case 1: Add many new clients
Use this when you are moving your client list from another system or onboarding a large group of investors.
- Fill Name, PAN and User Name for each new client. Add Title, Email, Mobile, Date of Birth and Address if available.
- Use Migration Created Date to record the date the client was created in your earlier system. This must be in date format.
- Each new PAN creates a new client record.
Use case 2: Set the portfolio review frequency for all clients
Use this when you want every client (or a group of clients) to be reviewed on a fixed schedule.
- Fill the Review Frequency column. The Annexure lists M for Monthly, Q for Quarterly, H for Half Yearly and Y for Yearly. Use the same format for every row.
- Fill Last Review Date if you want to record when each client was last reviewed.
Example: to put all clients on a quarterly review, enter Q in Review Frequency for every row.
Use case 3: Assign an RM or Sub Broker to many clients
Use this when you are reorganising your team or handing a set of clients to a new relationship manager or sub broker.
- Fill Level Name To Be Updated with the level of the person being assigned. The sample file uses "Relationship Manager".
- Fill Code To Be Updated with the user business code of that RM or Sub Broker. The sample file uses 1234.
The same assignment can also be done from the Clients page using the bulk actions Set RM and Set Sub Broker (see section 9). Use bulk upload when the assignment differs from client to client, because each row can have its own RM or Sub Broker.
Use case 4: Group family members under a family head
Use this to link many clients to their family heads in one go.
- Fill Family Head Username with the user name of the family head, for each family member's row. The family head must already exist in the system.
Use case 5: Update contact and address details
Use this to correct or refresh contact details, for example after a data clean-up.
- Contact: Email, Secondary Email, Mobile, Landline.
- Address: Address1, Address2, Address3, City, State, Country, Pincode.
Use case 6: Switch emails off for selected clients
- Fill Disable Emails with Y to stop emails to that client, or N to keep them on.
Use case 7: Maintain birthday and anniversary wishes
- Fill Date of Birth, Birthday Wish (the date on which the client should be wished), Anniversary and, where applicable, Date of Death.
- All four columns must be in date format.
Use case 8: Tag and rate your clients
Use this to segment clients by type so that you can filter them later.
- Tags: enter one or more tags in a single cell, for example Doctor, CORP, Test123.
- Client Rating: enter a rating that exists in the Client Rating dropdown of the Edit Profile screen.
- File No and App Code: use these to store your own file or reference number for each client.
Use case 9: Record the client's financial profile
- Annual Income, Gross Annual Income (for example 1-5 Lacs), Net Worth and Net Worth Date, Profession.
- Target SIP Amount and Target ELSS Amount.
- Target Equity Allocation (%) and Target Debt Allocation (%). The two must add up to 100, for example 50 and 50.
- Remarks, for any note about the client, for example "only MF".
Use case 10: Set billing preferences
- Preferred Billing Mode: AUM Based Fee or Flat Fee.
- Bill State: select the state from the same list used in the system.
- Bill GSTIN: the client's GST number, if the client is billed with GST.
Use case 11: Add demat, equity and NPS details
- Equity Code 1: the client's code from the share broker. It is used to import contract notes in bulk.
- Depository, DP Name and DP ID: the client's demat details. The Annexure lists NSDL and CDSL as depository values.
- NPS Account No: the 12-digit NPS account number.
Use case 12: Complete KYC and compliance details
Use this to fill in the details that are needed for investment accounts.
- Tax Status, Mode of Holding, Occupation, Nationality, Gender, Place of Birth, Country of Birth.
- Father Name, Mother Name, CKYC number.
- Joint Holder 1 and Joint Holder 2 names, for joint accounts.
- Guardian Name and Guardian PAN, for clients below 18 years.
- Attorney Name and Attorney PAN, where there is a power of attorney.
- For Individual and For Non Individual (PEP declarations). The sample file uses Not Applicable.
Use case 13: Add overseas (NRI) address details
- Fill OS Address1, OS Address2, OS Address3, Overseas City, Overseas State, Overseas Country, Overseas Pincode, Overseas Phone and Overseas Mobile.
Use case 14: Change a client's User Name
- Enter the new value in the User Name column. Name and PAN stay the same so that the system recognises the client. A blank User Name is not accepted.
6. Row actions: Edit Profile, Go to Dashboard and Send Invitation
Click the three dots at the end of a client's row to see the actions for that client.

- Edit Profile: update the client's details, including Family Head, RM, Sub Broker and Service RM.
- Go to Dashboard: open the client's dashboard.
- Send Invitation: send the client an invitation to log in via email scheduler
7. How to create a client segment
A segment is a saved filter that appears as a tab on the Clients page.
- Click the + icon next to the tabs.
- Type a name in Enter Client Segment Name.
- Select an Attribute, for example Address, Email, Equity Code 1, File Number, Mobile, Name or PAN. (Other attributes like RM, Tag, AUM, Sub broker etc, will be added soon)
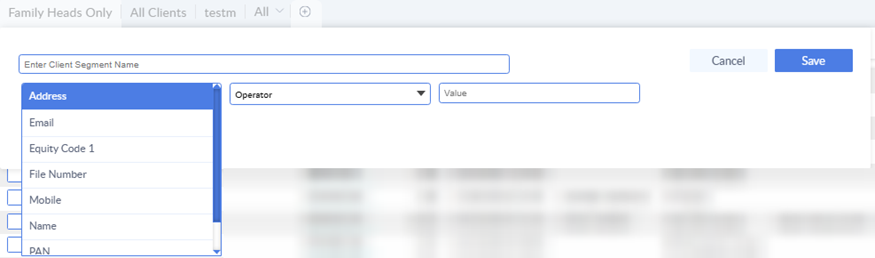
- Select an Operator: Like or Starts With. (other operators like is, >, =,< will be added soon)
- Type the Value to match.
- To add more conditions, click AND (all conditions must match) or OR (any condition can match).
- Click Save. The segment now appears as a tab.

8. How to customize columns
- On the Clients page, click Customize Columns.
- Tick the columns you want to see and untick the ones you do not.
- Drag the handle next to a column name to change its position.
- Click Apply. Click Cancel to discard your changes.
9. Bulk actions
Bulk actions let you update many clients at once. Select the clients using the checkboxes at the start of each row (use the checkbox in the header row to select all), and then choose the action you need.
Hierarchy and Sub Broker
- Set Family Head: links the selected clients to a family head.
- Reset Hierarchy: removes the broker users assigned to the client and maps it to admin broker user.
- Set Sub Broker: assigns the selected clients to a Sub Broker.
Relationship Managers
- Set RM: assigns an RM to the selected clients.
- Set Service RM / Unassign Service RM: assigns or removes the Service RM.
- Set Assistant RM / Unassign Assistant RM: assigns or removes the Assistant RM.
- Set PMS RM / Unassign PMS RM: assigns or removes the PMS RM.
Lock
- Set Lock: locks the selected clients' personal information. This action can be used in order to lock that client’s personal information from changing (like email, mobile) even when updated data is received from transaction files or RTA.
- Set Unlock: unlocks them.
Transactions
- Enable Online Transaction / Disable Online Transaction: allows or blocks online transactions.
- Enable Redemption / Disable Redemption: allows or blocks redemptions.
Communication
- Enable Communication / Disable Communication: turns communication (such as emails) on or off for the selected clients.
Login access
- Suspend Login: stops the selected clients from logging in.
- Reactivate Login: restores their login access.
Profile settings
- Set Model: assigns a model portfolio.
- Add Tag: adds a tag to the selected clients.
- Set Client Rating: sets the client rating.
- Set Portfolio Review Frequency: sets how often the portfolio is reviewed.
How to assign a Sub Broker to a client
For one client
- Go to Clients and click the three dots at the end of the client's row.
- Click Edit Profile.
- Select the Sub Broker from the Sub Broker dropdown and save.
For many clients
- Select the clients using the checkboxes.
- Choose the bulk action Set Sub Broker.
- Select the Sub Broker and confirm.
How to merge a client
In order to merge multiple clients, select the clients to be merged and in the actions dropdown shown on the top, select merge duplicates, then choose which member should the remaining clients be merged into and click on apply
10. How to view client fields: on screen and Excel download
The Clients table on screen shows only some of a client's fields. The remaining fields, such as First Investment Date or Last Login Date, are not available on screen. To see these for all clients, download the client list to Excel.
Fields you can view on screen
Name is always shown. Use Customize Columns (see section 8) to show or hide these columns:
- Family Head, PAN, AUM, Created At, Source, UserName
- Birthday (this is the client's date of birth)
- Service RM, Super RM, Assistant RM, PMS RM, Sub Broker
Super RM is switched off by default. Scroll down inside the Customize Columns panel to check whether any further columns are listed for your account.
How to download the Excel file
- Go to Clients.
- Click the Excel (XLS) icon next to the Upload button at the top right.
- The file is saved as Client_Details followed by the date and time, for example Client_Details-06-11-2026-12-09-02.xlsx.
- Open the file. It has one sheet (Sheet1) with one row per client and 125 columns. Use the Excel filter and sort options to find what you need.
Fields that are available only in the Excel download
The following fields are not shown in the Clients table. Use the Excel download to view them.
Contact details
- Title, App Code, Email, Disable Emails, Secondary Email, Mobile, Landline, Referred By
Important dates
- First Investment Date, Birthday Wish, Anniversary, Date of Death, Last Review Date, Net Worth Date
Login and invitation
- Invite Sent Date, Last Login Date
Address
- Address1, Address2, Address3, City, State, Country, PIN
Review, rating and tags
- Client Rating, Review Frequency, Last Review Date, Model Name, File No, Tags, Update Lock
Demat, equity and NPS
- Equity Code1, Equity Code2, Depository, DP Name, DP ID, NPS A/c No, Liquiloan No
Financial profile and goals
- Annual Income, Gross Annual Income, Net Worth, Profession, Target SIP Amount, Target ELSS Amount, Target Equity Allocation (%), Target Debt Allocation (%), Remarks
Billing
- Preferred Billing Mode, Bill State, Bill GSTIN
- Equity MF Billing (%), Debt MF Billing (%), Shares Billing (%), Bonds Billing (%), Fixed Income Billing (%), Other Assets Billing (%)
Bank and nominee
- Bank Details, Nominee Details
KYC and compliance
- Tax Status, Mode of Holding, Occupation, Nationality, Gender, Place of Birth, Country of Birth
- Father Name, Mother Name, Spouse
- KYC Check, Supplementary KYC, KYC Source, CKYC
- FATCA CAMS, FATCA KARVY, FATCA Other Details
- For Individual, For Non Individual (PEP declarations)
- Joint Holder 1, Joint Holder 2, Guardian Name, Guardian PAN, Attorney Name, Attorney PAN
Overseas address
- OS Address1, OS Address2, OS Address3, Overseas City, Overseas State, Overseas Country, Overseas PIN, Overseas Phone, Overseas Mobile
Hierarchy and relationship managers
- Branch, Branch Code, Region, Region Code, Zone, Zone Code, Operation, Operation Code
- RM, Super RM Code, RM Code, Sub Broker Code, Service RM Code, Assistant RM Code, PMS RM Code
System identifiers
- IWELL Code, IWELL Code 2, Family Head IWELL Code, Family Head IWELL Code 2, Family Head Username, Level Name To Be Updated, Code To Be Updated
Fields available both on screen and in the download
Name, PAN, UserName, Date of Birth (shown as Birthday on screen), Family Head, AUM, Created At, Source, Service RM, Super RM, Assistant RM, PMS RM and Sub Broker. In the download, each RM and Sub Broker column is followed by a separate code column.
Common uses of the Excel download
- See the First Investment Date of all clients: filter or sort the First Investment Date column.
- Find clients who have never logged in: look for blank values in the Last Login Date column. Compare with Invite Sent Date to see who was invited but has not logged in.
- Find clients due for a review: use Review Frequency and Last Review Date together.
- Find missing details: filter blank cells in Email, Mobile, PAN or Date of Birth, and then fix them using Edit Profile or bulk upload.
- Check KYC and FATCA status: use KYC Check, FATCA CAMS and FATCA KARVY.
- Count clients by team or location: use Branch, Region, Zone, RM, Sub Broker or Service RM.
- List clients by tag or rating: use the Tags and Client Rating columns.
Points to remember
- Most dates are written as DD-MM-YYYY text, and Created At is written as YYYY-MM-DD with the time. If Excel does not sort a date column correctly, convert the column to dates first.
- Bank Details and Nominee Details appear as a block of text in a single cell.
- A column is blank for a client if that detail was never entered. Some columns may be blank for all clients.
- Billing percentage columns show 0 unless a billing percentage has been set.
- The file contains client personal data, so store and share it carefully.
11. Frequently asked questions
Q1. How do I create a client?
Click Create New Investor on the Clients page, fill in the required Name and User Name along with any other details, and save. See section 2.
Q2. How do I add many clients together?
Click Upload, download the sample .xls file, fill it in (data in Sheet 1, file under 20 MB) and upload it. See sections 3 and 4.
Q3. How do I assign a Sub Broker to a client?
For one client, use Edit Profile. For many clients, use the bulk action Set Sub Broker. See section 9.
Q4. How do I assign or remove an RM, Service RM, Assistant RM or PMS RM?
Select the clients and use the matching Set or Unassign bulk action.
Q5. How do I make a client part of a family?
Use the bulk action Set Family Head, or set the Family Head field in the client's profile. To undo it, use Reset Hierarchy.
Q6. How do I merge duplicate clients?
See the section "How to merge a client" above.
Q7. How do I stop a client from transacting or redeeming?
Use Disable Online Transaction or Disable Redemption. Use the Enable actions to reverse them.
Q8. How do I block a client from logging in?
Use Suspend Login, and use Reactivate Login to restore access. To lock or unlock an account, use Set Lock or Set Unlock.
Q9. How do I stop emails going to a client?
Use the bulk action Disable Communication, or tick Disable Emails in the client's profile.
Q10. How do I send a login invitation to a client?
Click the three dots at the end of the client's row and choose Send Invitation.
Q11. How do I find a specific group of clients?
Use the search icons in the column headers, or create a client segment. See section 7.
Q12. A column I need is not showing. What should I do?
Click Customize Columns, tick the column and click Apply.
Q13. How do I tag clients or set a rating or review frequency in bulk?
Select the clients and use Add Tag, Set Client Rating or Set Portfolio Review Frequency.
Q14. Can I set the portfolio review frequency for all clients at once?
Yes. Use bulk upload and fill the Review Frequency column (M, Q, H or Y) and, if needed, the Last Review Date for each client. See section 5, use case 2.
Q15. Can I change a client's Name or PAN through bulk upload?
No. Name and PAN cannot be changed for an existing client. If you upload a row with a different PAN, the system creates a new client record.
Q16. Which columns are mandatory in the bulk upload file?
Name, PAN and User Name. All other columns are optional.
Q17. Can I assign RMs, Sub Brokers or family heads through bulk upload?
Yes. Use Level Name To Be Updated and Code To Be Updated for an RM or Sub Broker, and Family Head Username for a family head. See section 5, use cases 3 and 4.
Q18. if the client transacts through BSE star Mf and say by submitting form via the registrar, will that client be shown twice?
The duplicacy of a client created from any source is check on the basis of combination of Name and PAN, if a client with same Name and PAN already exists in the system, it will not appear twice. In case a client appears twice, they can be merged into a single client with the steps written above.
Was this article helpful?
Still stuck? Email support@investwellonline.com.